

|
Posting insurance payments
You can post an insurance payment to a patient's account.
To post a payment
1. In a patient’s Patient Information Center, on the Control Panel, under Transactions, click Payment. Alternately, under Transactions, from the Other menu, point to Payment, and then click Regular Payment.
The Payment window appears.
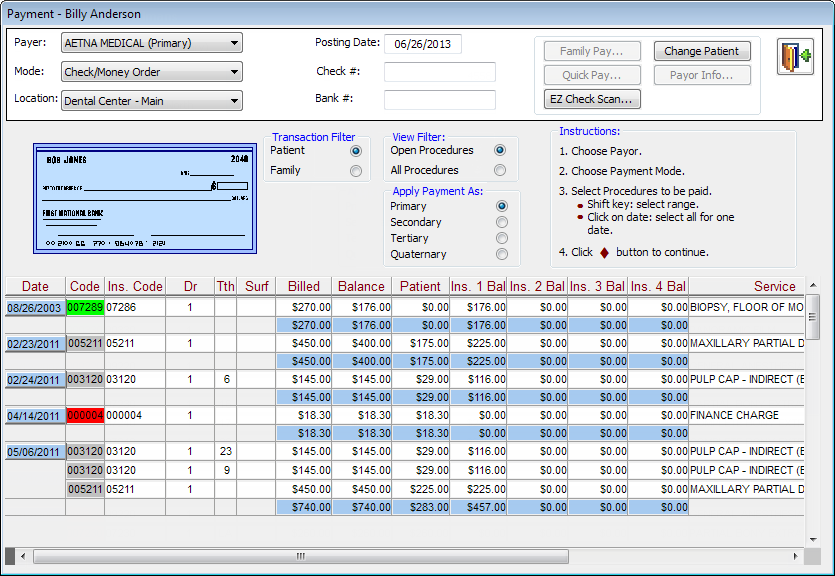
2. From the Payer list, select an insurance carrier.
3. Select the Mode or method of payment. For a check or money order, type the Check # and Bank # (bank routing number). If you do not enter the check and bank number, the check will not appear on the deposit slip. For an electronic funds transfer (EFT), type the Ref #.
4. Select the Location where the payment is being made.
5. Leave the current Posting Date entered, or enter the correct date that the payment is being posted in a mm/dd/yyyy format. By default, the current date is already entered.
6. To view the transactions for only the current patient, under Transaction Filter, select Patient. To view the transactions for all family members, under Transaction Filter, select Family.
7. If necessary, select a View Filter option to filter the procedures being viewed:
· Open Procedures - To view only the procedures with a balance.
· All Procedures - To view all procedures.
8. Under Apply Payment As, select the coverage type that the payment is being applied to: Primary, Secondary, Tertiary, or Quaternary.

9. If you need to choose a different patient whose account you want post a payment to, click Change Patient to select a patient.
10. To add the payor’s information, click Payor Info.
11. Select the procedures for which you want to post the payment (or denial).
Tip: To select all the procedures for a date, click that date in the Date column. To select all the procedures in a range, click the first procedure in the range, and then, while holding down the Shift key, click the last procedure in the range. The color code used in the Code column is the same as for the Ledger.
12. Click the Exit/Continue button.
One of the following occurs, depending on what the Exit/Continue button looks like:
· If the button has an open door icon on it, the Payment dialog box closes because no payor and procedures have been selected.
· If the button has a green check mark on it, the selected payor is an insurance carrier, the mode of payment is a check, and the preference setting to track bulk insurance payments is enabled, the Bulk Check dialog box appears.
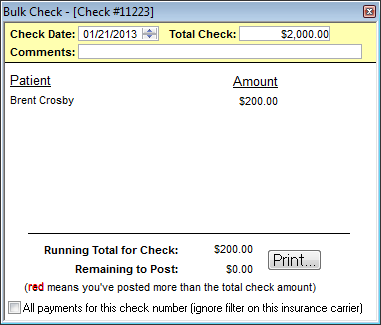
Type the total amount of the check and any comments, and then close the dialog box to continue posting.
Note: You can track bulk check payments on the Collections Report.
· If the button has a green check mark on it, the selected payor is an insurance carrier, the mode of payment is EFT (electronic funds transfer), and the preference setting to track bulk EFT payments is enabled, the Bulk EFT dialog box appears.

Type the total amount of the EFT and any comments, and then close the dialog box to continue posting.
Note: You can track bulk EFT payments on the Collections Report.
· If the button has a green check mark on it, the Payment dialog box changes so that you can continue posting the payment.

13. To enter an adjustment from an explanation of benefits (EOB), do the following:
a. Click EOB. This button is available only if the Use EOB view for insurance payments preference is not selected.
The Process EOB dialog box appears.
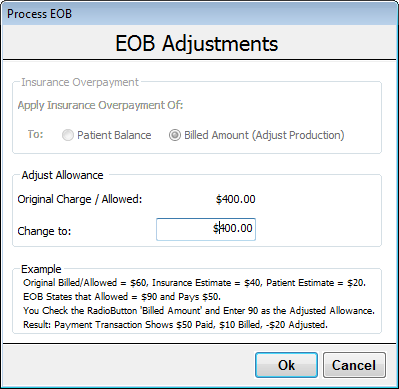
b. Set up the following options:
· Insurance Overpayment – Select where the overpayment should go: Patient Balance or Billed Amount (Adjust Production).
· Adjust Allowance – Leave the charged amount for the procedure in the Change to field, or type a different amount.
c. Click Ok.
14. For each procedure, set up the following options:
· Payment - Type the amount of the payment being made, or click the dollar sign ($) button to insert the amount of the insurance estimate.
· Adjustment - Type the amount to adjust in the Adjustment field. Then, from the Adjust. Type list, select the adjustment type. Changes you make to the adjustment amount might affect any adjustments you set up in the Process EOB dialog box from step 13.
· Date - Leave the current date entered, or enter a different date.
· Provider - Select the provider.
· Details - Click this button to view any transactions associated with the selected procedure.
![]()
Note: To enter the total amount paid or total amount adjusted if it is not broken down by procedure, click Insurance to enter the amount paid or Adjust to enter the amount of the adjustment, respectively. Additionally, if the insurance profile is set up so that the Estimator updates estimates based on payments, when you enter an amount for the total paid or total adjusted (using the Insurance or Adjust button), the Estimator does not “learn” from the amount entered.
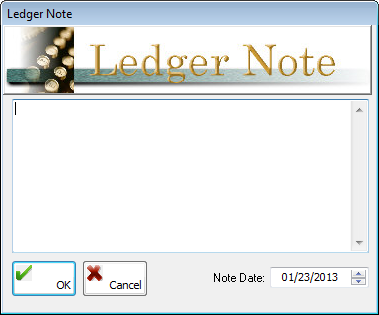
15. To enter notes regarding the account that will appear in the ledger, click Note.
16. If this is an electronic payment, select ePayment.
17. Select the Treatment complete check box to mark the procedures to which you are posting a payment complete in the Ledger automatically after you click Save & Exit.
18. Select the Receipt check box to view the receipt for the payment after you click Save & Exit.
19. Click Save & Exit.
A preview of the receipt and the Claim Submission dialog box may appear. Also, a claim status note may appear for your reference.
Need more help?
You can visit our website, contact OMSVision Customer Support, or suggest a new feature or improvement on User Voice.