PPO: Participating % dental plans
This is a dental insurance plan that the office DOES participate with. The contracted rate (insurance allowable) is charged to patient, and the different employer or group plans pay based on a precentage of the contracted amount.
Complete the following steps so that you can enter the contracted amounts once and link those contracted amounts to all the plans that pay a percentage of that amount.
Step 1 - Create template profile
In the Insurance Profiles window, click Add.
Set up the following options:
General
Carrier – Enter the insurance company's name (for example, METLIFE).
Employer – For the employer or group plan name, type *TEMPLATE.
Plan – Select PPO.
Benefits & Limits:
Estimates - Percents:
Estimate by percentage of UCR? – Select this check box.
Update percents from payments? – Clear this check box.
Estimates - Estimator:
Calculate percent of allowable – Select this check box.
Update Estimator from payments? – Clear this check box.
Note: You will attach a UCR group later.
Claims (basic):
Claims (advanced):
Put which amount on claim – Select Fee in Fee Schedule (UCR).
Click OK to save the profile.
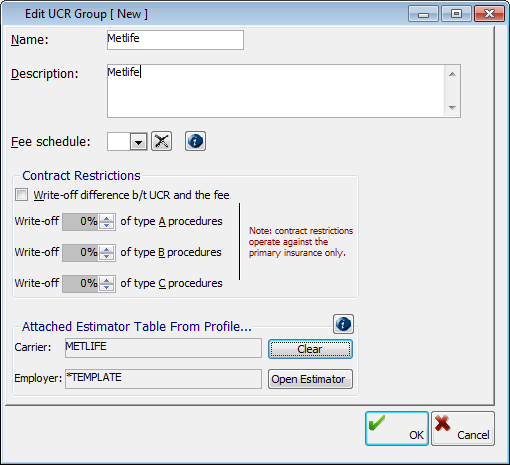
Step 2 - Create UCR group
In the Insurance Profiles window, click UCR Grps.
Click Add.
Set up the following options:
Name – Type a name (for example, Metlife).
Important: If the insurance has more than one set of allowables, you will need to differentiate between the plans by the name (for example, Delta PPO and Delta Premier), and then repeat the process for creating a UCR group for each different set of allowables.
Description – Type a description.
Note: Do not attach a fee schedule or select contract restrictions.
Attached Estimator Table From Profile – Click Attach, select the METLIFE *TEMPLATE profile that you just created, and then click Paste. (The Attached button is replaced by the Clear button.)
Click OK to save the UCR group.
Step 3 - Attach UCR group to *TEMPLATE profile
In the Insurance Profiles window, select the METLIFE *TEMPLATE profile, and then click Edit.
On the Estimates - Estimator tab, from the UCR Group list, select the UCR group that you just created.
Click OK to save the profile.
Step 4 - Enter insurance contracted rates (allowables)
Note: Only enter codes in which you know the contracted rate. If a code is entered into the estimator table with a $0 Allowable, the software will charge $0 instead of the office Master Fee.
In the Insurance Profiles window, click UCR Grps.
Select the UCR group, and then click Allowables.
Click Batch Edit.
Note: You can also use the Add and Import options.
Type a Code. This is the internal, 6-character code from the master fee schedule.
Note: Codes in red boxes are new codes that will be added to the estimator. Codes in green boxes already exist in the estimator but will be updated.
Type a Provider number. Use zero if the allowable applies to ALL providers.
Note: You can set up billing groups to enter allowables based on a grouping of providers such as by specialty. If you use billing groups, do NOT use the Batch Edit method as it does not allow you to attach a billing group to each procedure.
Type the Allowable amount.
Type zero (0) as the Estimate.
Repeat steps A–G for all codes.
Click OK.

Step 5 - Create new group/employer plans from template
For instructions, see Creating new profiles from existing ones.