

|
Adding to and editing codes in an Estimator table
You can add to or edit a single code in an Estimator Table.
To add or edit an Estimator code
1. From the File menu, click Insurance Profiles.
The Insurance Profiles window appears.

2. Select an insurance profile.
3. Click Estimator.
The Estimator Table window appears.

The Estimator is empty until a fee schedule is imported, estimates are manually entered, or insurance payments by procedure are recorded for patients with the currently selected insurance profile attached.
4. Do one of the following:
· To add an Estimator code, click Add.
· To edit an existing Estimator code, select a code, and then click Edit.
The Edit Estimator Code dialog box appears.
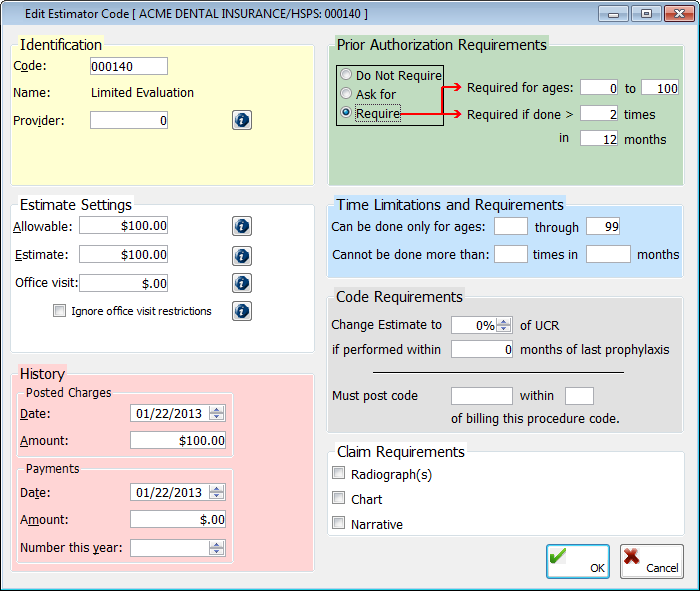
5. Set up the following options:
· Identification
· Code – Double-click in the field to select and paste in a fee schedule code. The name of the selected ADA code and name of the procedure appears next to Name.
· Provider – With certain insurance programs that you participate with you may have conditions wherein certain providers in your practice, possibly specialists, get reimbursed at a different rate than other providers in your practice. Select a provider number to reimburse that provider at a different rate than other providers. You can have only one entry per provider number for a procedure code within each estimator table. The default value of 0 indicates that all providers will be reimbursed at the same rate.
Note: If you select a specific provider, but that provider does not have a fee set up for the selected code, when you bill the service, the program will use the fee associated with the default provider (0). And, if there is no entry for the default provider, the program will use the percentage stored in the profile to perform the estimate or ask you to enter an estimate at the time the transaction is posted.
· Estimate Settings
· Allowable – Type the dollar amount allowed by the insurance company for this procedure in a $$,$$$.$$ format. The amount can be different, depending on whether the policy is an indemnity, PPO, or managed care plan:
· Indemnity plans – With indemnity plans, the allowable amount is for your information only and is not used to process estimates. When you first add a code in the Estimator, the allowable amount is equal to the fee. Many indemnity plans use this amount as a baseline and pay a certain percent of the allowable (for example, the insurance carrier typically pays 80% of the allowable on this type of procedure). Since insurance companies will not usually tell you what the allowable amount is, the program can refine this number from the data on your EOBs.
· PPOs and managed care plans – In both of these cases, the allowable is very important in the posting and treatment planning process. Since PPOs and managed care plans restrict how much you can actually bill, the allowable amount represents what is typically referred to as the Maximum Allowable Charge (MAC). The allowable amount entered in the Estimator will override the fee and be substituted as the billed amount when you post or treatment plan procedures.
· Estimate – Type the estimated insurance portion for posting and treatment planning in a $$,$$$.$$ format. The amount can be different, depending on whether the policy is an indemnity, PPO, or managed care plan:
· Indemnity plans – With indemnity plans, the estimate is the amount the insurance plan will pay. This is typically some percentage of the allowable.
· PPOs and managed care Plans – For PPOs and managed care plans, the estimate can represent the amount the insurance plan will pay as a direct reimbursement each time you post a particular code. In some cases, PPOs and managed care plans have a direct reimbursement, but often they do not. Also, the allowable and the estimate work together so that the allowable represents how much will be billed, and the allowable minus the estimate represents the amount the patient will pay. In cases where there is no patient portion, make the estimate equal to the allowable. In cases where there is a patient portion, increase the estimate so that the estimate is less than the allowable by that amount.
Note: The formula to calculate a deductible is the same as for an insurance profile that does not use the Estimator: Fee - (Deductible x Coverage Percent)
· Office visit – Type the office visit fee, or co-pay in a $$,$$$.$$ format. This not the patient portion of the billed procedures but an additional charge (which will appear in the Ledger as a separate line item). Typically, with managed care plans, where there is no direct patient portion per procedure, so the patient must pay a co-pay. In these cases, you can handle the co-pay in one of two ways:
· If there is a flat charge per office visit that is always the same, independent of what is posted, an office code in your fee schedule will probably work best.
· Where the co-pay is dependent on which procedure codes get posted, you will need to set office visit fees for each procedure code in the Estimator.
· Ignore office visit restriction – Many times, even if the various procedures that you post have their own individual co-pay amounts, the carrier wants you to post only the highest or lowest co-pay for a procedure (which is determined by the option selected under Office visit on the Estimates - Estimator tab of the Edit Insurance Profile dialog box). However, to override whether the highest or lowest co-pay for this procedure should be charged, select this check box. The Office visit for this procedure in the Estimator will be charged every time.
· History - The default dates for Posted Charges and Payments are the current date, but you can enter a different date. Also, the Date and Amount fields and the Number this year (of payments) box are updated as transactions are posted, but you can enter a different charge or payment amount or the number of payments.
· Prior Authorization Requirement - Set up one of the following options:
· Do Not Require - Not to require a pre-authorization number when posting this procedure. This option is selected by default.
· Ask for - To have a dialog box appear and provide the option to enter a pre-authorization number when posting this procedure.
· Require - To require a pre-authorization number when posting this procedure. Also, type any of the following requirements for pre-authorizations:
· Required for ages - Type the appropriate age range within which to require a pre-authorization number.
· Required if done > - Type the number of times after which a procedure is performed in a certain number of months to require a pre-authorization number.
· Time Limitations and Requirements
· Can be done only for ages - Type the age range limitation for this procedure code.
· Cannot be done more than - Type the number of times in a certain number of months that this procedure can be performed on a patient.
Note: You can view the time limitations from the Insurance Profiles window.
· Code Requirements
· Change Estimates to (a %) of UCR if performed within (number of) months of last prophylaxis - Enter an estimate to a new percentage of the UCR fee, and type the constraint on the number of months since a patient’s last prophylaxis to have the new percentage take effect.
· Must post code (procedure code) within (a number of weeks) of billing this procedure code - Type the ADA code of the additional procedure code that must be posted within a certain number of weeks after this procedure is billed in order for the additional procedure to be covered.
· Claim Requirements – Select any of the following check boxes to specify what is required when submitting a claim for this procedure: Radiograph(s), Chart, and Narrative.
6. Click OK.
Need more help?
You can visit our website, contact EndoVision Customer Support, or suggest a new feature or improvement on User Voice.