

|
Working with canals
You can add, edit, and delete canals for a tooth as needed. However, you cannot edit or delete a canal that has been locked.
To add a canal
1. In EHR, with a case selected, in the Plan - Teeth/Quads/Areas section, select a tooth.
2. In the Canals section, click New to add a canal.
3. Select the canal, trial length, actual length, file sizes, and reference point, and then type any notes.
To edit a canal
1. In EHR, with a case selected, in the Plan - Teeth/Quads/Areas section, select a tooth.
2. Select an existing canal, and then click Open to edit that canal.
The Edit Root Canal Details dialog box appears.
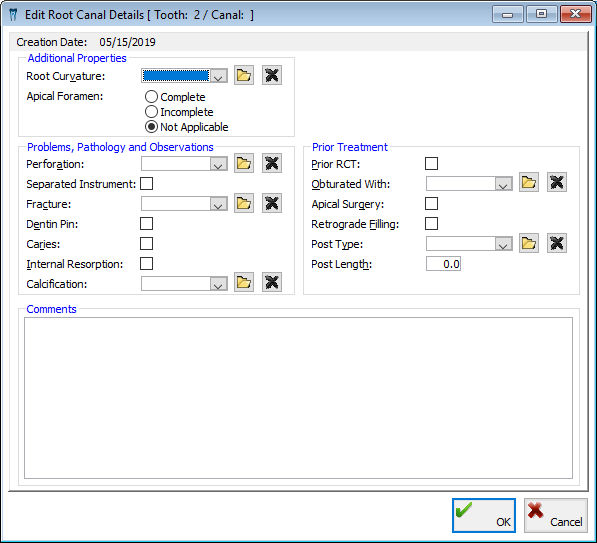
3. Set up the following options:
· Additional Properties
· Root Curvature - Select the degree of root curvature. Click the Remove button  to clear any previous selection.
Tip: To specify which items you want to include in the list, click the Open link. Click the New button to add a new item. Clear a check box to delete the corresponding item (if you try to delete an item that is in use, a message appears and asks if you want to inactivate the item instead). Click Exit.
· Apical Foramen - Select the appropriate apical foramen: Complete, Incomplete, or Not Applicable.
· Problems, Pathology, and observations
· Perforation - Select the perforation of the canal. Click the Remove button to clear any previous selection.
Tip: To specify which items you want to include in the list, click the Open link. Click the New button to add a new item. Clear a check box to delete the corresponding item (if you try to delete an item that is in use, a message appears and asks if you want to inactivate the item instead). Click Exit.
· Separated Instrument - Select this check box if there is a separated instrument obstructing the canal.
· Fracture - Select the type of root fracture associated with the canal. Click the Remove button to clear any previous selection.
Tip: To specify which items you want to include in the list, click the Open link. Click the New button to add a new item. Clear a check box to delete the corresponding item (if you try to delete an item that is in use, a message appears and asks if you want to inactivate the item instead). Click Exit.
· Dentin Pin - Select this check box if there is one or more pins in the dentin.
· Caries - Select this check box if there are any caries extending into the canal.
· Internal Resorption - Select this check box if the canal displays internal resorption.
· Calcification - Select the level of calcification.
Tip: To specify which items you want to include in the list, click the Open link. Click the New button to add a new item. Clear a check box to delete the corresponding item (if you try to delete an item that is in use, a message appears and asks if you want to inactivate the item instead). Click Exit.
· Prior Treatment
· Prior RCT - Select this check box if the canal has had prior root canal therapy.
· Obturated With - Select the material the canal is obturated with. Click the Remove button to clear any previous selection.
Tip: To specify which items you want to include in the list, click the Open link. Click the New button to add a new item. Clear a check box to delete the corresponding item (if you try to delete an item that is in use, a message appears and asks if you want to inactivate the item instead). Click Exit.
· Apical Surgery - Select this check box if the canal has had endondontic surgery.
· Retrograde Filling Select this check box if the canal has had a retrograde filling.
· Post Type - Select the post type inserted. Click the Remove button to clear any previous selection.
Tip: To specify which items you want to include in the list, click the Open link. Click the New button to add a new item. Clear a check box to delete the corresponding item (if you try to delete an item that is in use, a message appears and asks if you want to inactivate the item instead). Click Exit.
· Post Length - Type the length of the post.
· Comments - Type any comments.
4. Click OK.
To delete a canal
1. In EHR, with a case selected, in the Plan - Teeth/Quads/Areas section, select a tooth.
2. In the Canals sections, select the canal that you want to delete.
3. Click Delete.
A confirmation message appears.
4. Click Yes.
Need more help?
You can visit our website, contact EndoVision Customer Support, or suggest a new feature or improvement on User Voice.