

|
Adding an examination
You can add examinations and tests.
To add an examination or test
1. In the Assessment - Clinical/Radiographic Examination and Tests section of EHR, click New.
The Tooth Selector dialog box appears.
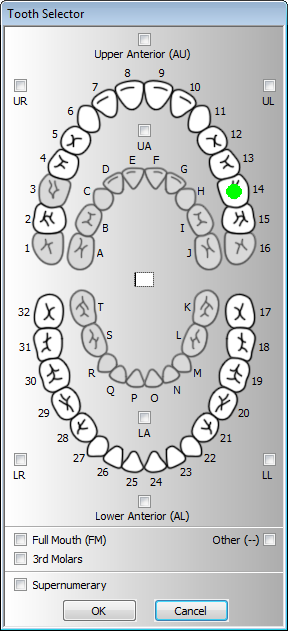
2. Select the teeth, quadrants, and/or arch to be examined, and then click OK.
The Edit Examination dialog box appears with as many columns as teeth or areas you selected in the Tooth Selector dialog box.
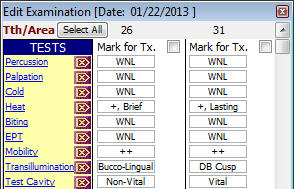
3. Enter any of the following exam information for each tooth or area:
· Mark for Tx. - To specify that you want to treat the tooth, quadrant, or arch, select this check box. Also, you can click Select All to mark all the teeth or areas for treatment.
· TESTS - Select an option for Percussion, Palpation, Cold, Heat, Biting, EPT, Mobility, Transillumination, and Test Cavity.
Tips:
· To designate that all teeth or areas for a test item are within normal limits, click the WNL button  next to that item to insert the letters “WNL” in all the columns of that row.
· You can click any of the name links to edit the master lists for those lists. Select the desired items to include, or click Add Item to add an item. Then, click Close.
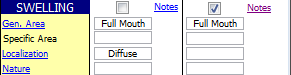
· SWELLING - If swelling occurs during the exam, select the SWELLING check box. Select an option for Gen. Area, Localization, and Nature. Also, type the Specific Area of the swelling.
Tips:
· Click the Notes link to type a note. You can insert a date and time and check the spelling of the note. The color of the Notes link will be red if a note has been entered. Also, the title of the Assessment - Clinical/Radiographic Examinations and Tests section in the main EHR window will be red to indicate that at least one note has been entered for the selected exam.
· You can click any of the name links to edit the master lists for those lists. Select the desired items to include, or click Add Item to add an item. Then, click Exit.
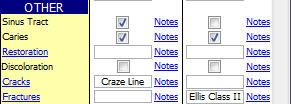
· OTHER - Select an option for Restoration, Cracks, and Fractures. Select the Sinus Tract, Caries, and/or Discoloration check boxes if any of these are associated with the exam.
Tips:
· Click any Notes links to type a note for that test item. You can insert a date and time and check the spelling of the note. The color of any Notes link will be red if a note has been entered. Also, the title of the Assessment - Clinical/Radiographic Examinations and Tests section in the main EHR window will be red to indicate that at least one note has been entered for the selected exam.
· You can click any of the name links to edit the master lists for those lists. Select the desired items to include, or click Add Item to add an item. Then, click Exit.
· XRAY
· To designate that all teeth or areas X-rayed are within normal limits, next to WNL, click the WNL button to insert the letters “WNL” in all the columns of that row.
· Select the appropriate check boxes for Caries, Widened PDL, Apical Radiolucency, Lateral Radiolucency, Crestal Radiolucency, Furcal Radiolucency, Radiopacity, Prior RCT, Perforation, External Resorption, Internal Resorption, Perio Involvement, Open Apex, Calcification, Canal Obstruction, Foreign Body, Osteosclerosis, Condensing Osteitis, and/or Other.
· Select a post if Posts are associated with the exam.
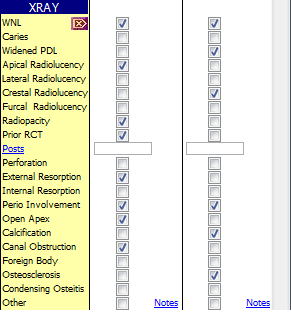
Tips:
· Click a Notes link to type a note for that test item. You can insert a date and time and check the spelling of the note. The color of a Notes link will be red if a note has been entered. Also, the title of the Assessment - Clinical/Radiographic Examinations and Tests section in the main EHR window will be red to indicate that at least one note has been entered for the selected exam.
· You can click the Posts link to edit that master list. Select the desired items to include, or click Add Item to add an item. Then, click Exit.
· PERIO
· Click the WNL button to select the WNL check box for all teeth to designate that the probing depths of all teeth are within normal limits, or select the WNL check boxes of the teeth with probing depths that are within normal limits.
· If the tooth’s probing depth is not within normal limits, enter the following periodontal measurements: buccal, in the B field; lingual, in the L field; mesiobuccal and mesiolingual, in the M fields; and distobuccal and distolingual, in the D fields.
· If there is bleeding upon probing, click Bleed.
· If there is a buccal furcation involvement, click Furc-B.
· If there is suppuration upon probing, click Supp.
· If there is a lingual furcation involvement, click Furc-L.
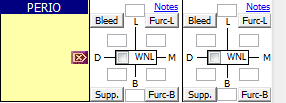
Tip: Click the Notes link to type a note. You can insert a date and time and check the spelling of the note. The color of the Notes link will be red if a note has been entered. Also, the title of the Assessment - Clinical/Radiographic Examinations and Tests section in the main EHR window will be red to indicate that at least one note has been entered for the selected exam.
4. Close the Edit Examination dialog box.
A message appears and asks if you want to save the information.
5. Click Yes.
Need more help?
You can visit our website, contact EndoVision Customer Support, or suggest a new feature or improvement on User Voice.