

|
Using the Day View
When you open the Appointment Book, the Day tab, which displays a day’s worth of appointments in each chair, is selected by default. The Appointment Book opens to the current system date by default.
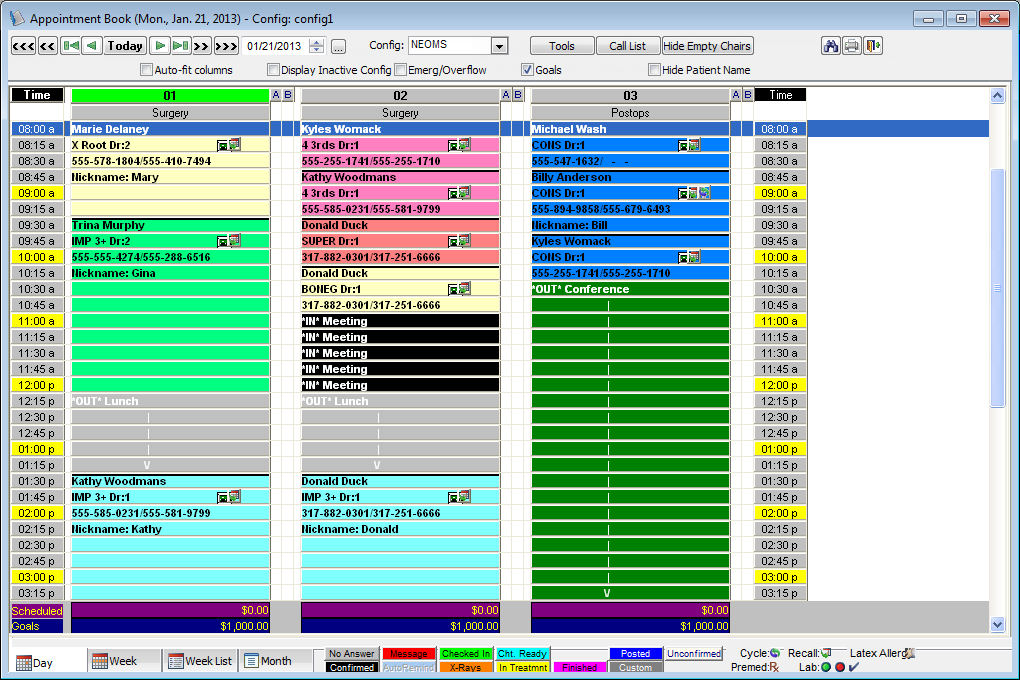
Note: The current time slot appears in bold and purple text on the time bars on the sides of the schedule (as shown below). The current time slot is the time slot (based on the time units defined) that coincides with the current system time.

Changing the Date
To change the date in the day view of the Appointment Book, use any of the following options:
· Date buttons

· Click the triple left arrow button to go back six months from the date you are currently viewing.
· Click the double left arrow button to go back one month from the date you are currently viewing.
· Click the left arrow with a line button to go back one week from the date you are currently viewing.
· Click the left arrow button to go back one day from the date you are currently viewing.
· Click the Today button to view appointments for the current date.
· Click the right arrow button to go ahead on day from the date you are currently viewing.
· Click the right arrow with a line button to go ahead one week from the date you are currently viewing.
· Click the double right arrow button to go ahead one month from the date you are currently viewing.
· Click the triple right arrow button to go ahead six months from the date you are currently viewing.
If you hold down a number key on your keyboard while clicking any of the above arrows, the amount of the date button you click is multiplied by the number you are pressing (for example, pressing 3 on your keyboard and clicking the double right arrow button will take you three months ahead from date you are currently viewing: 3 x 1 months = 3 months).
· Date box – Enter the date that you want to view in the date box; and then press Enter, or click the Go To button to the right of the box to go to the date you entered. Also, you can double-click the date box to open a six month calendar that you can select and paste in a date from.

If you are viewing a date in the past, the background of the Date box is yellow.

Changing the Configuration
To change the configuration you are viewing, from the Config list, select the desired configuration.

To include inactive configurations in the Config list so that you can view appointments for configurations that are no longer being used, select the Display Inactive Configurations check box.

Auto-fitting Columns
To view all of the chairs on the schedule at the same time, select the Auto-fit columns check box. You will not need to scroll because the chairs are resized to fit in the window. Also, if there is extra white space on the sides of the Appointment Book (you are only viewing a few chairs), and you select this check box, the chairs will expand to fill the entire window.

Viewing Goals
If chairs have been set up with production goals, to have the scheduled amounts and production goals appear at the bottom of the Appointment Book, select the Goals check box.

The scheduled amount is determined by the appointment service attached to each appointments or by the amount that was entered when each appointments is scheduled.
Hiding empty chairs
To specify whether or not chairs without any appointments scheduled on the day that you are viewing are displayed for the configuration that is currently selected, click the Hide Empty Chairs button. Select whether you want to hide chairs without appointments only if those chairs contain only "out" blocks, hide chairs without appointments only if those chairs contain "out" blocks and "in" blocks, or show all chairs (with or without appointments). Then, click OK.
![]()
![]()
Using the Emergency / Overflow Chair
You can use the emergency/overflow chair to enter emergency and quick check patients that you want to overlap with other appointments since the program does not allow you to enter one appointment on top of another.
To view the Emergency/Overflow panel, select the Emerg/Overflow check box.

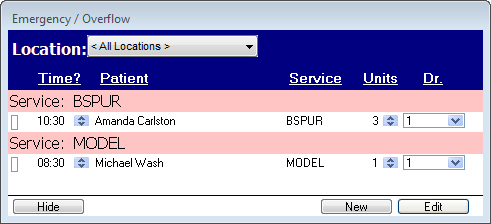
Perform any of the following tasks:
· To add an appointment to the Emergency/Overflow panel, drag an appointment from the Appointment Book onto the Emergency/Overflow panel, or click New.
· To edit an appointment on the Emergency/Overflow panel, select the appointment on the panel, and then click Edit.
· To filter the appointments being viewed, select a Location to view only the appointments associated with that location. The default is “<All Locations>.”
· To close the Emergency/Overflow panel, click Hide.
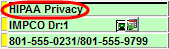
Hiding patient names
To hide patient names on appointments, select the Hide Patient Name check box. With this check box selected, the words "HIPAA Privacy" appear instead of the patient's name in the Appointment Book and on the printed schedule; however, the patient's name still appears on the tooltip that appears when you position your pointer over the appointment (if the preference to allow this is enabled) and still appears in the Edit Appointment dialog box.

Need more help?
You can visit our website, contact EndoVision Customer Support, or suggest a new feature or improvement on User Voice.