If you have an Updox user account, when you receive a DIRECT message or a message from a patient (through the Updox portal) with a file attached (such as a .jpg or .pdf file), you can attach the received file to a patient's record.
Notes:
The messages that appear in your patient health exchange inbox are the same ones that appear in your inbox in the Updox secure messaging application.
Accessing the patient health exchange inbox requires the "Patient Health Exchange Document Inbox, Open" security right.
To import a file upload
In Office Manager, do one of the following:
Click
the Patient Health Exchange Inbox
button  on the toolbar.
On the File menu, click Patient Health Exchange Inbox.
If applicable, do one of the following:
If the Password - Patient Health Exchange Document Inbox, Open dialog box appears, user verification has been assigned to the "Patient Health Exchange Document Inbox, Open" task. Do one of the following:
If your user account has been granted the "Patient Health Exchange Document Inbox, Open" security right, enter your credentials in the User ID and Password boxes, and then click OK.
If your user account has not been granted the "Patient Health Exchange Document Inbox, Open" security right, have a user with permission temporarily override this restriction so you can access the patient health exchange inbox this one time. The overriding user enters his or her credentials in the User ID and Password boxes and then clicks OK.

If a message appears, informing you that you do not have rights to this operation, your user account has not been granted the "Patient Health Exchange Document Inbox, Open" security right. To have a user with permission temporarily override this restriction so you can access the patient health exchange inbox this one time, do the following:
On the message, click Yes.

In the Password - Patient Health Exchange Document Inbox, Open dialog box, the overriding user enters his or her credentials in the User ID and Password boxes and then clicks OK.

A progress indicator appears, followed by a completion message.

Click Close.
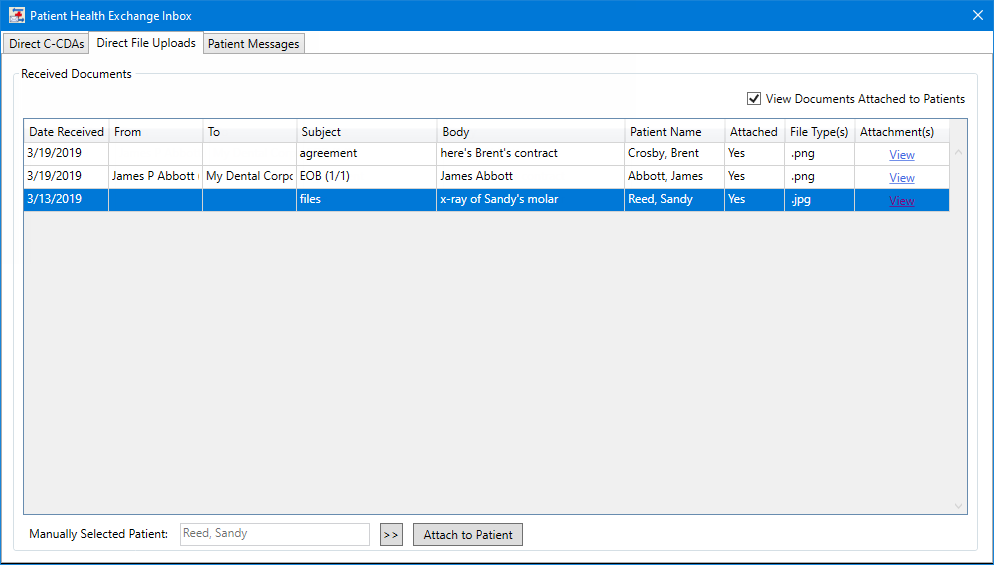
The Patient Health Exchange Inbox dialog box appears.
Select the Direct File Uploads tab.

Note: To view messages with files that are already attached to the correct patients, select the View Documents Attached to Patients checkbox. Messages with files that are not attached to patients still appear in the Received Documents list.
To view the file attached to a message, click the corresponding View link. When you are finished viewing the file, close the Patient Health Exchange Attachments Viewer dialog box.

Note: You can preview the content of any attachment that is of a file type that you can preview in Document Center (such as document and image file types). When you are finished viewing the file, close the dialog box.
To select the patient record in Dentrix Enterprise into which you want to attach a file upload, do the following (otherwise, ignore the steps that follow):
Select the message (if not already selected).

Click
the Manually Selected Patient
search button  to select
the correct patient.
The selected patient appears in the Manually Selected Patient box.

Click Attach to Patient.
A message appears, stating that the file was imported successfully.
Click OK.