When a new dental insurance claim is created, Dentrix Enterprise uses a patient's default dental insurance claim settings. However, you can change the standard information (which includes the patient's default settings) for a specific dental insurance claim as needed.
Notes:
Changing the standard dental insurance claim information from the insurance claim window affects the dental insurance claim; any associated primary, secondary, tertiary, and/or quaternary dental insurance claim; and any associated medical insurance claim.
Changing the standard dental insurance claim information requires the "Insurance Claims, Edit" security right.
To change standard dental insurance claim information
In the insurance claim window, double-click the Claim Information block.

Note: The Claim Information block displays "Standard" unless the information has been changed; in which case, it displays "Non-Standard."
If applicable, do one of the following:
If the Password - Insurance Claims, Edit dialog box appears, user verification has been assigned to the "Insurance Claims, Edit" task. Do one of the following:
If your user account has been granted the "Insurance Claims, Edit" security right, enter your credentials in the User ID and Password boxes, and then click OK.
If your user account has not been granted the "Insurance Claims, Edit" security right, have a user with permission temporarily override this restriction so you can change standard claim information this one time. The overriding user enters his or her credentials in the User ID and Password boxes and then clicks OK.

If a message appears, informing you that you do not have rights to this operation, your user account has not been granted the "Insurance Claims, Edit" security right. To have a user with permission temporarily override this restriction so you can change standard claim information this one time, do the following:
On the message, click Yes.

In the Password - Insurance Claims, Edit dialog box, the overriding user enters his or her credentials in the User ID and Password boxes and then clicks OK.

The Insurance Claim Information dialog box appears.

Change any of the following options as needed:
Place of Treatment - Where the treatment for this claim was performed. To change the place of treatment for this claim, do the following:
Click the Place of Treatment search button  .
.
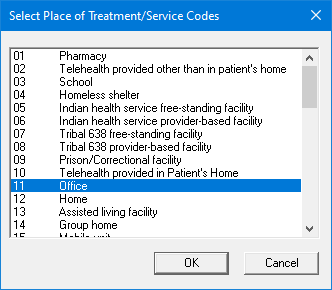
The Select Place of Treatment/Service Codes dialog box appears.

Select a place of treatment.
Click OK.
Notes:
You can customize the list of places of treatment in the Medical/Cross Code Setup dialog box.
The default Place of Treatment selection is determined by the patient's default claim settings. You can change the default place of treatment for your organization. Also, you can override the organization-level default place of treatment per clinic.
Pre-Authorization Number - If a pre-treatment estimate was approved for the procedures on this claim, enter the pre-authorization number.
Notes:
If a pre-treatment estimate was approved for the procedures on this claim, the pre-authorization number will automatically appear on this claim.
If there is more than one pre-authorization number for the procedures on this claim, you should create a claim for each set of procedures that have a different pre-authorization number.
First Visit Date Current Series - If this claim is for treatment that is part of a multi-visit treatment, enter the first date of service (in a mm/dd/yyyy format) for this series of treatments.
Note: Dentrix Enterprise automatically adds slashes to dates when you enter six or eight numbers (mmddyy or mmddyyyy) and then press the Tab key.
Original Reference Number (#) - For a voided or resubmitted Medicaid claim, enter the original reference number.
Student Status - To specify that a patient is enrolled in school (college, university, and so forth), select one of the following options: None, Part-Time, or Full-Time. If the Part-Time or Full-Time option is selected, enter the school and city in the School - City box.
Attachments - You can include attachments with the claim.
Disabled - If the patient is disabled (work-related or not), select this checkbox.
Occupational Illness or Injury - If the treatment for this claim became necessary due to a work-related injury or illness, select this checkbox, and then enter the date (in a mm/dd/yyyy format) and description of the injury or illness in the corresponding Dates and Descriptions boxes.
Note: Dentrix Enterprise automatically adds slashes to dates when you enter six or eight numbers (mmddyy or mmddyyyy) and then press the Tab key.
Auto Accident - If the treatment for this claim became necessary due to an automobile accident, select this checkbox, and then enter the date (in a mm/dd/yyyy format) and description of the accident in the corresponding Dates and Descriptions boxes.
Note: Dentrix Enterprise automatically adds slashes to dates when you enter six or eight numbers (mmddyy or mmddyyyy) and then press the Tab key.
Other Accident - If the treatment for this claim became necessary due to an accident that was not automobile-related or work-related, select this checkbox, and then enter the date (in a mm/dd/yyyy format) and description of the accident in the corresponding Dates and Descriptions boxes.
Note: Dentrix Enterprise automatically adds slashes to dates when you enter six or eight numbers (mmddyy or mmddyyyy) and then press the Tab key.
Services Covered by Another Plan - If the treatment for this claim can be covered by another insurance plan, select this checkbox, and then enter a description in the corresponding box.
Prosthesis - Select one of the following options:
No - If a prosthetic device is not required for the treatment for this claim.
Initial - If a prosthetic device is required for the treatment for this claim and is the first prosthesis. With this option selected, in the Date Ordered box, enter the date (in a mm/dd/yyyy format) that the device was ordered.
Note: Dentrix Enterprise automatically adds slashes to dates when you enter six or eight numbers (mmddyy or mmddyyyy) and then press the Tab key.
Replacement. - If a prosthetic device is required for the treatment for this claim and is a replacement prosthesis . With this checkbox selected, specify the following information:
Date Ordered - Enter the date (in a mm/dd/yyyy format) that the prosthesis was ordered.
Note: Dentrix Enterprise automatically adds slashes to dates when you enter six or eight numbers (mmddyy or mmddyyyy) and then press the Tab key.
Replace Reason - Enter the reason that the prosthesis is being replaced.
Prior Date - Enter the date (in a mm/dd/yyyy format) that the previous placement of the prosthesis was done. Also, if the date is an estimate, select the Estimated checkbox.
Note: Dentrix Enterprise automatically adds slashes to dates when you enter six or eight numbers (mmddyy or mmddyyyy) and then press the Tab key.
Orthodontic Treatment - If this claim is for orthodontic treatment, select this checkbox, enter the date (in a mm/dd/yyyy format) that the orthodontia was initially put in the patient's mouth in the Placement Date box, and enter the number of months until the existing orthodontia will be removed from the patient's mouth in the Mos. Remain box.
Note: Dentrix Enterprise automatically adds slashes to dates when you enter six or eight numbers (mmddyy or mmddyyyy) and then press the Tab key.
For Special/Medicaid Claims - The following options are for Medicaid or special claim forms:
Referring Prov - In the box, enter the referring doctor's name.
Reason for Pre-Auth - The reason for the pre-authorization. Select one of the following options: Required or Services Exceed Max.
Service Authorization - Exception Code - From the list, select an exception code or <NONE>.
90-Day Indicator - From the list, select an indicator or <NONE>.
Other options - Select any of the following checkboxes that correspond to conditions that apply to this claim: Oral Surgery, Special Case/EPSDT, Medicare, Eligibility Pending, Retroactive Eligibility, Re-Evaluation, CHDP, and/or CCS).
Referring Physician - To specify a referring physician, do the following:
Click the Referred search button  .
.
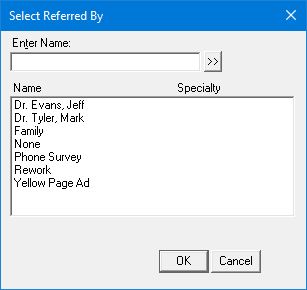
The Select Referred By dialog box appears.

If the list is long, to filter it by name, in the Enter Name box, enter all or part of the referral source name, and then click the search button  .
.
In the list, select the correct referral source.
Click OK.
With a referring physician selected, specify IDs for that provider as needed:
First ID - Select an ID type from the ID Number Type list, and enter an ID (up to 29 characters in length) in the ID Number box.
Second ID - Select an ID type from the 2nd ID Number Type list, and enter an ID (up to 29 characters in length) in the 2nd ID Number box.
Notes:
By default, Dentrix Enterprise uses the referring physician's information from a referral that is associated with a procedure on the claim and uses the rendering provider’s UPIN.
You can enter a referring provider’s ID for a specific insurance plan by setting up provider IDs for a rendering, billing, or pay-to provider.
Other Subscriber Information - (For a secondary insurance claim only) Set up the following options:
Remaining Patient Liability Amount - By default this box is blank. Enter the amount remaining to be paid by the patient up to 99,999,999.99. If you have entered the primary claim adjustment reasons, enter the patient portion from the ERA/EOB from the primary insurance payor; this amount should be total amount billed on the primary claim minus the sum of the primary claim payment and adjustments (from the CAS segment).
Note: The remaining patient liability must equal the amount being billed to the secondary payor. In other words, if you subtract the primary claim payment, the adjustments in the CAS segment of the primary claim, and the remaining patient liability amount from the total amount billed on the primary claim, the balance must be zero (0). For example:
Total billed to primary = $100
Primary claim payment = -$70
Primary claim adjustments = -$10
Remaining patient liability = -$20
Balance = $0
Total Non-Covered Amount - By default this box is blank. Enter the total amount that is not covered by insurance up to 99,999,999.99.
Primary Claim Adjustment Reason(s) - The reasons for adjustments that were made to the corresponding primary claim. To enter, edit, or delete reasons, do the following:
Click the button.
The Primary Claim Adjustment Reason(s) dialog box appears.

Note: All of the information that the codes represent should be reflected on the ERA/EOB from the primary insurance payor. However, the codes themselves might not appear on a paper remittance. (Refer to the X12 standards website for more information on the possible codes.)
Do any of the following as needed:
To add a reason, do the following:
From the Group Code list, select one of the following options:
CO: Contractual Obligations - The amount of the adjustment is not the patient's responsibility under any circumstances due to either a contractual obligation between the payor and provider or a regulatory requirement.
CR: Correction and Reversals, - The claim is the reversal of a previously reported claim or claim payment.
OA: Other adjustments - If no other category is applicable for the adjustment.
PI: Payor Initiated Reductions - In the payor's opinion, the amount of the adjustment is not the patient's responsibility without a supporting contract between the payor and provider.
PR: Patient Responsibility - The amount of the adjustment is the patient's responsibility.
In the Reason Code box, enter a code (two to five characters in length).
Notes:
If you use a code from 1-9, make sure that you include a leading zero when you enter the code (01-09).
Use the following guidelines for specifying a reason code:
01, 02, or 03 - Use only with PR (Patient Responsibility).
18 - Use only with OA (Other Adjustment) except where state workers' compensation requires CO (Contractual Obligations).
23 - Use only with OA (Other Adjustment).
45 - Use only with PR (Patient Responsibility) or CO (Contractual Obligations) depending upon liability.
85 - Use only with PR (Patient Responsibility).
133 - Use only with OA (Other Adjustment).
136 - Use only with OA (Other Adjustment).
201 - Use only with PR (Patient Responsibility).
209 - Use only with OA (Other Adjustment).
229 - Use only with PR (Patient Responsibility).
238 - Use only with PR (Patient Responsibility).
249 - Use only with CO (Contractual Obligations).
255 - Use only with OA (Other Adjustment).
257 - Use only with OA (Other Adjustment).
P3 - Use only with PR (Patient Responsibility).
P11 - Use only with OA (Other Adjustment).
P16 - Use only with CO (Contractual Obligations) or OA (Other Adjustment).
W5 - Use only with CO (Contractual Obligations) or OA (Other Adjustment).
In the Amount box, enter the amount of the adjustment (negative or positive, from -99,999,999.99 to 99,999,999.99) that was made to the primary claim.
Click Add.
To edit a reason, do the following:
In the list, select a reason.
Change any of the options (Group Code, Reason Code, and/or Amount).
Click Change.
To delete a reason, do the following:
In the list, select a reason.
Click Delete.
Click Close.
HSN - If the payor ID entered for the insurance plan is "MCMA1" or an HSN payor ID from Change Healthcare, this button is available. To enter HSN information, do the following:
Click the button.
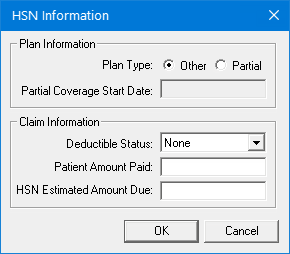
The HSN Information dialog box appears.

Set up any of the following options:
Plan Information - Next to Plan Type, select the Full option if the patient has full coverage or the Partial option if the patient has partial coverage. With the Partial option selected, in the Partial Coverage Start Date box, enter the date (in a mm/dd/yyyy format) that the patient’s coverage started.
Note: Dentrix Enterprise automatically adds slashes to dates when you enter six or eight numbers (mmddyy or mmddyyyy) and then press the Tab key.
Claim Information:
Deductible Status - None, Open, or Met is selected by default according to the status of the deductible that applies to the claim, but you can select a different status.
Patient Amount Paid - In the box, enter the amount (up to 99,999,999.99) that the patient has paid for the procedures included on the claim.
HSN Estimated Amount Due - In the box, enter the total estimated amount (up to 99,999,999.99) that is due from the patient for the procedures on the claim.
Click OK.
Note: To reset all the options in the Insurance Claim Information dialog box to their default settings, click Clear. A confirmation message appears, reminding you that the claim information will be cleared for this claim and any other claims that include the procedures on this claim. Click OK.
Click OK.