With a certain global setting enabled, the Enter Required Procedure Fields dialog box appears when you chart a completed procedure. However, if this global setting is disabled, to change the information that will be used for certain required fields for completed procedures that you chart during the current charting session, you must do so manually.
To change the required procedure fields
With a patient selected in Chart, on the View menu, click Set Required Procedure Fields.
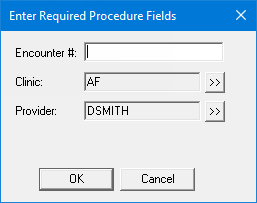
The Enter Required Procedure Fields dialog box appears.

Verify or change any of the following information that will be used for certain required fields for completed procedures:
Encounter Number - If a certain global setting has been enabled, this option is available. To specify an encounter number, do one of the following:
Enter an encounter number (numeric or alphanumeric, depending on a certain global setting).
Select an encounter number (if the applicable global setting is enabled).
Note: Depending on a certain global setting, the number may have to be unique for each patient, for each day, or for each patient per day.
Clinic - By default, the clinic that you are currently logged in to is selected, but you can select a different clinic. To change the clinic, do the following:
Click
the search button  .
.
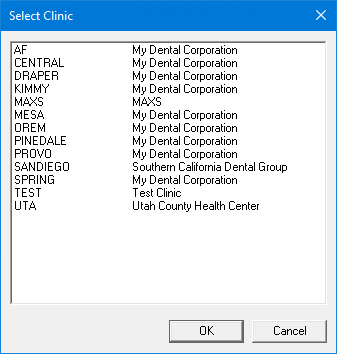
The Select Clinic dialog box appears.

Note: If your user account has been granted the "View All Patients" security right for the Central clinic, the ID and name of all clinics appear in the list; otherwise, the ID and name of each clinic for which your user account has been granted the "My Clinics, View" security right (in the "Practice/Clinic Setup" category) appear in the list; however, if your user account has not been granted that right to any clinic, only the ID and name of the clinic that you are currently logged in to appear in the list.
In the list, select the correct clinic.
Click OK.
Provider - By default, default chart provider is selected, but you can select a different provider. To change the provider, do the following:
Click the search button  .
.
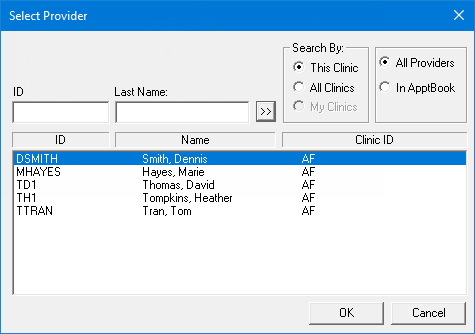
The Select Provider dialog box appears.

Either leave the ID and Last Name boxes empty to get a list of all providers, or enter all or part of a provider's ID or last name in the ID or Last Name box, respectively, to search for a provider.
Under Search By, select one of the following options: This Clinic, to search for the provider in the clinic that you are currently logged in to; All Clinics, to search for the provider in all clinics; or My Clinics, to search for the provider in the clinics to which you have been granted the "My Clinics, Select Provider " security right.
Notes:
The All Clinics option is available only if your user account has been granted the "View All Providers" security right for the Central clinic and if your user account has not been granted the "My Clinics, Select Provider" security right for the clinic that you are currently logged in to.
The My Clinics option is available only if your user account has been granted the "My Clinics, Select Provider" security right for at least one clinic and if your user account has not been granted the "View All Providers" security right for the Central clinic.
Either select the All Providers option to include providers who are associated with clinics (and who have a Log On User ID), or select the In ApptBook option to include providers who have been set up in Appointment Book.
Click
the search button  .
.
The matching primary and secondary providers appear in the list.
Select the correct provider.
Click OK.
Instructor - If a certain global setting has been enabled, this option is available.
Click OK.
All completed procedures from this point on during the current charting session will use the information that you have specified until you select another patient or change the settings again.