
After selecting a printer, you can print a patient's chart and save the settings you choose. Saving these settings lets you create a custom view for the patient you selected.
To print a patient's chart
1. Select a patient.
2. In the File menu in the Patient Chart, point to Print, and then click Patient Chart.
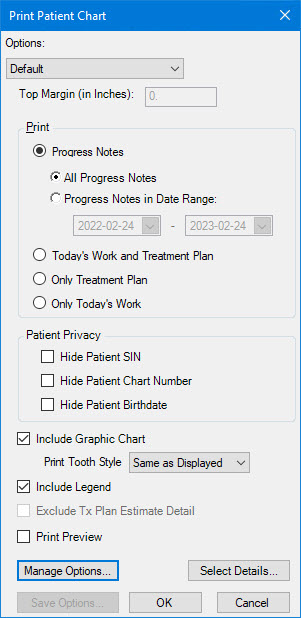
The Print Patient Chart dialog box appears.

3. Select the report that you want to print from the Options list.
4. Under Print, do one of the following:
All Progress Notes – Select to print all of the patient's progress notes.
All Progress Notes – Select to print all of the patient's progress notes.
Displayed Progress Notes in Date Range – Select to print the patient's progress notes specific to a date range that you select.
Today's Work and Treatment Plan – Select to print the treatment plan and the completed work you posted for the current date.
Only Treatment Plan – Select to print all of the patient's treatment plans regardless of date.
Only Today's Work – Select to print the completed work you posted for the current date only.
5. Under Patient Privacy, select one or all of the following to prevent Dentrix from printing the information indicated:
Hide Patient SIN –
Hide Patient Chart Number –
Hide Patient Birthdate –
6. Select a tooth style from the Print Tooth Style list.
7. Click Select Details.
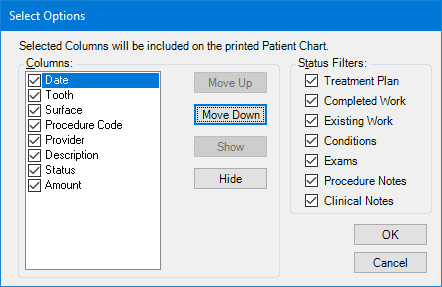
If you chose to print the patient's progress notes, the Select Options dialog box appears.

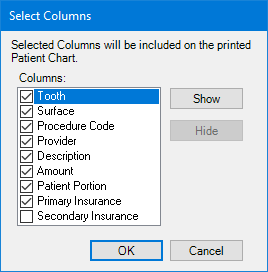
If you chose to print anything other than the patient's progress notes, the Select Columns dialog box appears.

8. Select a column from the list, click Show or Hide to specify the columns that you want to appear in the patient's chart, and then click OK.
Note: From the Select Options dialog box, you can change the order of the columns by clicking Move Up or Move Down, and under Status Filters, you can select the patient information that you want to appear in the patient's chart
9. To create a custom view for the selected patient, click Save Options.
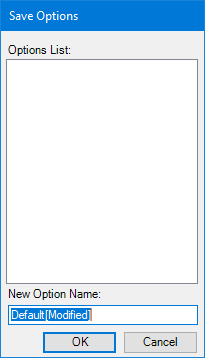
The Save Options dialog box appears.

10. Under New Option Name, type a name, such as the patient's, for the custom chart, and click OK.
11. From the Print Patient Chart dialog box, click OK to print the selected patient's custom chart.