Requesting patient forms
Dentrix Ascend provides an online portal where patients can complete forms prior to or during their visits.
You can send requests for patient forms that are due to be completed using the following methods:
-
Bulk automated appointment reminders - Each appointment reminder that Dentrix Ascend sends out automatically by email and text message can include a button (with email messages) or a link (with text messages) that a patient can use to open the portal where he or she can complete online forms.
-
Individual manual request - You can manually send an email or text message with a link to a patient, such as when a patient accidentally deletes the text message for his or her appointment reminder. You can also have a patient complete forms in your office on a mobile device connected to the patient's online portal, such as when a patient shows up at the office without having completed the necessary forms.
Notes:
-
The Web address for a patient's online portal is unique to a given patient. Each patient must open the online portal using the link (or button) that is specific to his or her record.
-
The link to the online portal is valid for seven days or until the associated forms have been completed, whichever comes first. After that, you must generate a new link if the patient still has not used the original link provided.
To create an appointment reminder for bulk automated requests
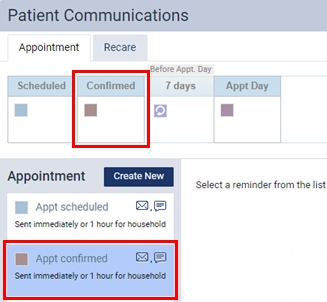
As part of your patient communication campaign for appointment reminders, create an Appt confirmed appointment reminder, which is based on the Appointment Confirmed Date event.
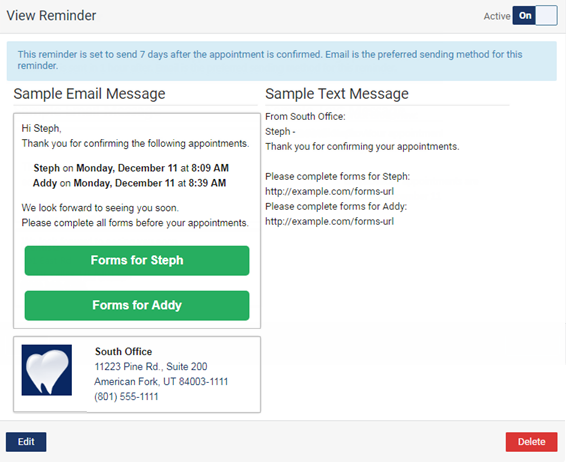
An email message will have a button for each related patient on that reminder. A text message will have a link for each related patient on that reminder.
To request patient forms manually
-
Do one of the following:
-
While viewing a patient's Overview page, on the Patient Forms box, click (or tap) Request All Due.
Do the following:
-
If the correct patient is not already selected, use the Patient Search box to access the patient's record.

-
If the patient's Overview page is not already open, do one of the following:
-
Click (or tap) the Patient menu.
-
On the Patient menu, under General, select Overview.
The patient's Overview page opens.
-
-
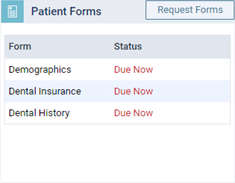
The Patient Forms box displays the published patient forms that are applicable for the patient. If any forms have a "Due" Status, click (or tap) Request All Due.
-
-
While viewing the Patient Forms section of a patient's Patient Information page, click (or tap) Request All Due.
Do the following:
-
If the correct patient is not already selected, use the Patient Search box to access the patient's record.
-
Do one of the following:
-
If the patient's Overview page is not already open, on the Patient menu, under General, select Overview. The patient's Overview page opens. Click (or tap) the title bar (at the top) of the Patient Forms box.
The patient's Patient Information page opens with Patient Forms selected on the navigation panel (on the left).
-
On the Patient menu, under General, select Patient Information. The patient's Patient Information page opens. Select Patient Forms on the navigation panel (on the left).
-
-
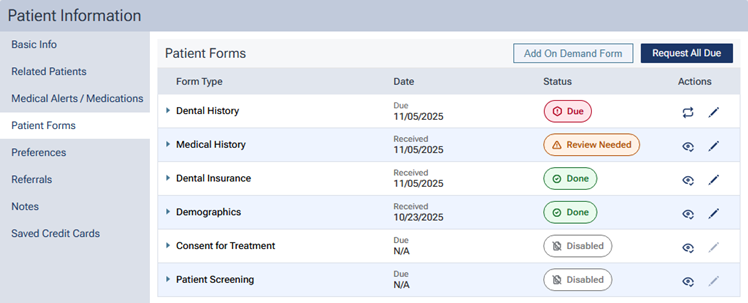
The patient forms that are associated with the patient's record appear. If any forms have a "Due" Status, click (or tap) Request All Due.
-
-
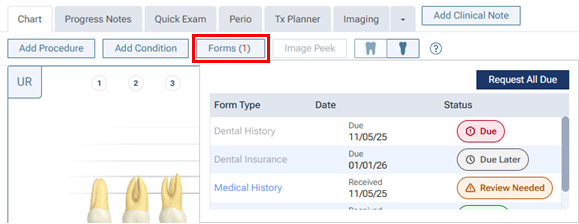
While viewing the Chart tab of a patient's clinical record, click (or tap) Forms and then Request All Due.
Do the following:
-
If the correct patient is not already selected, use the Patient Search box to access the patient's record.
On the Patient menu, under Clinical, select Chart.
The patient's clinical record opens with the Chart tab selected.
-
Click (or tap) Forms to view a pop-up box that displays the published patient forms that are applicable for the patient. If any forms have a "Due" Status, click (or tap) Request All Due.
-
-
While viewing a patient's appointment, click (or tap) Forms and then Request All Due.
Do the following:
-
Do one of the following:
-
Click (or tap) the Schedule menu.
-
On the Schedule menu, select Calendar.
The Calendar page opens.
-
Click (or tap) an appointment.
The Appointment Information panel opens.
-
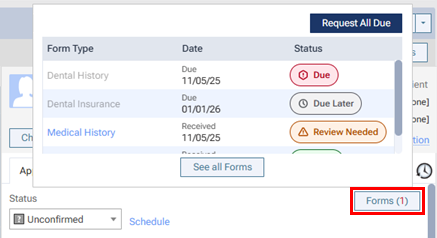
Click (or tap) Forms to view a pop-up box that displays the published patient forms that are applicable for the patient.
-
If any forms have a "Due" Status, click (or tap) Request All Due.
-
-
While confirming a patient's appointment, click (or tap) Forms and then Request All Due.
Do the following:
-
On the Schedule menu, select Unconfirmed Appointments.
The Unconfirmed Appts page opens.
-
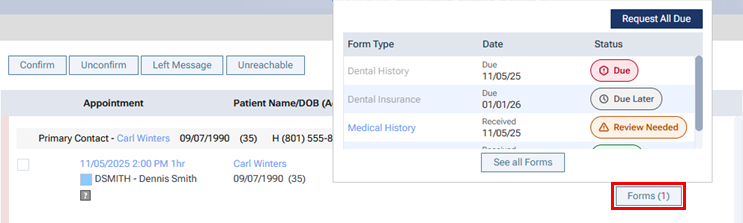
Click (or tap) Forms to view a pop-up box that displays the published patient forms that are applicable for the patient.
-
If any forms have a "Due" Status, click (or tap) Request All Due.
-
-
While viewing a patient's appointment card on the routing panel, click (or tap) Forms and then Request All Due.
Do the following:
-
Locate the patient's appointment card.
-
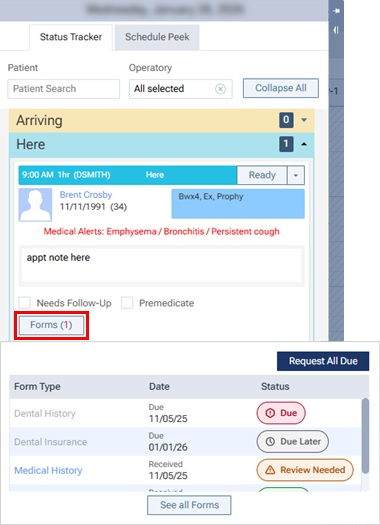
Click (or tap) Forms to view a pop-up box that displays the published patient forms that are applicable for the patient.
-
If any forms have a "Due" Status, click (or tap) Request All Due.
-
Notes:
-
A form can have one of the following statuses:
-
"Due" - The form is due now (the due date is on or before today's date), but a request to complete it has not been sent.
-
"Sent" - The form is due now, and a request to complete it was sent.
-
"Due Later" - The form has never been completed but will be due in the future.
-
"Done" - The form was completed. It may be due again in the future.
-
"Review Needed" - The form was completed and must be reviewed by a provider.
-
"Disabled" - The form was completed, but it was required only one time (such as with an on-demand request) or has been unpublished.
-
-
You can send requests for patients to complete any of the published forms that have been created using the new form builder. You cannot send requests for patients to complete any forms that were created using the legacy patient forms tool; however, any of those forms that were completed by patients remain associated with the respective patient records.
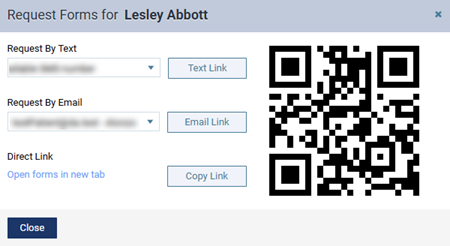
The Request Forms for [Patient Name] dialog box appears.
Note: You can no longer register kiosk devices or push requests to those devices as you could in the legacy system. However, patients can still complete forms on a practice-owned mobile device.
-
-
Do one of the following:
-
To send the portal link to a mobile phone number, select the desired number from the list, and then click (or tap) Text Link. This button is available only if the patient has a mobile phone number entered in his or her record. The mobile phone numbers of the patient and his or her primary contact are available for selection.
-
To send the portal link to an email address, select the desired address from the list, and then click (or tap) Email Link. This button is available only if the patient has an email address entered in his or her record. The email addresses of the patient and his or her primary contact are available for selection.
-
To copy the portal link to the Windows Clipboard, click (or tap) Copy Link. You can then paste the link in a document or email message for the patient.
-
To open the patient's portal on another tab of your Web browser (for instance, if you are opening it on a practice-owned mobile device that the patient can use to complete forms in the office; be sure to close any other Dentrix Ascend tabs before giving the device to the patient), you can click (or tap) the Open forms in new tab link.
-
To access the patient's portal link on a mobile device, use the camera on that device to scan the QR code, and then tap the link that appears on the mobile device.
Important:
-
Since using a mobile device to scan a QR Code to open a patient's portal registers that mobile device with Dentrix Ascend, you should use a mobile device that is owned by your practice.
-
Using a QR code requires that your mobile device meet the following specifications: for an Apple device, iOS 11 and the Safari browser; or for an Android device, Android 4 or newer and the Chrome browser.
-
-