Posting insurance overpayments
You can post an insurance overpayment for the following situations:
-
The primary insurance carrier overpays. Sometimes this occurs when the carrier makes an additional payment, which is the scenario covered in this article.
-
The secondary insurance carrier overpays. For a patient with dual coverage, the sum of the payments from the primary insurance carrier and the secondary insurance carrier cannot exceed the charge.
-
The procedure or product is posted with a $0 charge, and the insurance carrier unexpectedly pays.
To post an insurance overpayment
-
How to get there
-
If the correct patient is not already selected, use the Patient Search box to access the patient's record.
Note: You can include inactive patients in the search results by setting the Include inactive patients switch to On.
-
Do one of the following:
-
On the Patient menu, under General, click (or tap) Overview. The patient's Overview page opens. Click (or tap) the Ledger box.

-
On the Patient menu, under Financial, click (or tap) Ledger.
The patient's Ledger page opens.
-
Open a patient's Ledger page, and make sure that you are using the guarantor view for efficiency.

-
-
If you are posting an additional payment, click (or tap) the original claim payment. Make sure that the Additional payment(s) expected later from insurance checkbox is selected. If it is selected, click (or tap) Cancel; if not, select the checkbox, and then click (or tap) Save.


-
On the Ledger page, click (or tap) Payment, and then select Insurance Payment.


-
Enter the Amount of the payment.
-
Select the Method of payment received from the insurance carrier.
Additional options appear in the dialog box.

-
Select the applicable Claim (if not already selected).
-
Make sure the Balance amounts are all equal to or greater than zero. You may need to remove one or more estimated Adjustment amounts or modify one or more Applied amounts.
Note: If you attempt to save the payment while there is an amount greater than zero next to Amount of other credits to be applied, an error message appears. You cannot continue until you resolve the error.

-
From the Insurance Adjustment list, select Offsetting (+). The carrier wants a refund, or your office wants to keep the money and process adjustments.
Note: Dentrix Ascend automatically calculates the amount that was overpaid by insurance and displays it in the Amount box for the Insurance Adjustment.
-
From the Adjustment Type list, select an adjustment type that affects collections (such as Insurance Over-pmt Refund).
-
If applicable, on the Xfer Reason(s) tab, select or create reasons for a transfer of responsibility as needed.

Note: To save the payment after you add reasons for a transfer of responsibility, your user account must have the security right "Edit responsibility transfer reason" enabled.
-
Click (or tap) Save.
The insurance payment and adjustment appear on the ledger. The adjustment is automatically associated with the billing provider for the claim, which may not be the correct provider (for instance, if the billing provider is a location).

Note: In the insurance payment's Edit Payment dialog box, the adjustment also appears as a line item.

-
If the adjustment is associated with the incorrect provider, enter a set of adjustments to transfer the amount to the correct provider. Do the following:
-
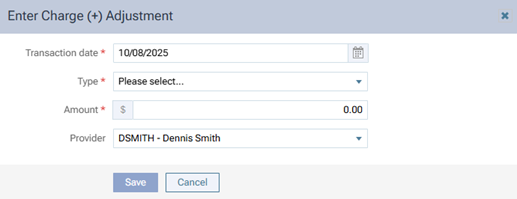
Click (or tap) Charge Adjustment.

The Enter Charge dialog box appears.

-
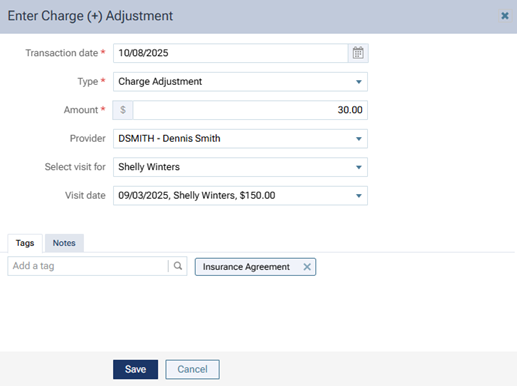
From the Type list, select an adjustment type that affects production (such as Charge Adjustment or Transfer Charge Balance).
Additional options appear in the dialog box.

-
Enter the Amount.
-
Select the Provider to associate the credit with (the one who actually did the work).
-
From the Visit date list, select [None].
-
Add Tags as needed.
-
Click (or tap) Save.
The charge adjustment appears on the ledger.

-
Click (or tap) Credit Adjustment.

The Enter Credit Adjustment dialog box appears.

-
From the Type list, select an adjustment type that affects collections (such as Offsetting Adjustment).
Additional options appear in the dialog box.

-
Enter the Amount.
-
Change the Apply to charges for selection as needed.
-
Make sure the correct amount is Applied to the charge adjustment.
-
If applicable, on the Xfer Reason(s) tab, select or create reasons for a transfer of responsibility as needed.

Note: To save the adjustment after you add reasons for a transfer of responsibility, your user account must have the security right "Edit responsibility transfer reason" enabled.
-
Click (or tap) Save.
The credit adjustment appears on the ledger.

-