Editing user roles
You can edit a user role as needed. Changing a user role affects all users that have that role assigned to them. The changes to a role will take effect for each user with that role the next time he or she logs in.
Important: Your organization's business owners, doctors, and office managers should be the only ones who have administrative security roles.
To edit a user role
-
On the Settings menu, under Location, click (or tap) User Roles.
The User Roles page opens.
-
Select a user role.

The options for editing the user role become available.

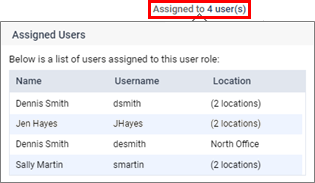
Tip: To see a list of users who are assigned to this user role, click (or tap) the Assigned to link.

-
If necessary, enter a different Role name (the role name must be unique).
-
Under Full List, for each Security Category, click (or tap) the category to view the corresponding security rights. Select the checkboxes of the rights that you want to assign to this user role. To select all the rights in a given category at one time, select the All available rights checkbox. Clear the checkboxes of any rights that you do not want to assign to this user role.
Important: The "Edit User" and "Create/Update Role" rights are required for at least one user in each location of your organization:
-
At least one user in each location must be assigned a role with the "Edit User" right enabled.
-
At least one user in each location must be assigned a role with the "Create/Update Role" right enabled.
-
-
Do one of the following:
-
Click (or tap) Save.
-
To save a copy of this user role as a new role (users with the original role attached will not be affected), click (or tap) Save As New Role. In the New Role dialog box that appears, enter a New Role Name (or leave the one that you typed in step 2, if applicable; the role name must be unique), and then click (or tap) Save.

-