DEXIS Platinum Sensor (with Direct Integration) Setup Guide (Mac OS)
This guide describes the installation and setup of the DEXIS Platinum intraoral sensor for use with Dentrix Ascend Imaging via direct integration (without the DTX Studio Bridge).
Last updated: 10/31/2025
Overview
Dentrix Ascend Imaging supports the acquisition of intraoral images from the DEXIS Platinum intraoral X-ray sensor on a computer running the Mac operating system. Calibration (correction) files must be installed on each computer that the DEXIS sensor will be connected to.
Note: Prior to the installation of the DEXIS sensor, the acquisition agent application must be installed on each computer that will acquire images. Refer to Setting up the acquisition agent for instructions on downloading and installing the acquisition agent.
Minimum Version
-
Acquisition agent v1.2.7412.28241
Configuration
To configure the computer for use with the DEXIS Platinum sensor, do the following:
-
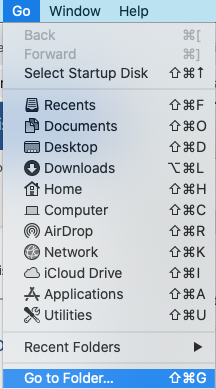
Open Finder, and then select Go > Go to Folder from the toolbar.

-
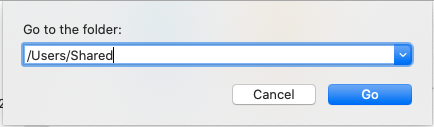
In the Go to the folder box, enter /Users/Shared, and then click Go.
-
If an Acquisition Agent folder does not exist in that location, create one.

-
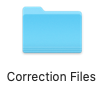
Open the Acquisition Agent folder. If a Correction Files folder does not exist, create one.
-
Open the Correction Files folder, and then place the calibration/correction files for the Platinum sensor inside. The calibration/correction files are included with the sensor on a disc labeled "DEXIS Platinum Sensor File."
Note: If you cannot locate the CD, and the calibration files are not already copied onto the computer, in most cases, DEXIS can supply the calibration/correction files for the specific serial number sensor.
-
Click the Acquisition Agent app on the dock.

-
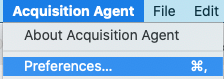
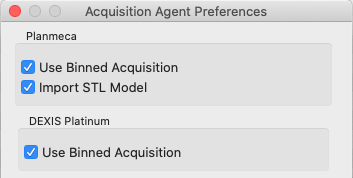
Select Acquisition Agent > Preferences from the toolbar.
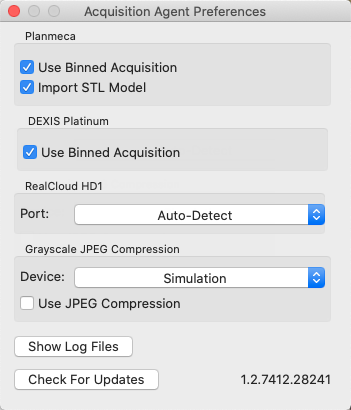
Note: Make sure that the acquisition agent version number (in the bottom-right corner of the Acquisition Agent Preferences dialog box) meets the minimum version requirement.
-
Click Show Log Files to open a folder that contains the log files and the Acquisition Agent.ini file.
-
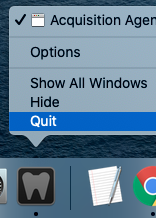
Right-click the Acquisition Agent app on the dock, and then select Quit to close the acquisition agent.
-
Open the Acquisition Agent.ini file in Text Edit.


-
Set DexisForcePlatinumFallback = True.
Note: If the DexisForcePlatinumFallback option is not listed, then add it under the [Digital Sensor] settings section.

-
Save the Acquisition Agent.ini file and close Text Edit.
-
Click on the Acquisition Agent app in the Dock to re-open.
Note: If you has DTX Studio Bridge for other DEXIS devices on this computer, proceed to the next step; otherwise, skip to the "Testing" section.
-
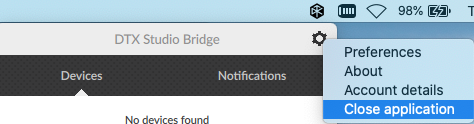
If DTX Studio Bridge is running, click the icon on the toolbar, click the gear icon, and then select Close application.
-
Open Finder, and then go to Applications.
-
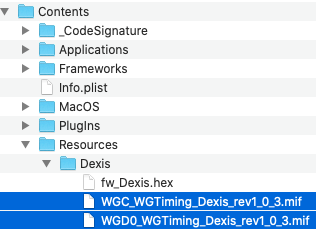
Right-click the DTX Studio Bridge app, and then select Show Package Contents.

-
Go to Contents > Resources > Dexis, and then delete the .mif timing files. After doing this, DTX Studio Bridge will no longer find the Platinum sensor, allowing for direct integration, but will continue to work for other DEXIS devices.

-
Restart the computer, and then start DTX Studio Bridge if it is not set to run at start-up.
Binning Modes
You can enable/disable binning with the DEXIS Platinum sensor as needed. In the acquisition agent preferences, under DEXIS Platinum, select or clear the Use Binned Acquisition checkbox.
Testing
The DEXIS Platinum sensor is now functional in Dentrix Ascend Imaging. To acquire a test image, do the following:
-
Select the 1 Bitewing imaging procedure.

-
Select any teeth for the test.

-
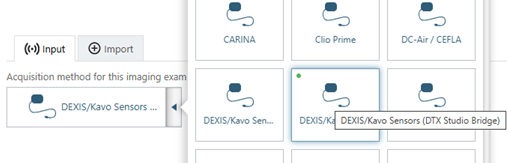
On the Available Devices menu, select DEXIS/Kavo Sensors (DTX Studio Bridge).
-
Click Start.

-
Acquire an image using the DEXIS Platinum sensor.
Note: If an error appears, try restarting the computer to correct the issue.
Troubleshooting
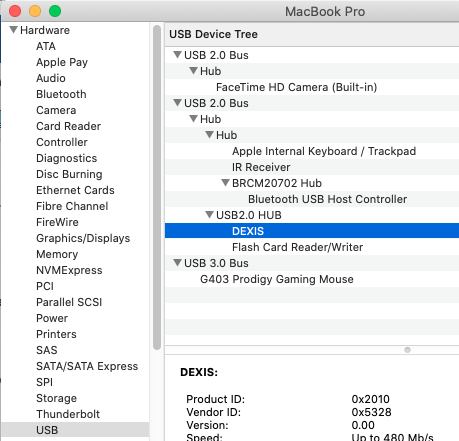
To confirm that the device is connected and being recognized by the Mac OS, open System Information, select Hardware > USB, and then make sure that the camera is listed.
Make sure that the correction files for the Platinum sensor are in the correct place by opening the Acquisition Agent.ini file located at ~/Library/AcquisitionAgent.
Make sure that the DexisCorrectionFilePath folder has the correction files for the sensor that is being used and that the user account has access to the file path.

Note: Any changes you make to the Acquisition Agent.ini file must be made while the acquisition agent app is not running; otherwise, the changes will not be saved.
Then, restart the computer to see if the issue has been resolved.