Carestream Software Bridge Setup Guide
This guide describes the installation and setup of the Carestream software bridge for use with Dentrix Ascend Imaging.
Last updated: 10/30/2025
Overview
Dentrix Ascend Imaging supports the acquisition of intraoral, extraoral, and CBCT images from the Carestream software on a computer running the Windows operating system. The Carestream software must be installed on each computer that the software bridge will be used.
Notes:
-
It is recommended that all acquisition devices are configured in the Carestream software on each computer that will acquire images using the Carestream software bridge.
-
Prior to the installation of any imaging devices or setting up the Carestream software, the acquisition agent application must be installed on each computer that will acquire images using the software bridge. Refer to Setting up the acquisition agent for instructions on downloading and installing the acquisition agent.
-
The acquisition agent must be configured to support DICOM files so CBCT acquisition is functional.
Recommended Version
-
Carestream Imaging software v8.0.15 or later
Minimum Version
-
Carestream Imaging software v8.0.15 or later
Configuration
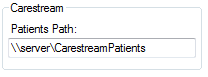
Note: The acquisition agent must be configured with a Patients Path. Currently, the software bridge does not work with the previous database, so it is recommended that you set up a new Patients Path for the software bridge.
To configure Carestream settings, do the following:
-
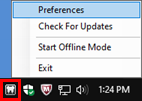
To open the acquisition agent preferences, click the Acquisition Agent icon in the system tray, and then select Preferences.
-
Select the Software Bridge tab.
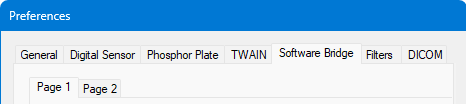
-
On the Page 1 tab, under Carestream, enter the Patients Path.
Note: If the images need to be accessed by more than one computer, it is recommended that you set the Patients Path folder to a network location that is accessible by all computers. By default, the folder location is set to the local C drive of the computer.
-
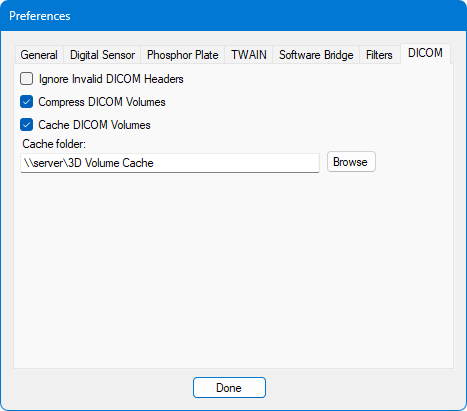
If Carestream is going to be used for 3D volume acquisition, select the DICOM tab to set up additional options. Iif applicable for your needs, select the Compress DICOM Volumes and Cache DICOM Volumes checkboxes. Specify the Cache folder to be a shared folder with plenty of storage space so each computer can use the same cache for efficiency.
Testing
The Carestream software bridge is now functional in Dentrix Ascend Imaging. To acquire a test intraoral image, do the following:
-
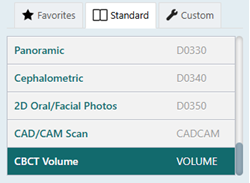
Do one of the following:
-
Select the 1 Bitewing imaging procedure.

Select the CBCT Volume imaging procedure.
-
-
Do one of the following:
-
For a bitewing acquisition, select any teeth for the test.

-
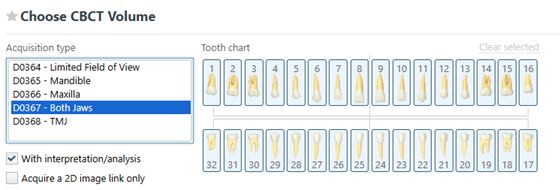
For a 3D acquisition, select an Acquisition type. Depending on the selected acquisition type, you may also need to select teeth for the test.
-
-
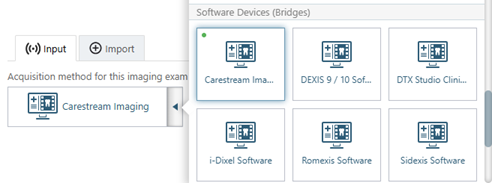
On the Available Devices menu, select Carestream Imaging.
-
For a 3D acquisition, the Acquire a 2D image link only checkbox must be selected so a 2D image of the volume instead of the full volume will be transferred. The 2D image is linked to the full volume in the Carestream software.
-
Click Start.

-
Acquire an image in the Carestream software. Then, close the Carestream imaging software. The captured image appears in Dentrix Ascend Imaging automatically.
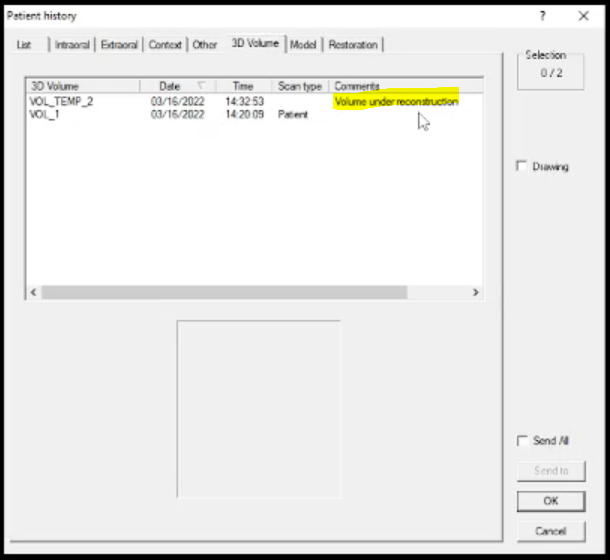
Note: If you are acquiring a 3D volume, you must wait for the volume to finish being constructed in Carestream before closing the application; otherwise, the volume will not be transferred to Dentrix Ascend Imaging.