Adding operatory groups
An operatory group is a selection of operatories that you can use to quickly customize the schedule view. You can add operatory groups as needed.
Notes:
-
Operatory groups are location specific (each location of your organization has its own operatory groups).
-
To add, edit, or delete an operatory group, the "Manage Location Information" security right is required for the location that you are currently logged in to.
-
You can assign an operatory to multiple operatory groups.
-
An operatory group may include operatories from multiple locations.
To add an operatory group
-
If you are not already viewing the correct location, select it on the Location menu.
-
On the Settings menu, under Location, click (or tap) Operatory Groups.
The Operatory Groups page opens.
-
Click (or tap) Create New.

The options for adding an operatory group become available.

-
Enter a name, and assign at least one location and one operatory.
Set up the following options:
-
Group Name - Enter a name (up to 25 characters long) to identify the operatory group on the View menu of the Calendar page. The name must be unique for the current location.
-
Locations - By default, the location that you are currently logged in to is selected. To assign additional locations to the group, expand the Locations menu, and then select the checkbox of each desired location.

If the list of locations is long, to search for a location, begin typing a location name in the Search box. The matching locations appear as you type. If you see the location that you want to include, select its checkbox.

The selected locations appear in the Included Locations list.

Notes:
-
Only locations that you have been granted the "Review Location Information" security right for appear on the Locations menu.
-
To remove a location in the Included Locations list, click (or tap) the corresponding X, and then click (or tap) Remove on the confirmation message that appears. Additionally, the operatories assigned to that location are removed from the Operatory List.
-
If the group has multiple locations assigned to it, it is available on the Calendar page only if the Multi-location View switch on the page is set to On.
-
-
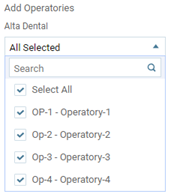
Add Operatories - For each included location, select the desired operatories to assign to the group. Expand a location's menu under Add Operatories, and then select the checkbox of each desired operatory (or select the Select All checkbox); repeat as needed to assign other operatories from the other locations.


If a location's list of operatories is long, to search for an operatory, begin typing part of an operatory's name or description. The matching operatories appear as you type. If you see the operatory that you want to include, select its checkbox.

The selected operatories appear in the Operatory List.

Notes:
-
Only active operatories for a given location are available for selection.
-
You must select at least one operatory for each location that is assigned to the group.
-
To remove an operatory in the Operatory List, click (or tap) the corresponding X.
-

Notes:
-
Be aware that the number of columns displayed on the Calendar page can affect the schedule's performance.
-
In the Available groups list on the Operatory Groups page, you can position your pointer over the multi-location icon
 next to a group name to view the associated locations. This icon appears only if multiple locations are associated with the group.
-
An operatory group is available on the Operatory Groups page only if your user role has been granted the "Review Location Information" security right for all the locations that are assigned to the group. If you do not have sufficient access, you can click (or tap) the orange warning icon
 to view the restricted locations.
-
-
Click (or tap) Save.