Acteon Sopro SOPIX Gen. 1 Sensor Setup Guide (Mac OS)
This guide describes the installation and setup of the Acteon Sopro SOPIX (Gen. 1) intraoral sensor for use with Dentrix Ascend Imaging.
Last updated: 10/29/2025
Overview
Dentrix Ascend Imaging supports the acquisition of intraoral images from SOPIX intraoral X-ray sensors on a computer running the Mac operating system.
Notes:
-
Prior to the installation of the SOPIX sensor, the acquisition agent application must be installed on each computer that will acquire images. Refer to Setting up the acquisition agent for instructions on downloading and installing the acquisition agent.
-
This guide does not apply to the newer generation of SOPIX sensors (as of March 2024).
Installation
The minimum version of the acquisition agent that includes the device drivers is 1.2.6798.31616. Confirm that your version is the minimum version or later. If your version of the acquisition agent is an earlier version than the minimum version, obtain the latest version of the acquisition agent application, which includes the device drivers for the SOPIX sensor.
Notes:
-
If you are using Mac OS 10.13 or earlier, the latest version of the acquisition agent that will work on the computer is v1.2.7447.28207.
-
If you are using Mac OS Catalina (v10.15), v1.2.7524.29328 or later of the acquisition agent is required.
Refer to Updating the acquisition agent for instructions on checking for, downloading, and installing updates for the acquisition agent.
Testing
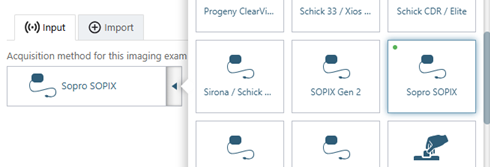
The SOPIX sensor is now functional in Dentrix Ascend Imaging. To acquire a test image, do the following:
-
Select the 1 Bitewing imaging procedure.

-
Select any teeth for the test.

-
On the Available Devices menu, select Sopro SOPIX.
-
Click Start.

-
When you see the Sopro SOPIX capture software window, acquire an image using the SOPIX sensor.
Troubleshooting
If the images are not transferring to Dentrix Ascend Imaging, it is likely that the path for the images is not set correctly. Do the following:
-
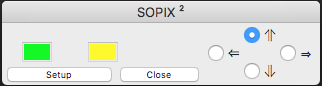
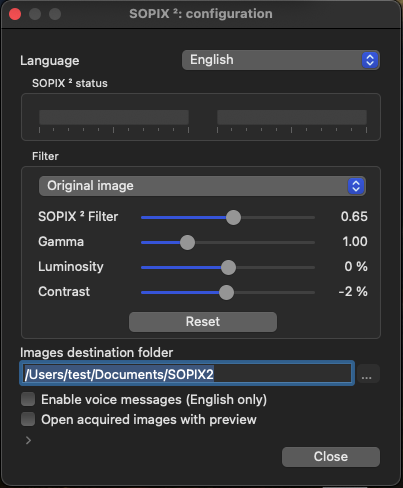
In the Sopro SOPIX capture software window, click Setup.
-
Make sure that the Images destination folder is set to /Users/(username)/Documents/SOPIX2.
-
Click Close.