Acquiring CAD/CAM scans
You can acquire CAD/CAM scans with third-party programs.
Note: For the complete list of acquisition devices that are supported by Dentrix Ascend Imaging, see "Supported Acquisition Devices."
To acquire a CAD/CAM scan
-
If the correct patient is not already selected, use the Patient Search box to access the patient's record.

-
On the Patient menu, under Clinical, select Chart, Progress Notes, Quick Exam, Perio, Tx Planner, or Imaging.
The patient's clinical record opens with the Chart, Progress Notes, Quick Exam, Perio, Tx Planner, or Imaging tab selected.
-
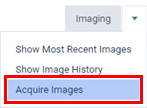
On the Imaging tab's menu, select Acquire Images.
Notes:
Alternatively, you can press Alt+X to start the acquisition process (instead of using the Acquire Images option on the Imaging tab's menu). To use this keyboard shortcut, you must be viewing the patient's clinical record (on the Chart, Progress Notes, Quick Exam, Perio, Tx Planner, or Imaging tab).
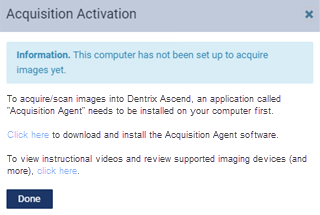
If the acquisition agent is not installed, the Acquisition Activation dialog box appears. Click (or tap) the Click here link to download the acquisition agent installer. Then, click (or tap) Done. After you install the acquisition agent and the drivers for your acquisition devices, you can begin acquiring images.
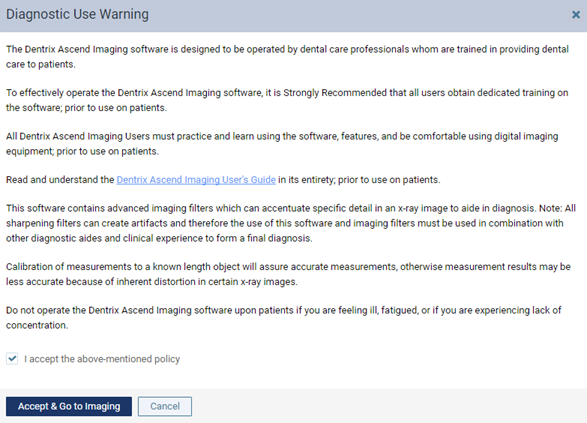
If you have not already accepted the diagnostic use policy, the Diagnostic Use Warning dialog box appears. To begin using the imaging features of Dentrix Ascend, you must select the I accept the above-mentioned policy checkbox, and then click (or tap) Accept & Go to Imaging.
The options for acquiring images become available.
-
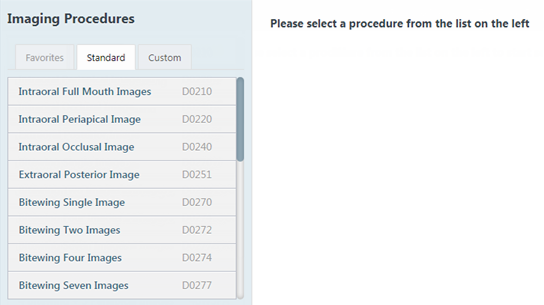
On the navigation panel, select one of the following tabs:
-
Favorites - This tab contains the imaging procedures for the current location that have been marked as favorites. This tab is available only if there are favorite imaging procedures for the current location. If there are favorite imaging procedures for the current location, this tab is selected by default.
-
Standard - This tab contains the standard imaging procedures that come with Dentrix Ascend Imaging. This tab is available for all locations. If there are not any favorite imaging procedures for the current location, this tab is selected by default.
Note: The Custom tab, even if it is available, does not contain imaging procedures for CAD/CAM scans.
-
-
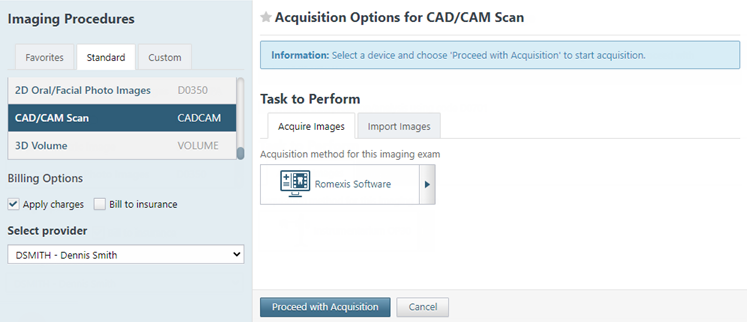
Select the imaging procedure CAD/CAM Scan, which corresponds to the only acquisition type for a CAD/CAM scan.
The options for the selected procedure become available.
-
Under Billing Options, set up the following options:
-
Apply charges - To post the fee for the selected procedure, select the checkbox. To post a zero amount for the procedure, clear the checkbox.
-
Bill to insurance - To bill the patient's insurance carrier for the procedure, select the checkbox. To not bill the patient's insurance carrier for the procedure, clear the checkbox.
-
Select provider - From the list, select the provider who you want to associate with the procedure.
Note: Only providers who have access to the current location and who are flagged as charting providers are available for selection. Also, the provider who is selected by default is determined by the current location's Default procedure provider setting.
-
-
On the Input tab, select the correct device on the Available Devices menu if it is not already selected.
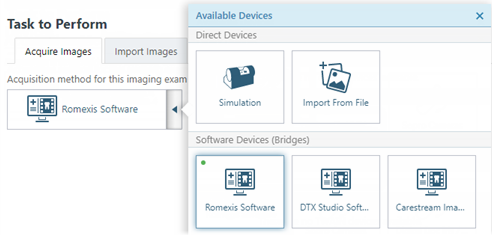
Note: For the complete list of acquisition devices that are supported by Dentrix Ascend Imaging, see "Supported Acquisition Devices."
-
If the selected device supports 3D CAD/CAM scan processing within Dentrix Ascend Imaging, the Acquire a 2D image link only checkbox is available. Select or clear this checkbox:
-
With this checkbox selected, Dentrix Ascend Imaging displays and saves only a 2D snapshot of the CAD/CAM scan.
-
With this checkbox clear, Dentrix Ascend Imaging displays and saves the full CAD/CAM scan (you can save a 2D snapshot of that scan later).
Note: The state of this checkbox is saved for the next time you acquire a CAD/CAM scan.

Note: If the selected device does not support 3D CAD/CAM scan processing within Dentrix Ascend Imaging, the Acquire a 2D image link only checkbox is not available. When you acquire a CAD/CAM scan using the selected device, Dentrix Ascend Imaging displays and saves only a 2D snapshot of that CAD/CAM scan.
-
-
Click (or tap) Start.
-
Acquire the CAD/CAM scan with the specified device.
Do the following:
-
Use the options in the third-party imaging program that opens to get ready to acquire scans.
-
Acquire scans in the third-party imaging program.
-
Close the third-party imaging program.
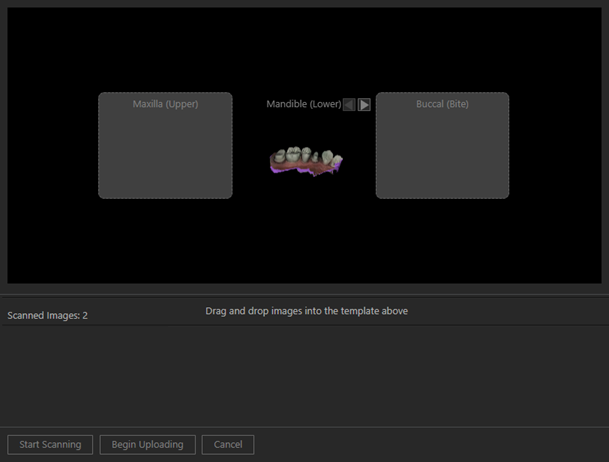
The scans that you acquired in the third-party imaging program appear as thumbnail images on the panel at the bottom of the Dentrix Ascend Imaging program.
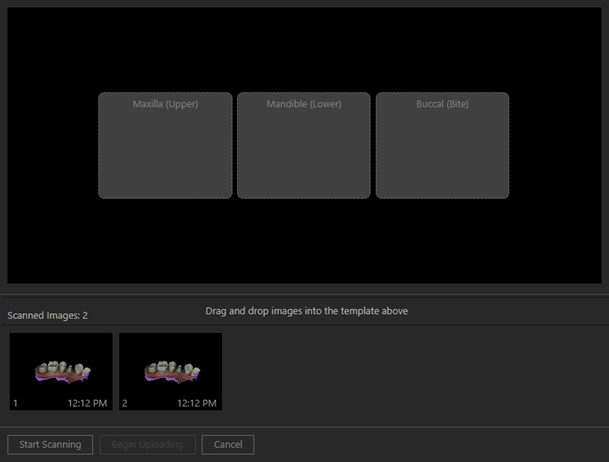
Note: If a scan has metadata that indicates the orientation (upper, lower, or bite), the image is automatically mounted in the correct slot of the template; however, you can drag the image to another box if necessary. If all the scans are mounted automatically, and you do not need to move any to other orientation boxes, you can skip to step e.
-
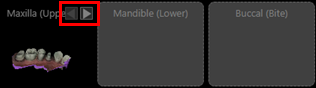
One at a time, drag the thumbnail images from the panel to the correct orientation box of the template: Maxilla (Upper), Mandible (Lower), or Buccal (Bite).
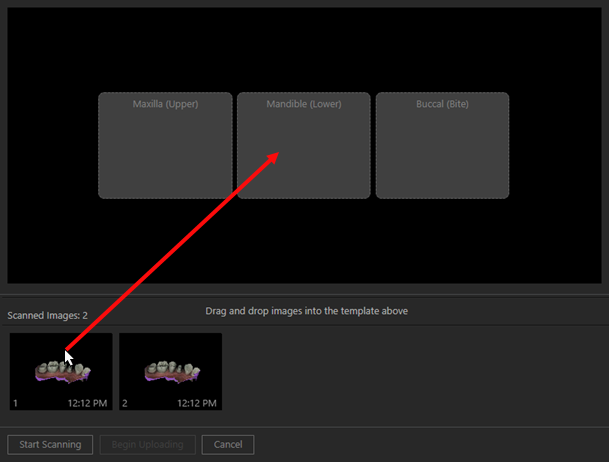
Note: For a template slot with multiple images, you can navigate between the images in the stack by clicking (or tapping) the corresponding Next or Previous button as needed.
-
Click (or tap) Begin Uploading to save the mounted images to the patient's record.
-
If not all thumbnail images have been mounted to the template when you click (or tap) Begin Uploading or Cancel, a message appears, stating that unassigned images will not be saved to the patient's record.
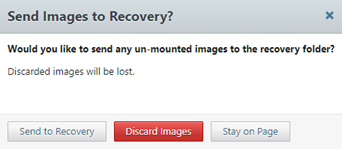
Click one of the following buttons:
-
Send to Recovery - To save the unassigned images. You can assign them to the patient later using the existing functionality for recovering images.
-
Discard Images - To delete the unassigned images permanently.
-
Stay on Page - To return to where you were so you can assign unassigned images or make other changes.
-
-
If any images fail to upload, a message appears and provides the option for you to recover the images. Click (or tap) Recover Images to begin the recovery process.
-