In Dentrix, you can set up saved views that you can select as needed to print views of a day, week, month, or any range of days; to specify the number of copies you want to print; to exclude the hours or days a practice is not open from being displayed or printed; to select a view from multiple default views; and to select a default view that loads automatically without clicking Load View.
To print the Appointment Book View report
1. In the Appointment Book, click File, and then click Print Appointment Book View.
Note: The first time you open the Print Appointment Book View dialog box, Current Appt Book View is the only available option until you save a new report option by clicking Save Options or save a default report option when the dialog box closes.
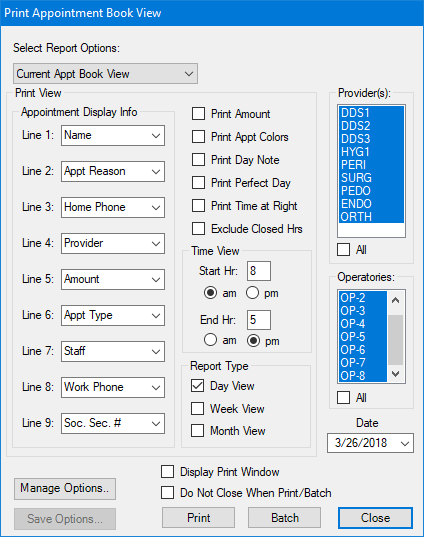
The Print Appointment Book View dialog box appears.

Note: The selected view in the Appointment Book determines the default settings for the Print Appointment Book View dialog box. For example, if you are viewing only one operatory and one provider in the Appointment Book, when you click Print Appointment Book View, the report defaults to printing only the operatory and provider being viewed. For more information on selecting a view, click Setting up views and Switching between views.)
2. Do the following:
Providers - Select up to 10 providers that you want to include on the report.
Operatories - Select up to 10 operatories that you want included on the report.
Date - Do one of the following to select a date other than the default:
Type a new date in the Date field.
Click Date and select a new date from the calendar.
Note: By default, the current date is assigned as the date the schedule is printed.
3. Under Appointment Display Info, select the information that you want to appear on an appointment.
Note: Depending on the length of an appointment, you can print up to nine lines of information for each appointment. The Appointment Display Info option allows you to customize and prioritize the text lines for each appointment.
For each line, click the arrow and select the item that you want to display on that line:
[none] - Select if you do not want any information to display on a line.
Name - Select to display the patient's name. Typically this item is assigned to the first position.
Appt Reason - Select to display the reason for the appointment.
Note: If you frequently schedule several procedures per appointment, you can use two or three back-to-back lines with this option. That way, if the description will not fit on one line, Dentrix wraps it to the next line. The wrap ability is limited to the Appointment Reason option.
Phone - Select to display the patient's home phone number.
Provider - Select to display the provider ID.
Amount - Select to display the production amount for the appointment.
Appt Type - Select to display the Appointment Type (High Production, Medium Production, and so forth.).
Staff - Select to display the staff member assigned to the appointment.
Work Phone - Select to display the patient's work phone number.
Soc Sec # - Select to display the patient's Social Security number.
Pref Name - Select to display the patient's preferred name.
Note: You should not use the Pref Name option in place of the Name option because Dentrix will leave the line blank if the patient does not have a preferred name.
Chart Num - Select to display the patient's chart number.
Name/Pref - Select to display the patient's first name and preferred name on the same line.
Referred By - Select to display who referred the patient to the practice.
Note: On average, most appointments will use between two to four information lines. Assign the most important items to the first lines.
4. Select the print options that you want.
Print Amount - Select to print the total amount of production scheduled for the day.
Print Appt Colors - Select to print the Appointment Book View in color.
Print Day Note - Select to print a day note for the date being printed.
Print Perfect Day - Select if you use Perfect Day Scheduling.
Print Time at Right - Select to print the time bar on the right and the left sides.
Exclude Closed Hours - Select if you do not want to print the hours your practice is closed.
5. Type the earliest hour to print in the Start field. Select am or pm, as appropriate. Type the latest hour to print in the End field. Select am or pm, as appropriate.
Note: Depending on the length of your day, Dentrix can print some of your later hours on a second page. However, you can to fit an entire day's schedule on one page.
6. To use your settings each time you print the Appointment Book View, click Save Options.
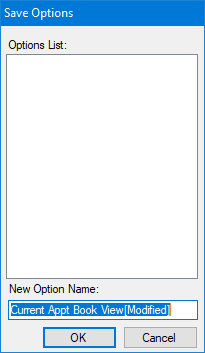
The Save Options dialog box appears.

7. Type a name for the option, and then click OK.
8. Do one of the following:
Print - Click to print the report immediately.
Batch - Click to send the report to the Batch Processor.
Note: You can print multiple copies of the Appointment Book View when you send the report to the Batch Processor by opening the Print Preview window in the Office Manager.