
In Dentrix, each insurance carrier you add is saved to a database, so you only need to enter the insurance information once. As necessary, you can edit this insurance information.
To edit an insurance carrier
1. In the Office Manager, click Maintenance, point to Reference, and then click Insurance Maintenance.
The Insurance Maintenance dialog box appears.

2. Select the carrier that you want to edit, and then click Ins Data.
The Dental Insurance Plan Information dialog box appears.
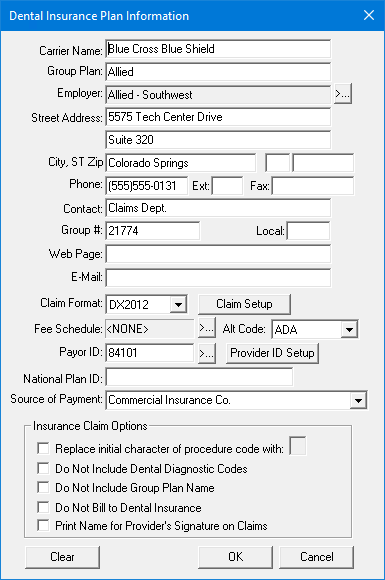
3. As appropriate, change the following information:
· Carrier Name - Type the insurance carrier's name or click the search button to select a carrier.
· Group Plan - Type the group plan name or click the search button to select a group plan. If you do not have a group plan name, use the employer name.
· Employer - Type the employer's name or click the search button to select an employer. Dentrix links the insurance plan with the employer so that, when you enter patients with this employer in the Family File, you can search by employer for the correct insurance plan.
· Address - Type the insurance carrier's street address, city, state, and ZIP code.
Note: Be sure to type the carrier's ZIP + 4 ZIP Code. You don't have to include the hyphen. Dentrix does that for you.
· Phone - Type the insurance carrier's phone number and extension, if applicable.
· Contact - Type the name of your contact at the insurance carrier.
· Group # - Type the plan number. If the plan is a union plan, type the local chapter's number.
· Web Page - Type insurance carrier's website address.
· E-Mail - Type the insurance carrier's email address.
· Claim Format - Select the appropriate format from the list for printing claims for the selected carrier.
Note: For dental insurance plans, you can print the standard ADA form DX2024 using a laser printer. You can also send DX2024 claim forms electronically. If printed, Dentrix includes both the insurance claim form and the information for the claim. The DX2024 form lets you create most insurance forms, but some carriers require their own form and will not accept standard ADA forms. Dentrix integrates with many forms. If you need to use a carrier-specific form, contact Dentrix Support for help in setting this up.
· Alt Code - (Optional) Select an alternate code for the selected carrier. Defaults to the ADA procedure codes.
· Fee Schedule - Click the search button to attach a fee schedule to the insurance carrier.
Note: If you attach a fee schedule to the carrier, that fee schedule is used instead of the fee schedule attached to the patient’s primary provider. However, if you selected a fee schedule for the patient, that fee schedule is used instead of the one attached to the carrier.
· Payor ID - Relates to Dentrix eClaims. If you subscribe to Dentrix eClaims, type the ID or click the search button to select one.
· Provider ID Setup - Click the button to specify a specific insurance ID for a provider. For information on how to set up multiple IDs for a provider, click Customizing provider ID codes.
· National Plan ID - Relates to Dentrix eClaims. If you subscribe to Dentrix eClaims, type the ID for the carrier.
· Source of Payment - Relates to Dentrix eClaims. If you subscribe to Dentrix eClaims, select the appropriate source for the carrier from the list.
4. Under Insurance Claim Options, do one or more of the following:
· Replace initial character of procedure code with - Select if the carrier requires the new ADA CDT-3 or CDT-4 codes, and you have not converted all of your codes to this format. Type the appropriate letter to replace the initial character of each procedure code, such as "D."
· Do Note Include Dental Diagnostic Codes - Select to exclude dental diagnostic codes on claims.
· Do Not Include Group Plan Name - Select to exclude the group plan name from printing on the claim or from being sent electronically.
· Do Not Bill to Dental Insurance - Select to prevent creating batch insurance claims for the carrier, to have Dentrix ask if you want to include or exclude procedures flagged as "Do Not Bill to Dental Insurance" when you create a claim, and to exclude procedures from the Procedures Not Attached to Insurance report. For more information, see Batch processing primary dental insurance claims.
· Print Name for Provider's Signature on Claims - Select to print the provider's name on claims instead of the provider's signature.
5. Click OK.
The Insurance Plan Change dialog box appears.
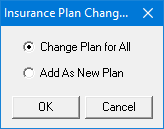
6. Do one of the following:
· Change Plan for All - Select if you want any change to the existing insurance plan information to change that information for ALL other subscribers who have the same insurance plan. These changes will affect all past claims too.
· Add As New Plan - Select if you want to copy all of the insurance information for the current subscriber and add the changed insurance plan without changing the original plan.
7. Click OK.