
With the default or custom benchmarks and the Practice Advisor set up, you can generate the Practice Advisor report.
To run the Practice Advisor Report
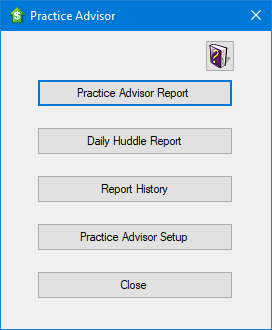
1. In the Office Manager, click Analysis, and then click Practice Advisor.
The Practice Advisor dialog box appears.
Note: If you enabled Dentrix passwords, a user must have security rights to "Practice Analysis, Open" to open the Practice Advisor.
2. Click Practice Advisor Report.
The Practice Advisor Report dialog box appears.
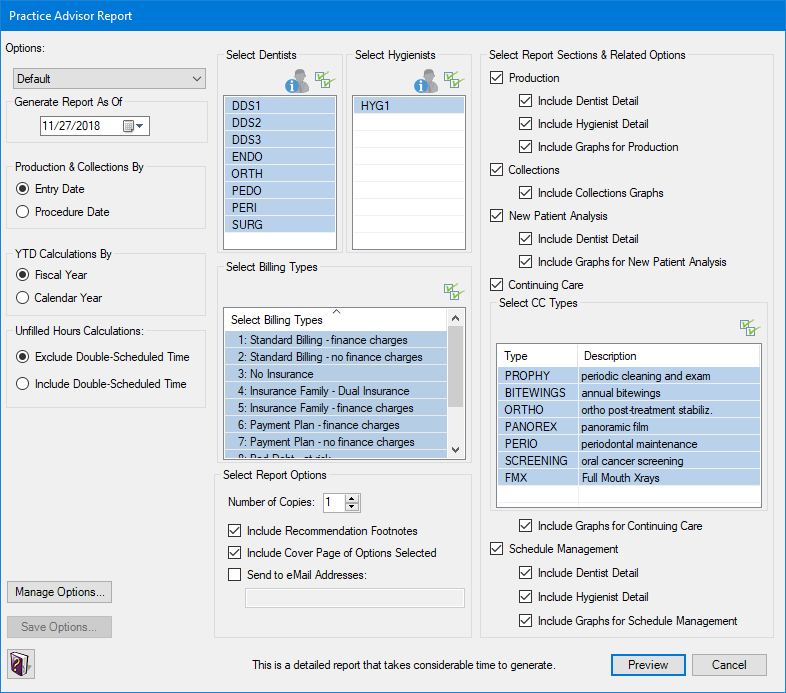
3. Select one of the Options to load a set of previously saved report options.
Note: The "Default" option is the only available option if you haven't previously saved a set of report options.
If you select a set of saved options before saving the current options being viewed, a message appears asking if you want to save the options. You have the following options:
· Click Yes to save the current options being viewed as a report option set, type the New Option Name, and then click OK.
· Click No to replace the current options being viewed with the selected option set.
· Click Cancel to return to the Practice Advisor Report dialog box with the current options still being viewed. The options from the saved set you selected are not loaded.
4. Set up the following options to change the settings that are loaded by one of the selected Options or to change the default system settings for the report:
· Generate Report As Of - The As Of date for the report is used to determine the current month-to-date (MTD) range/cutoff, previous month range (always the full month), next month range (always the full month; only used for the Schedule Management section on the report), and year-to-date (YTD) cutoff.
Type a date in a MM/DD/YYYY format or select a date by clicking the down arrow to open a calendar that you can choose the desired date from (click the arrows to navigate from month to month; click the year to change it; click the month to change it; click a date to select it). The date you type or select is used as the report As Of date.
· Production & Collections By
· Entry Date - With this option selected, all transactions used for production and collections are used according to entry date and the report As Of date.
· Procedure Date - With this option selected, all transactions used for production and collections are used according to procedure date and the report As Of date
· Entry date and procedure date apply to the following sections on the report:
· The Production section (and anywhere that production amounts from the Production section are used in other sections).
· The Collections section, except for A/R amounts.
· Procedure date applies to the following sections on the report:
· The accounts receivable aged balance amounts in the Collections section are always determined according to procedure date, as they are for aging reports, billing statements, Practice Analysis, and so on.
· Treatment plan amounts are always determined according to procedure date for treatment-planned procedures and by the treatment plan date for completed procedures. Entry dates are not used for treatment plans.
· YTD Calculations by
· Fiscal Year - With this option selected, all dated records that are used for the YTD calculations use a range as of the first day of the fiscal year for the practice through the report As Of date. (for details about indicating the practice's fiscal year in the Practice Information dialog box, see Configuring your practice information.)
· Calendar Year - With this option selected, all dated records that are used for the YTD calculations use a range as of January 1st for the year of the report As Of date through the report As Of date.
Note: To view production and collections for the fiscal year and the other sections for the calendar year, you must generate two reports.
· Select
Dentists - Click the Select All button  to
include all dentists on the report, or select specific dentists by clicking
each one. The selected dentists are used as a filter for the following
sections of the report:
to
include all dentists on the report, or select specific dentists by clicking
each one. The selected dentists are used as a filter for the following
sections of the report:
· Production, according to transaction provider.
· New Patient Analysis, according to patient provider.
· Schedule Management, according to provider setup in the Appointment Book and the appointment provider.
All providers are always used for the Collections and Continuing Care sections on the report.
Note: We
recommend that you do not select an inactive provider, indicated with
an "(I)," if the date range will not include a time when that
inactive provider had production. To select an inactive provider, click
the Show Inactivated Providers  button. Also, we recommend that you save the report options with the appropriate
providers selected.
button. Also, we recommend that you save the report options with the appropriate
providers selected.
· Select
Hygienists - Click the Select All
button to include
all hygienists on the report, or select specific hygienists by clicking
each one. The selected hygienists are used as a filter for the following
sections of the report:
· Production, according to transaction provider.
· Schedule Management, according to provider setup in the Appointment Book and appointment provider.
All hygienists are always used for the Collections and Continuing Care sections.
Selected hygienists are not used for the New Patient Analysis section on the report based on the assumption that new patients will not have a hygienist as their primary provider.
Note: We
recommend that you do not select an inactive hygienist, indicated with
an "(I)," if the date range will not include a time when that
inactive hygienist had production. To select an inactive hygienist, click
the Show Inactivated Hygienists
button. Also, we recommend that you save the report options with the appropriate
hygienists selected.
· Select
Billing Types - Click the Select All button  to include information for patients with any billing type on the
report, or select specific billing types by clicking each one to include
information for patients with those billing types on the report.
to include information for patients with any billing type on the
report, or select specific billing types by clicking each one to include
information for patients with those billing types on the report.
· Select Report Options
· Number of Copies - Enter the number of copies of the report that you want to print. Dentrix uses the number specified as the default when you click the Print button from the Print Preview window.
· Include Recommendation Footnotes - Select to include an additional page of recommendations for any report item that is outside of the normal benchmark range.
· Include Cover Page of Options Selected - Select to print a cover page with the report that details all of the options used to generate the report and includes the practice information, such as the name, phone number, and address.
This option is inactive if you do not select all under Select Dentists, Select Hygienists, or Select Billing Types. A cover page is included with the generated report.
Note: We recommend that you always include the cover page for later reference.
· Send to eMail Addresses - Select to email a PDF copy of the report after the report is generated but before it is previewed.
· The PDF is attached to a new email message (you must install and set up a MAPI-compliant email software for this feature to function properly).
· The To field of the email message will be populated with the email addresses you type in the Send to eMail Addresses field. Separate each email address with a semi-colon and a space (; ).
· Select Report Sections & Related Options
· Production - Select to include production statistics on the report.
· Include Dentist Detail - Select to generate a report of production information for each of the selected or for all dentists.
· Include Hygienist Detail - Select to generate a report of production information for each of the selected or for all hygienists.
· Include Graphs for Production - Select to include a page with graphs for the production information.
· Collections - Select to include collections statistics on the report.
· Include Graphs for Collections - Select to include a page with graphs for the collections information.
· New Patient Analysis - Select to include new patient analysis statistics on the report.
· Include Dentist Detail - Select to generate a report of new patient analysis information for each of the selected or for all dentists.
· Include Graphs for New Patient Analysis - Select to include a page with graphs for the new patient analysis information.
· Continuing Care - Select to include continuing care statistics on the report.
· Click
the Select All button
to include all continuing care types on the report, or select specific
continuing care types in the Select CC Types list box. Continuing
care types are only used for the continuing care information section of
the report.
Note: You may want to select specific continuing care types because some continuing care types are not recurring and should, therefore, not be counted when evaluating the continuing care effectiveness of the practice.
· Include Graphs for Continuing Care - Select to include a page with graphs for the continuing care information.
Note: You may want to select specific continuing care types because some continuing care types are not recurring and should, therefore, not be counted when evaluating the continuing care effectiveness of the practice.
· Schedule Management - Select to include schedule management statistics on the report.
· Include Dentist Detail - Select to generate a report of schedule management information for each of the selected or for all dentists.
· Include Hygienist Detail - Select to generate a report of schedule management information for each of the selected or for all hygienists.
· Include Graphs for Schedule Management - Select to include a page with graphs for the schedule management information.
5. Click Save Options to save the set of report options you have chosen for future use.
From the Save Options dialog box, type a name for the option set, and then click OK.
6. Do the following:
· Click Manage Options to rename or delete previously saved report option sets.
· From the Manage Saved Options dialog box, select a saved report, and then click Rename or Delete.
7. Click Preview to generate the report, send an email with the report attached (if applicable), and then preview the report.
The Processing Report dialog box appears.
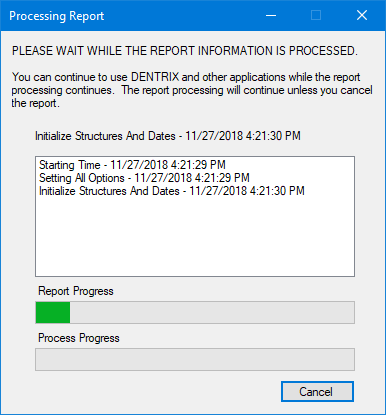
Note: The report may take a long time to generate, but you can continue working in Dentrix during the process.
If you need to abort the report generation, you can click Cancel at any time. The report will not show in the report history (for details about previewing reports that have been generated previously, see Viewing reports generated previously).