Due to licensing issues, Dentrix does not come pre-loaded with the dental diagnostic codes. Dentrix lets you edit these codes, but you must add them first. You can get information on the codes and their descriptions using reference books provided by the ADA. Please contact your local chapter of the American Dental Association for assistance.
To edit a dental diagnostic code
1. In the Maintenance menu in the Office Manager, point to Practice Setup, and then click Procedure Code Setup.
The Procedure Code Setup dialog box appears.
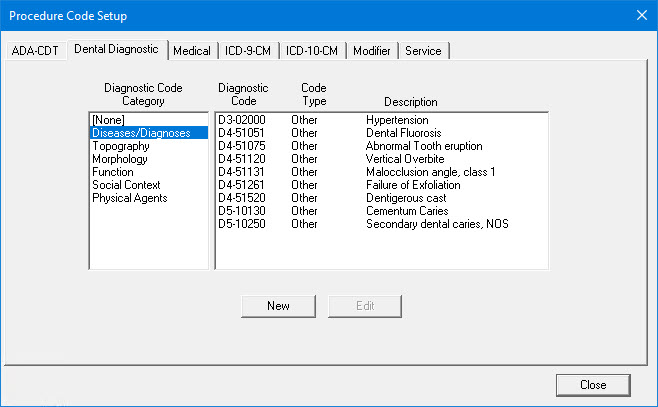
2. Click the Dental Diagnostic tab, and then select a Diagnostic Code Category from the list.
All diagnostic codes associated with that category appear in the right pane.
3. Select the diagnostic code that you want to edit from the list, and then click Edit.
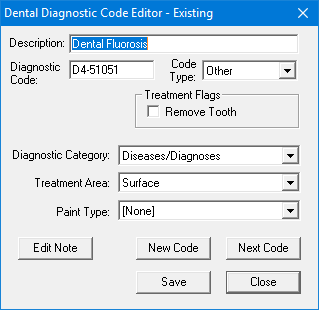
The Dental Diagnostic Code Editor - Existing dialog box appears.
4. Do the following:
Description - Type a description for the diagnostic code.
Note: The procedure description appears in most of the Dentrix modules and on insurance claims, billing statements, and various reports.
Diagnostic Code - Type the corresponding ADA Dental Diagnostic Code for the procedure.
Note: The diagnostic code appears in most Dentrix modules. Dentrix also uses it to print some reports by procedure range and on insurance claims.
Code Type - Select a code type from the list (Other or SNODENT).
Note: Other is the default setting. While you can select the SNODENT code type, SNODENT codes are not included with Dentrix. SNODENT is distributed by the ADA as a set of downloadable files and is available under license only.
Treatment Flags - Select Remove Tooth to remove the selected tooth from the graphic Patient Chart when you post the procedure with this flag as Complete.
Note: The applicable Dentrix procedures, such as extractions, missing teeth, and so forth, have already been flagged.
Diagnostic Category - Select the appropriate category to put the dental diagnostic code in for easy access.
Treatment Area - Select the treatment area that the procedure applies to: Surface, Tooth, Mouth, Arch, Root, Quadrant, Sextant, or Other.
Note: Selecting a treatment area flags the specified area when you chart or enter the procedure for a patient. Surface, Tooth, and Root flag a tooth. Surface flags at least one surface. Arch flags at least one arch. Mouth does not flag anything except possibly a tooth range. The applicable treatment area is already applied to each default procedure when you install Dentrix.
Paint Type - Select the paint type that you want Dentrix to paint the tooth with in the Patient Chart when you recommend or complete the procedure.
Note: For information on customizing paint types, click Customizing practice definitions.
5. If you are editing an existing diagnostic code, click Edit Note.
The Edit Diagnostic Code Notes dialog box appears.
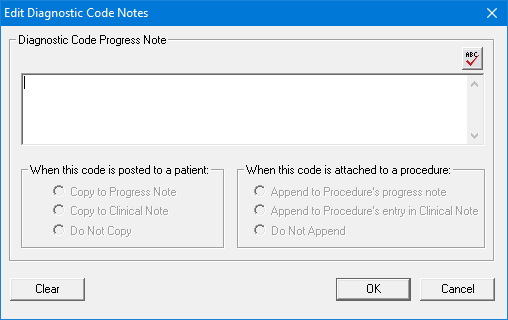
6. To attach a note, type the text in the field, and click the spell check button to perform a spell check.
7. Under When posting this diagnostic code to a patient, select one of the following:
Copy to Progress Note
Copy to Clinical Note
Do Not Copy
8. Under When this code is attached to a procedure, select one of the following:
Append to Procedure's progress note
Append to Procedure's entry in Clinical Note
Do Not Append
9. Click OK to save the note.
The Dental Diagnostic Code Editor dialog box appears.
10. Click Save.
11. To edit the next code numerically, click Next Code and repeat steps 4 through 10.
Note: If you have not saved the changes made to the current diagnostic code, a message appears. Click Yes to save your changes.
12. Click Close when you have finished editing the last diagnostic code in a category.
The Dental Diagnostic Code Editor dialog box closes.
13. Select the next Diagnostic Code Category from the list and repeat steps 3 through 12.
14. When you have finished editing, click Close to close the Procedure Code Setup dialog box.