
Before you can log in to Dentrix Mobile, you must set up Dentrix Mobile using the WebSync Wizard. A WebSync is performed to synchronize data between your practice management system and other programs like eCentral and Dentrix Mobile.
To set up Dentrix Mobile using the WebSync Wizard
1. In
the toolbar
of any Dentrix module (such as Family File), click the DXWeb Toolbar icon
![]() .
.
If you have set up the WebSync Wizard previously, the DXWeb Toolbar appears.
a. Click
the Settings icon ![]() on
the toolbar, click DXWeb Updates,
and follow the prompts to install the DXWeb Updates.
on
the toolbar, click DXWeb Updates,
and follow the prompts to install the DXWeb Updates.
b. When
finished, click the Settings icon ![]() on the toolbar again, and click WebSync
Wizard to launch the WebSync Wizard.
on the toolbar again, and click WebSync
Wizard to launch the WebSync Wizard.
The WebSync Wizard - Start screen appears.

This screen explains some basic information about running the WebSync Wizard and performing a WebSync.
2. Click Next.
The WebSync Wizard - WebSync Setup screen appears.

Tip: At any time throughout the wizard you can click Back to return to the previous screen or Cancel to exit the wizard without saving any changes.
a. Under Login Setup, enter your eCentral User ID and Password. The User ID is the same as your username for eCentral. If you don’t have an eCentral user ID, click the Register link.
b. Under Schedule WebSync, select either Once Daily to run WebSync at the specified time or Do not run WebSync Automatically:
· Once Daily - If you select this option and enter a time to automatically perform the WebSync, the WebSync will run every day at the time you specify. We recommend that you select a time when your office is least busy because the WebSync could potentially slow down regular work.
· Do not run WebSync Automatically - Select this option if you want to specify each time a WebSync is performed. With this option you will need to remember to run a WebSync each night before you leave for the day so that the data is available on Dentrix Mobile or eCentral.
c. Under WebSync Options, notice that Appointment Manager/Mobile Upload is automatically selected; this sends the necessary information to use Dentrix Mobile and the eCentral Appointment Manager.
Note:
· If this is the first time you're running the WebSync Wizard, Appointment Manager/Mobile Upload may not appear yet. You may need to run the WebSync Wizard once with the DXWeb Toolbar Updates option selected to add this new option and then perform a manual WebSync.
· Appointment Manager/Mobile Upload is not a user-definable option; this is always performed automatically with a WebSync.
Important: If you want to use Dentrix Mobile to view information for all of your patients, including those who do not have an appointment, you must select the Patient Upload option.
3. Click Next until you get to the WebSync Wizard - Correspondence Setup screen.

If you don’t send Email, Text Message, or Postcard reminders through eCentral, you will want to clear these options under Correspondence Types.
4. Click Next to accept the defaults for the next screens in the WebSync Wizard until you get to the WebSync Wizard - Finish screen.

5. Click Finish to save any changes you have made.
The WebSync Wizard closes.
If you chose Do not run WebSync automatically in step 2, or if you have data you want to sync before or after your automatic WebSync has run for the day, you will need to perform a manual WebSync.
To run a manual WebSync after the wizard has been set up
1. In
the toolbar
of any Dentrix module, click the DXWeb Toolbar icon ![]() .
.
The DXWeb Toolbar appears.

2. Click
the WebSync ![]() button, and then
click WebSync override.
button, and then
click WebSync override.
The WebSync Override Options dialog box appears.
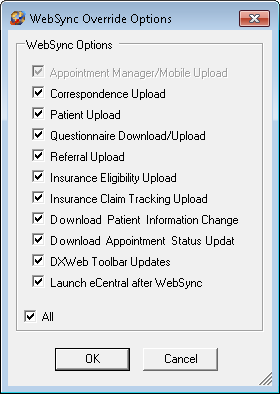
The WebSync Override Options default to what you selected under WebSync Options in the WebSync Wizard. You can select or clear any option here without affecting the default options you specified in the WebSync Wizard.
Note: The Appointment Manager/Mobile Upload option at the top of this dialog box is always selected and cannot be turned off. Any time you run the WebSync Wizard or perform a manual override, key appointment and patient data for patients with past or future appointments is automatically synchronized between Dentrix and Dentrix Mobile. You do not need to have any other options in this dialog box selected to update Dentrix Mobile.
3. Click OK.
The WebSync Override begins and runs through each option that you have selected. A blue line indicates an option that was skipped because that option is cleared in the WebSync options or in the WebSync Override options.
Once a WebSync has been performed on all your selected options, the WebSync In Progress screen closes, and you are able to log in to Dentrix Mobile or eCentral.