
You can apply finance charges to accounts with or without payment agreements. You can apply finance charges to all or part of your patients and automatically calculate the charges, or you can enter the finance charges manually for individual patients at any time. The finance charge option is used to calculate and create finance charge entries for accounts automatically.
You can apply finance charges on a monthly basis. Although you can apply the finance charges at any time during the month, we recommend the end of the month. If you choose to apply finance charges at a different time, apply them consistently and at about the same time each month.
Note: You can also apply finance charges to individual accounts manually. (For more information, see Posting finance and late charges.)
To apply finance charges at month end
1. From the file server, complete a backup of your Dentrix directory. (Please read Backing up the Dentrix database or refer to your hardware technician for assistance in creating a backup.)
Important: We strongly recommend that you have a current backup before proceeding.
2. In the Ledger, click Task Scheduler.
The Reports and Tasks Scheduler dialog box appears.

3. In the Available Tasks list, right-click Apply Finance Charges.
The following options appear.
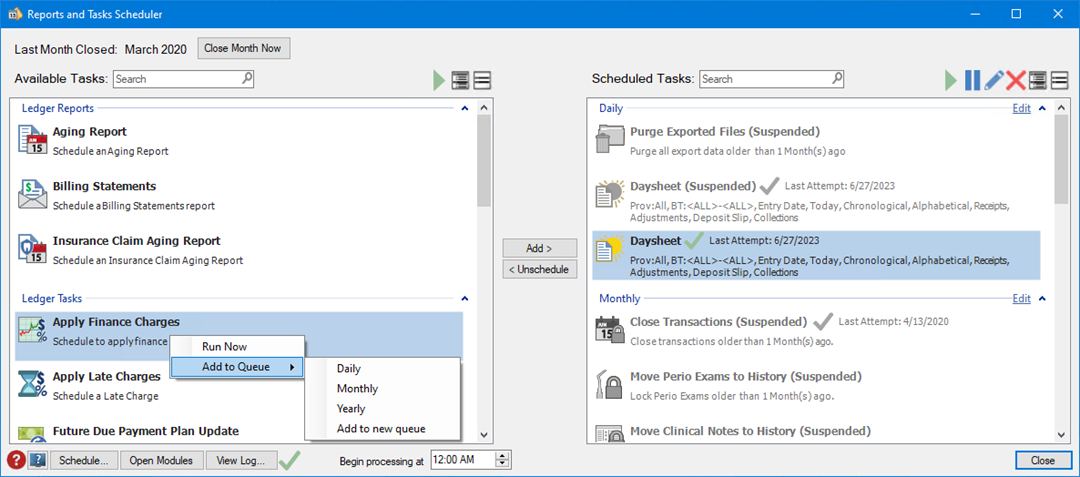
4. Click the appropriate option:
· Run Now.
· Add to Queue, and then select a queue from the list.
The Apply Finance Charges dialog box appears.
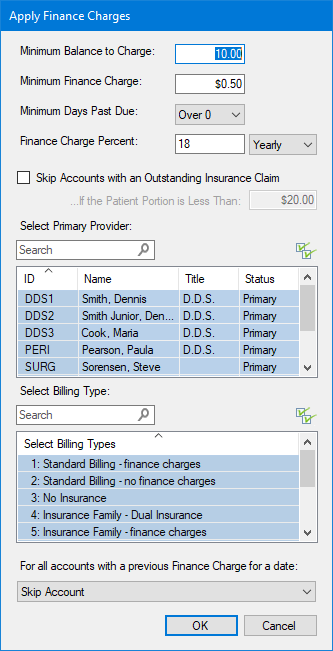
5. Complete one or more of the following:
· Minimum Balance to Charge – When assessing finance charges, the minimum balance to each aged account balance is compared and a finance charge is only applied to accounts with an aged balance greater than the minimum. The minimum balance defaults is $10.00, but you can change this amount.
· Minimum Finance Charge – Accounts are charged the amount entered in this field when the calculated finance charge is less than the amount. The default is $.50, but you can change this amount.
· Minimum Days Past Due – Finance charges are calculated on the portion of each account balance that is past due, according to the option you select and the aging of the account as of the Finance Charge Date. The default is Over 0 assuming that charges are due when they are incurred.
Important: If you do not want to apply finance charges to current accounts, you must change this option.
· Finance Charge Percent – The finance charge is calculated as a percentage of the amount owed. Type the percent that you want to charge and then select Monthly or Yearly. By default, finance charges are calculated on a monthly basis, so if you select Yearly, the percentage is divided by 12 to derive a monthly charge. For example, if you want to apply an 18% yearly finance charge to outstanding balances, that 18% is divided by 12 months to arrive at a monthly finance charge of 1.5%.
· Skip Accounts with an Outstanding Insurance Claim – Select to skip accounts with outstanding insurance claims, and then type an amount in the If the Patient Portion is Less Than text box (default is $20.00).
· Select Primary Provider – From the list, select the providers whose patients you want to apply finance charges to. By default, all providers are selected.
· Select Billing Type – From the list, select the billing types that you want to apply finance charges to. By default, all billing types are selected.
· For all accounts with a previous Finance Charge for a date – Select Skip Account (default), Replace previous Finance Charge with the new Charge, or Add Additional Finance Charge.
6. Click OK.
If you selected Run Now, finance charges are calculated immediately. If you selected Add to Queue, the report or task is added to the Scheduled Tasks list.
7. Set the time you want the report or task to process (default is midnight).
The report or task processes automatically at the time you set and according to the queue you placed it in.
8. Edit the queue to set when and/or how often you want the report or task to run.
Note: You can print a Finance Charge Report from the Office Manager to see the finance charge entries. You can edit or delete each entry from the Ledger.