Managing ERAs
In Dentrix Ascend, you can view an ERA that Dentrix Ascend receives through the clearinghouse and then post payments in patients' ledgers for the claims on that ERA.
Important: Before locations can accept ERAs, you must enroll those locations in the ERA service and then enroll for ERAs with participating payers (insurance carriers).
Tip: For information on automating ERA payments for your organization, see Managing ERA payment options.
To manage ERAs
-
If you are not already viewing the correct location, select it on the Location menu.
-
On the Home menu, under Insurance, select Bulk/ERA Insurance Payments.
The Bulk/ERA Insurance Payments page opens.

-
Select the ERA Payments tab on the left panel.
ERAs for claims that correspond to the current location appear.
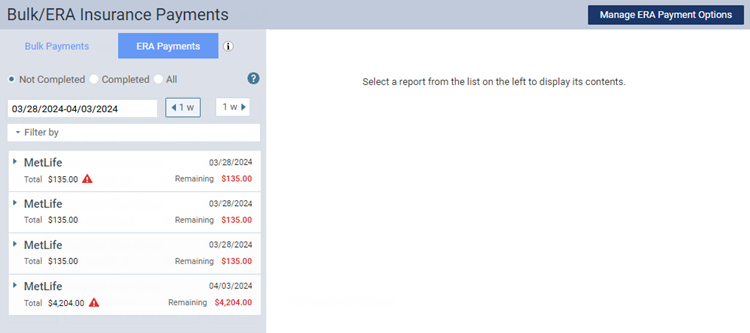
Note: By default, only incomplete ERAs appear in the list.
-
To include incomplete and/or completed ERAs in the list, select one of the following options:
-
Not Completed - To view incomplete ERA payments (the payments for all associated claims have not been posted).
-
Completed - To view completed ERA payments (the payments for all associated claims have been posted).
-
All - To view both completed and incomplete ERA payments.
Notes:
-
By default, Not Completed is selected.
-
An ERA is considered Incomplete if a payment has not been posted for all the claims on that ERA.
-
An ERA is considered Complete if payments have been posted for all the claims on that ERA.
-
-
By default, the ERAs for the past seven days appear in the list. To change the date range, do any of the following as needed:
-
To go back one week from the beginning date of the displayed range, click (or tap) the left 1 w button. To go forward one week from the ending date of the displayed range, click (or tap) the right 1 w button.
-
To specify a different date range, click (or tap) in the date box, and then select the desired date (today, yesterday, or a specific date) or date range (last 7 days, last 30 days, this month, or a custom range).
-
-
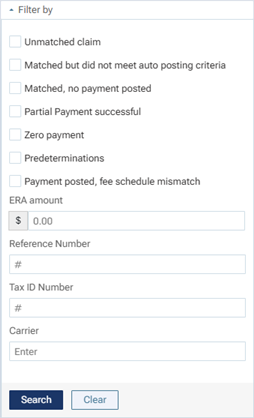
To include only ERAs that match certain criteria, do the following:
-
Expand the Filter by menu.
-
Set up any of the following options:
-
Unmatched Claim - To include ERAs that could not be matched to claims in Dentrix Ascend, select this checkbox. With the checkbox clear, ERAs are included whether or not they were matched to claims.
-
Matched but did not meet auto posting criteria - To include ERAs that have been matched to claims but did not meet the auto-posting/quick-posting criteria.
-
Matched ERA to EFT - To include ERAs that were matched to EFTs, select this checkbox. With the checkbox clear, ERAs are included whether or not they were matched to EFTs.
-
Matched, no payment posted - To include ERAs that were matched to claims but for which a payment has not been posted. With this checkbox clear, ERAs are included whether or not they were matched to claims and whether or not payments were posted.
-
Partial Payment successful - To include ERAs for which a partial payment has been posted.
-
Zero payment - To include ERAs that have or have not been matched to claims with payments for zero dollars.
-
Predeterminations - To include ERAs that were matched to predeterminations. With this checkbox clear, ERAs are included whether or not they were matched to predeterminations.
-
Payment posted, fee schedule mismatch - To include ERAs for which a payment has been posted, but a procedure's allowed amount on the ERA does not match the allowed amount (from the insurance plan's Max allowable amount fee schedule) in Dentrix Ascend.
-
ERA Amount - To include ERAs for the specified amount. Without an amount entered, ERAs for any amount are included.
-
Reference Number - To include ERAs with check numbers or trace numbers that contain the specified numbers. Without numbers entered, ERAs with any reference number are included.
-
Tax ID Number - To include ERAs with TINs that contain the specified numbers. Without numbers entered, ERAs with any TIN are included.
-
Carrier - To include ERAs from the insurance carriers whose names contain the specified text. Without text entered, ERAs from any insurance carrier are included.
-
-
Click (or tap) Search.
Notes:
-
An ERA and a claim (or predetermination) on an ERA can have any of the following symbols associated with them:

If an ERA has unmatched claims, this symbol appears to the left of the ERA's total, and this symbol appears to the left of each applicable patient's name.

If a payment was successfully posted for a claim, this symbol appears to the left of the applicable patient's name.

If a payment has not yet been posted for a matched claim, this symbol appears to the left of the applicable patient's name.

If a claim was matched but did not meet the auto-posting/quick-posting criteria, this symbol appears to the left of the applicable patient's name.

If an ERA has been matched to an EFT, this symbol appears to the left of the ERA's total.

If an ERA has been successfully posted to an EFT, this symbol appears to the left of the ERA's total.

If a partial payment was successfully posted for a claim, this symbol appears to the left of the applicable patient's name.

If an ERA has any matched or unmatched claims with a zero-dollar ($0.00) payment, this symbol appears to the left of the ERA's total, and this symbol appears to the left of each applicable patient's name.

If an ERA has any matched predeterminations, this symbol appears to the left of each applicable patient's name.

If a payment was posted for a claim on an ERA, but a procedure's allowed amount on the ERA does not match the allowed amount (from the insurance plan's Max allowable amount fee schedule) in Dentrix Ascend, this symbol appears to the left of the applicable patient's name.
-
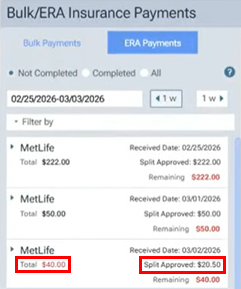
If the Total amount and the Split Approved amount for an ERA differ, the Total amount appears in red text to alert you of the discrepancy. This can happen if (1) there is a provider-level adjustment or (2) depending on your specified ERA delivery method, the payment is split between locations that share a tax ID. For example, if the total check is for $40, but it is split into two $20 payments for different locations, the split amount is $20 for each payment. This enhancement allows for easier tracking of claim payments and adjustments.
-
-
Do any of the following as needed:
Note: You can also view received ERAs from your location's inbox.