
Welcome to the quick start guide for Dentrix Ascend Eligibility Essentials.
Dentrix Ascend Eligibility Essentials simplifies the process of requesting insurance eligibility information with an integrated and automated workflow—all within Dentrix Ascend. You'll receive reliable, timely responses from top insurance payers. Responses will include detailed data like patient history, frequency limitations, and procedure code level coverage percentages, all in a standardized form that's automatically saved to the patient's Document Manager.
To get started, watch this video to become familiar with your new eligibility workflow (Duration 3:31).
Note: In this video, you'll see and hear references to Eligibility Essentials. Don't let that distract you. The routine daily workflow for Eligibility Essentials and Pro is much the same, though Eligibility Pro automatically searches payor portals and returns more information.
|
Have you recently begun using Eligibility Essentials or Eligibility Pro Click here to watch a prerecorded webinar and learn more about Eligibility Essentials and Eligibility Pro. Our onboarding team will walk you through setting up your Payer Connection Portal in order to get the most out of your eligibility responses. Our team will also take you through the Eligibility workflow so can begin receiving current, reliable and detailed eligibility data today. |
|---|
To learn how to use Dentrix Ascend Eligibility Essentials, click the topics below.
Eligibility requests run automatically for appointments scheduled within the next several days. You can configure the number of days in the Business Day Lead for Batch Eligibility Verification field on the Location Information page.
When you add an appointment and the patient's last eligibility response was received more than 30 days ago, Dentrix Ascend checks the patient's eligibility immediately.
You can view a patient's eligibility status in the Calendar. Look for the letter "E" on an appointment and note the color code.
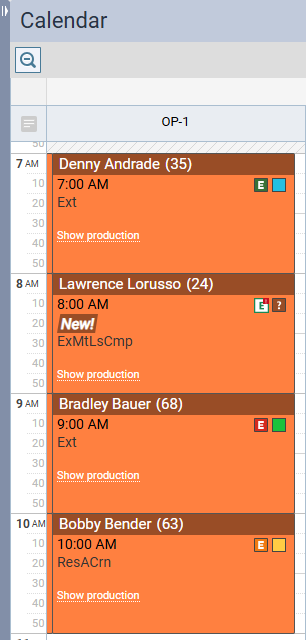
To see the eligibility detail for a patient, click the E symbol to open the most recent response.
This opens an HTML document containing the patient's eligibility detail in a new tab. Dentrix Ascend automatically downloads eligibility details to the Document Manager and displays them in a standardized layout for all payers, formatted to improve readability.
You can check eligibility for an insurance subscriber without creating a patient appointment. This quick check will let you know if the subscriber is eligible, not eligible, or if there is some kind of error that needs to be addressed. This will reduce the need for you to leave Ascend to do this check via the insurance website or on phone calls.
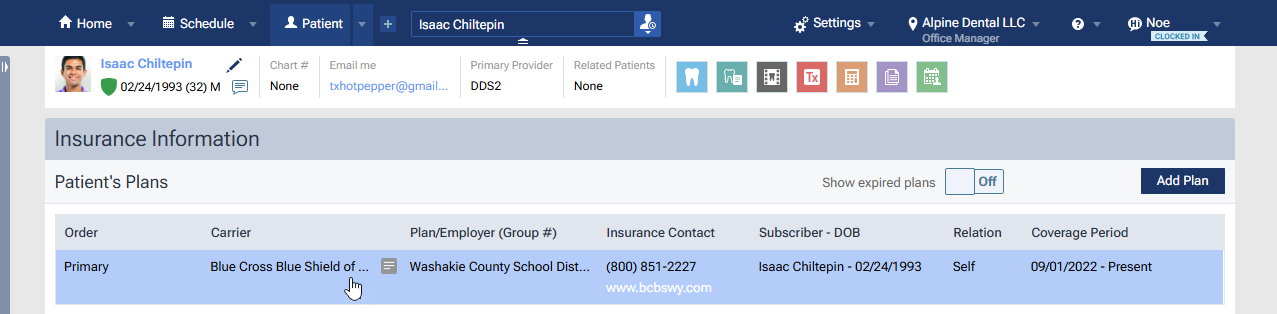
To check eligibility status for a patient, search for and locate the patient. From the patient Overview page, open the Insurance widget.

Click to open the patient's primary insurance plan.
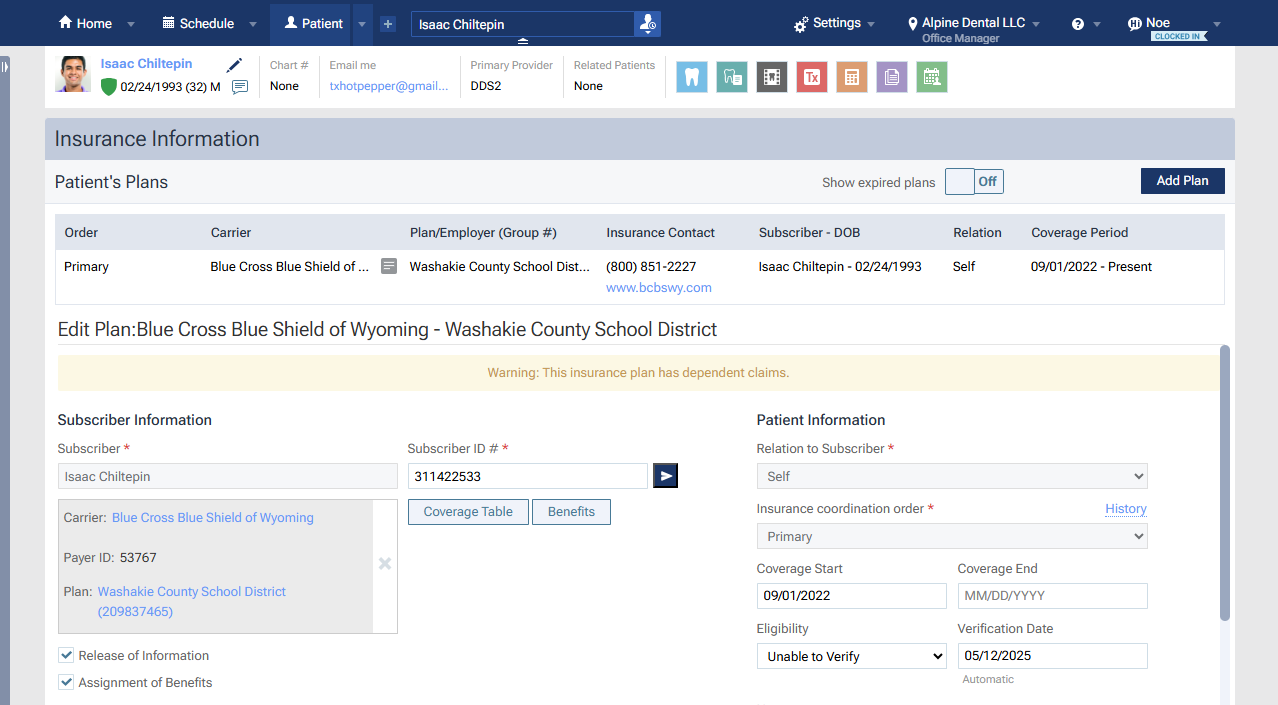
Look at the Subscriber ID # field in the middle of the page. To validate the subscriber ID number, click the > icon to the right of the field.
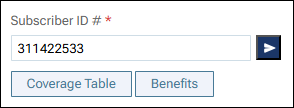
You will see a spinner while the query runs. The response appears below the Subscriber ID # field. These are the possible responses:
 |
Green Check - Verified (Eligible Response) |
 |
Red Triangle - Verified (Not Eligible Response) |
 |
Orange Triangle - Error Response/Timeout |
| Blue Circle - Insurance Doesn't Support Electronic Eligibility |
Note: This check works only for primary plans, and the carrier must accept eligibility checks.
This check will not include a PDF or import option (those are specific to checks done when there is an appointment scheduled). This is just a quick status to give your office advance notice of the patient status without needing to set up an appointment.
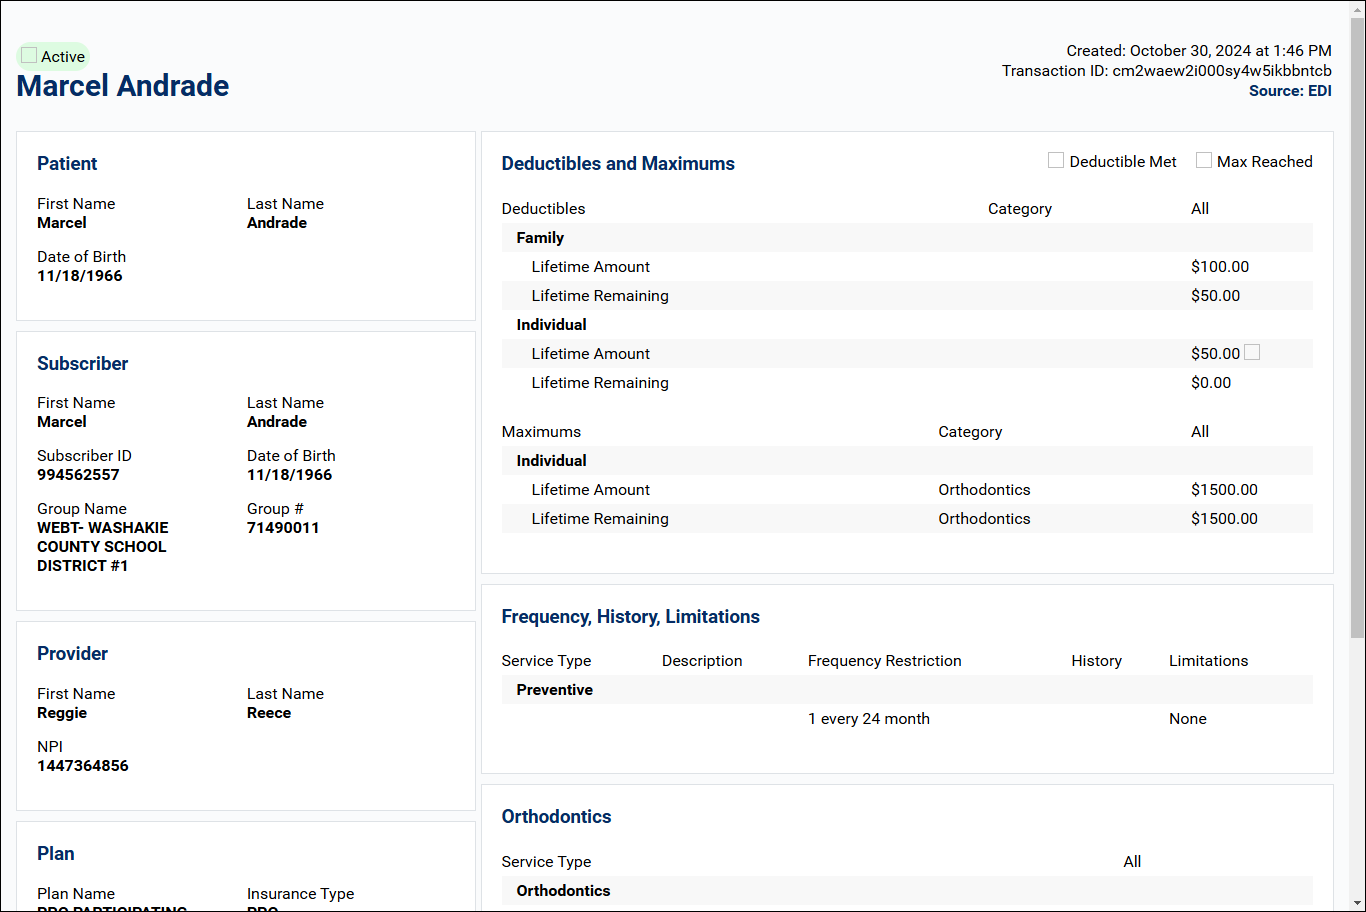
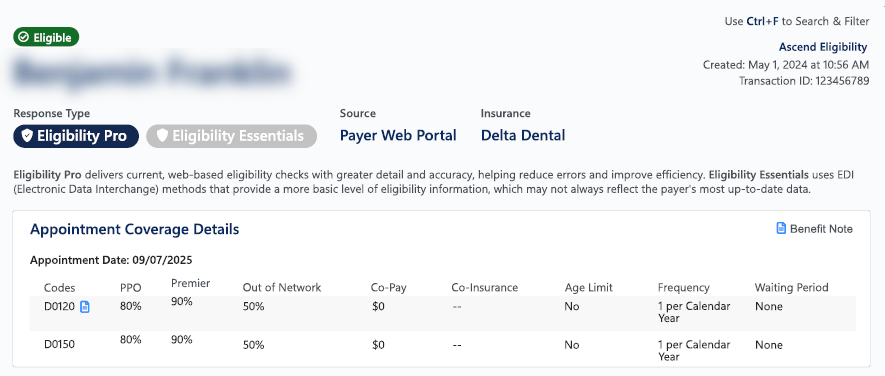
When an eligibility request (automatic or manual) successfully returns either standard or enhanced data, a summary section titled "Appointment Coverage Details" appears at the top of the PDF document.
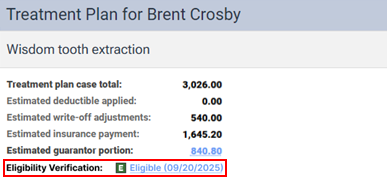
While presenting a patient's treatment plan, you can quickly view the patient's eligibility status and open the corresponding eligibility document.
If an eligibility document (for the patient's primary insurance coverage only) exists for the patient, an Eligibility Verification line appears. The "E" icon indicates the status (eligible, ineligible, or unable to verify). The status and date of the verification is a link that you can click to view the corresponding eligibility document on a new browser tab.
From time to time, you may need to submit an eligibility verification request manually. For example, this might be necessary if the automatic check returned an error and you have subsequently corrected the patient or insurance information.
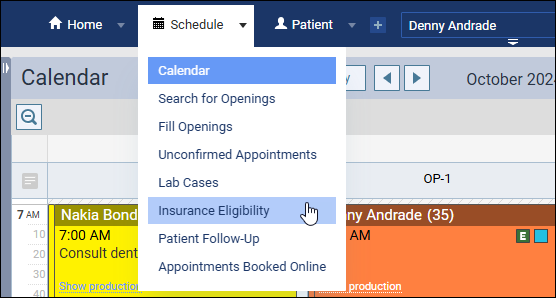
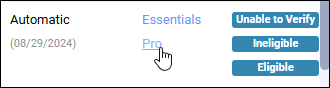
To resubmit another eligibility request manually, open the Insurance Eligibility page. Locate the patient, and in the Auto Verify column select either Essentials or Pro.
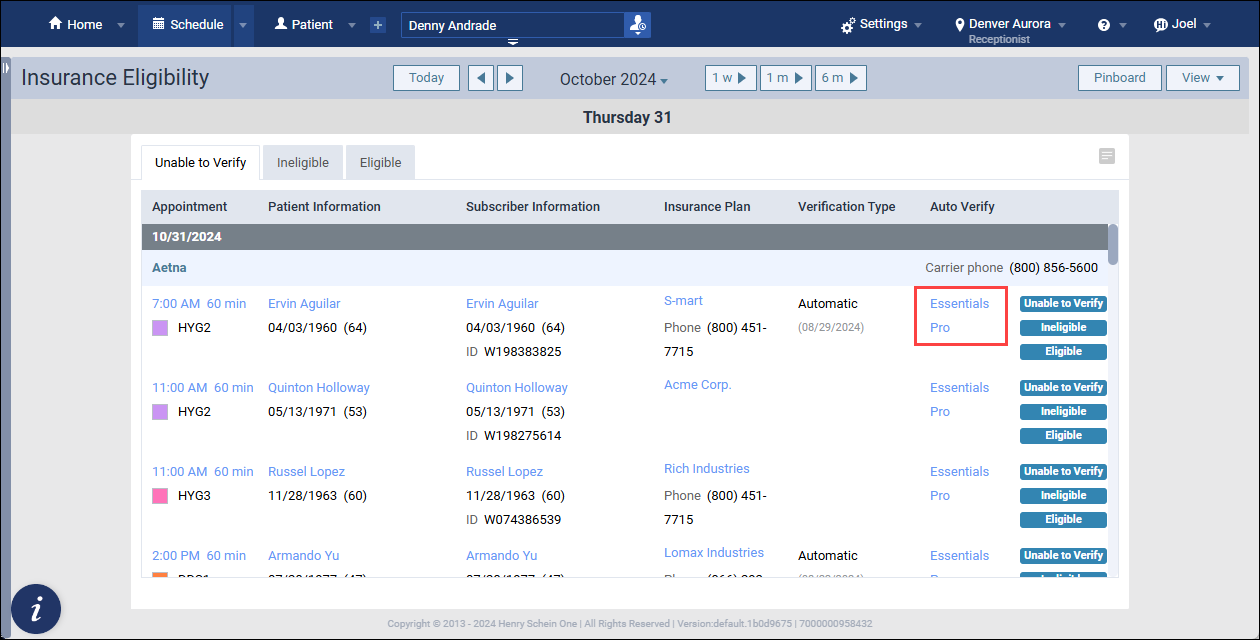
Note: Not all payers support both types of response. When one response type is not supported, the link will be grayed out.
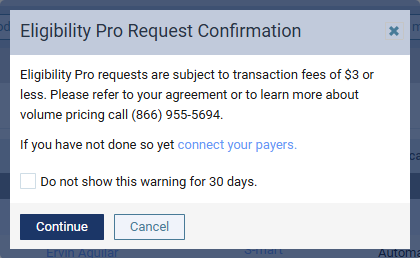
Note: Eligibility Pro requests require you to first enter your usernames and passwords for payer websites in the Payer Connection Portal. See the section below "Setting Up Payor Connections..." for more detail.
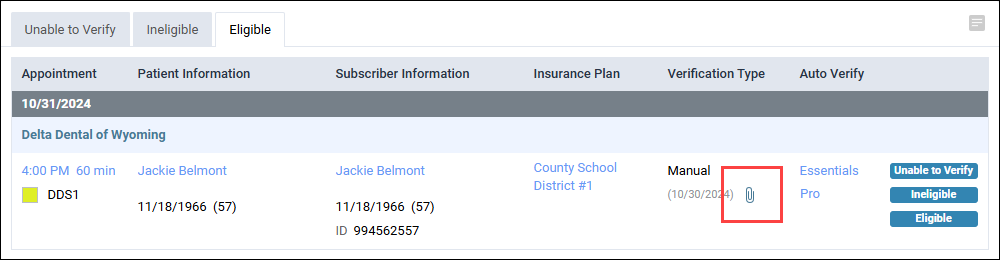
An activity icon will spin until the response returns, typically within a couple of minutes. To open the latest response, click the paperclip icon that appears.
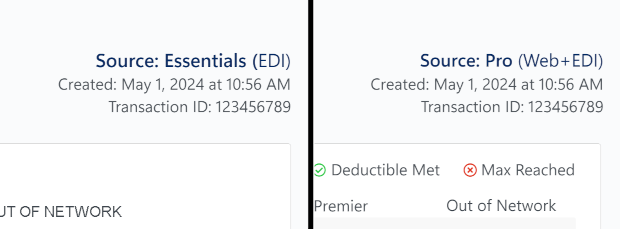
Eligibility Essentials submits the patient's information using the industry standard electronic data Interchange (EDI). No special credentials are necessary to make these requests.

With these requests, many carriers will send additional information with this check. Some carriers are generous with the information shared over an EDI request, but many are not. The amount and timeliness of the information can vary greatly from payer to payer.
In contrast, payers usually keep the information on their portals complete and up-to-date.
Eligibility Pro will check both sources. It will make a standard EDI request AND use your office's payer website usernames and passwords to check the insurance payer's web portal. Depending on what the payer includes on their portal, Eligibility Pro can often get details such as patient history, frequency limitations, and procedure-level coverage percentages.
When you view eligibility responses, look at the upper-left corner of the first page. The response type will clearly indicate either Eligibility Pro or Eligibility Essentials.
If you want more eligibility detail than payers routinely return with essential checks, you can request an enhanced eligibility check with Eligibility Pro. Eligibility Pro scours insurance portals, pulling in detailed data beyond traditional electronic responses, like patient history, frequency limitations, and covered percentages at the procedure code level. You can make on-demand Eligibility Pro checks for a small processing fee per request with no commitment, or you can choose a monthly package for a lower cost per request. To learn more, please call 1-866-955-5694.
Dentrix Ascend Eligibility Pro can retrieve more eligibility information for your patients, but only after you've set up the connection between your practice and the payers you work with. To allow Ascend to contact insurance payers on your behalf, the first step is to set up a connection in the Payer Connection Portal.
In the portal, you'll save your office's unique usernames and passwords that you use to access the payers' web portals. Ascend will use this information to retrieve your patient's eligibility status and plan benefit information.
Watch this short video to learn how to use the Payer Connection Portal (Duration 2:33)
Eligibility Essentials can help you update insurance benefits and coverage information. You'll save time and avoid the potential errors caused by manual data entry.
When you see a small red exclamation point on the letter E, it means there's an opportunity for you to import deductibles, maximums, coverages, or other benefit information directly into Dentrix Ascend without having to do any manual data entry.
Note: Importing benefits is an optional activity that requires the Import Insurance Benefit Details right.
To begin importing, click the eligibility icon.

The Import Insurance Benefit Details window opens. By clicking the tabs at the left, you can view different information. The sections below review each tab.
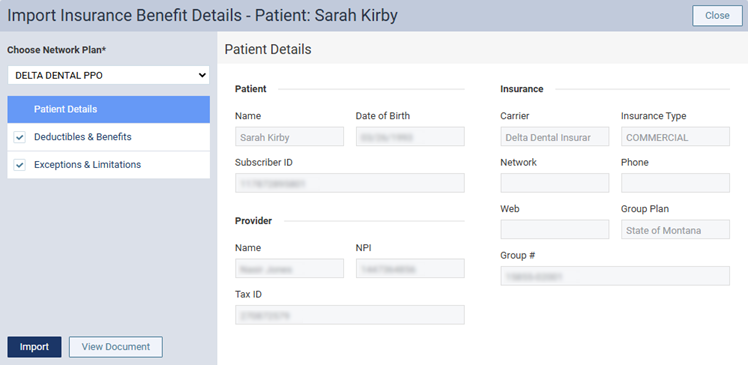
When eligibility results are received, they may include information for more than one type of insurance. Use the Choose Network Plan menu to select the type of plan that corresponds to the correct network status (such as in-network or out-of-network).
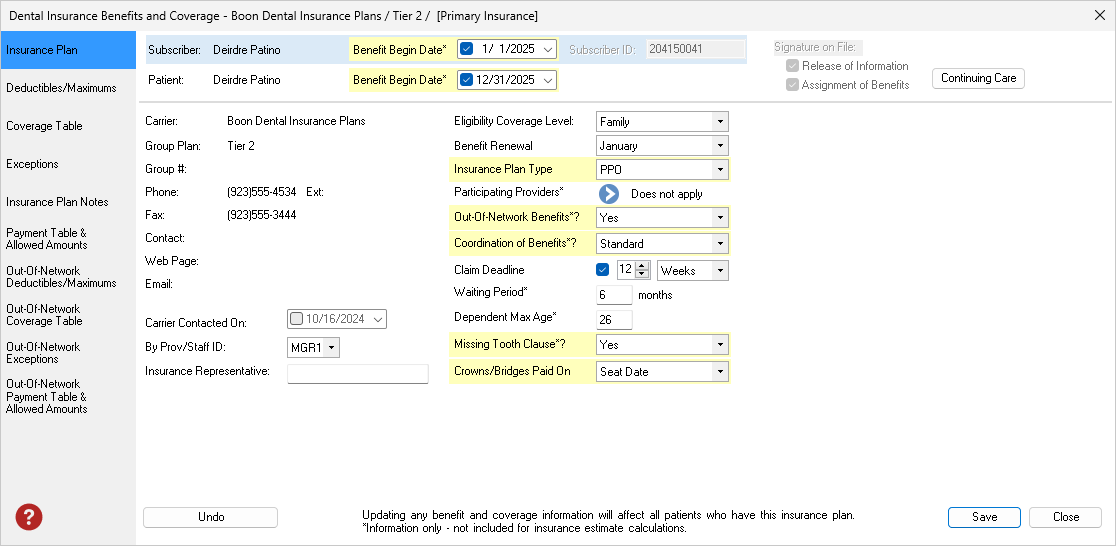
The Insurance Plan tab will display information about the plan.
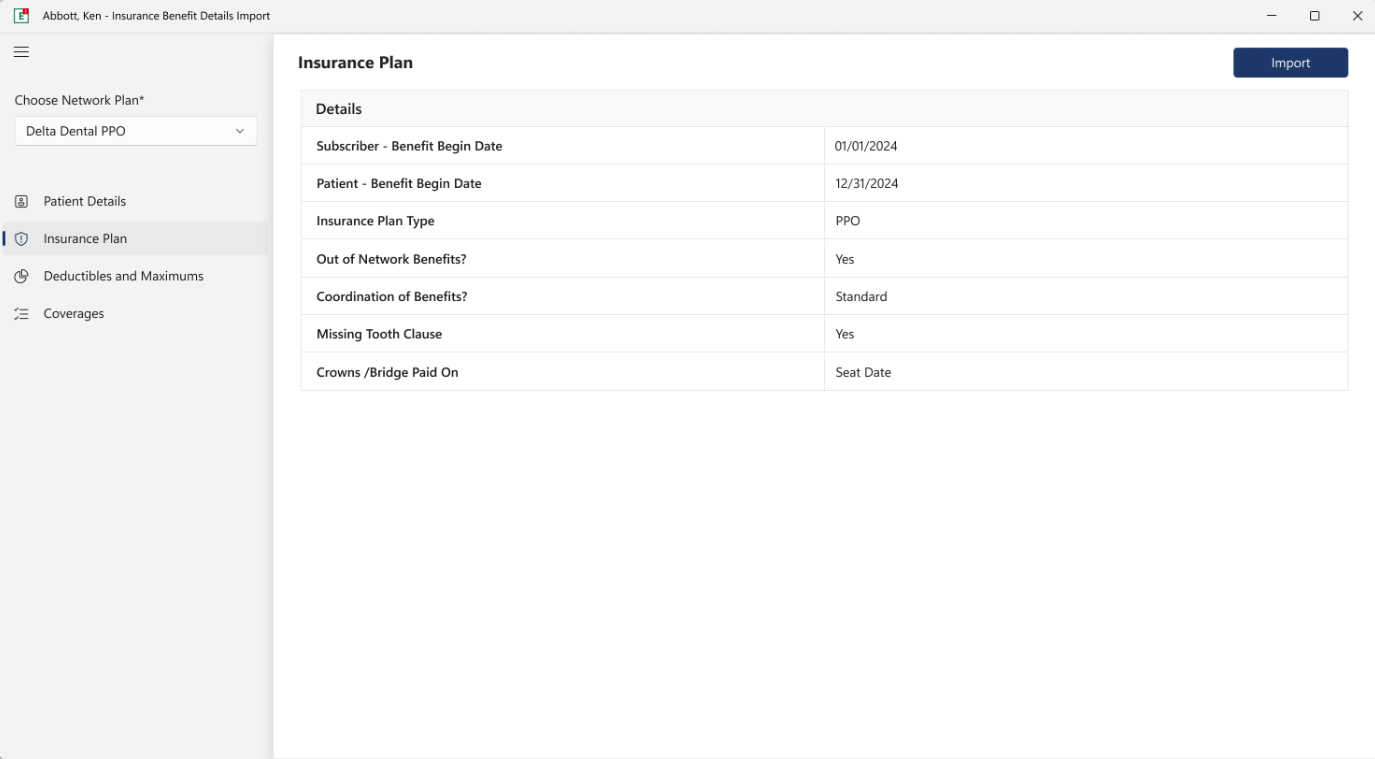
When imported, areas such as those illustrated below will be updated:
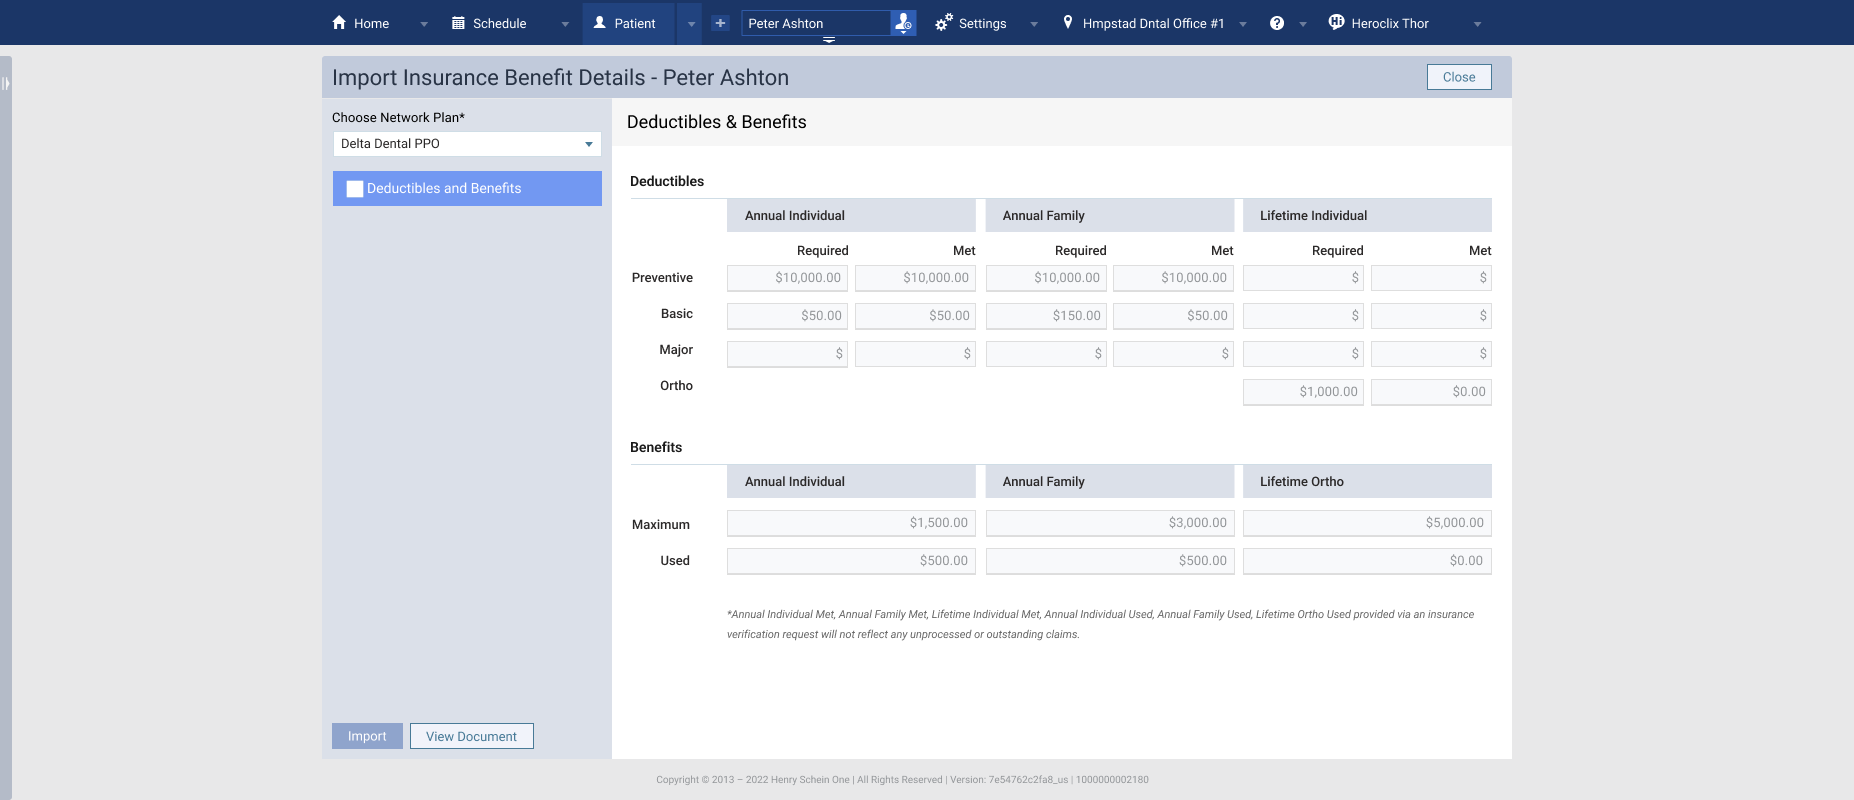
Click Deductibles and Benefits to see a proposed update to the patient's benefits table. This information will often include the deductibles met and the benefits used to date. Importing this information updates only this patient.
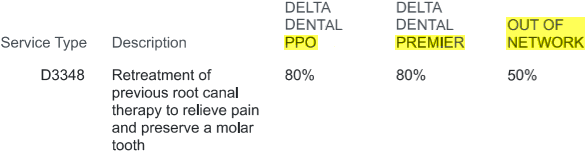
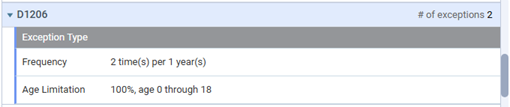
Click Exceptions & Limitations on the left to review the exceptions per procedure.
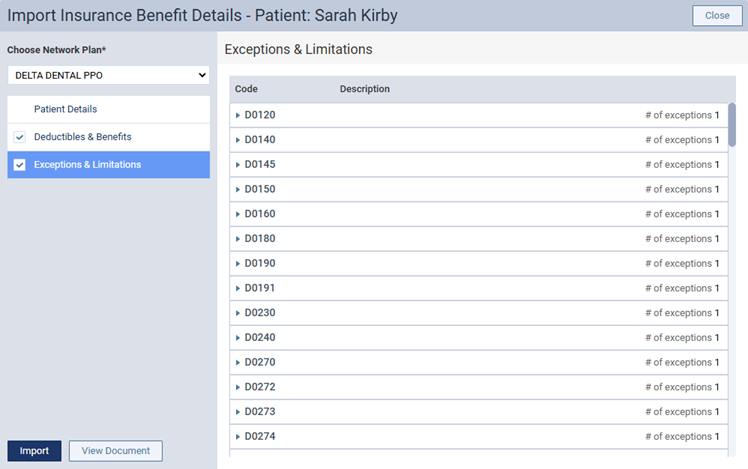
Note: The number of exceptions appears for each procedure in the list. To view the exceptions for a procedure and a description of each, click that procedure to expand it. An exception type can be one of "Frequency," "Age Limitation," or "Not Covered."
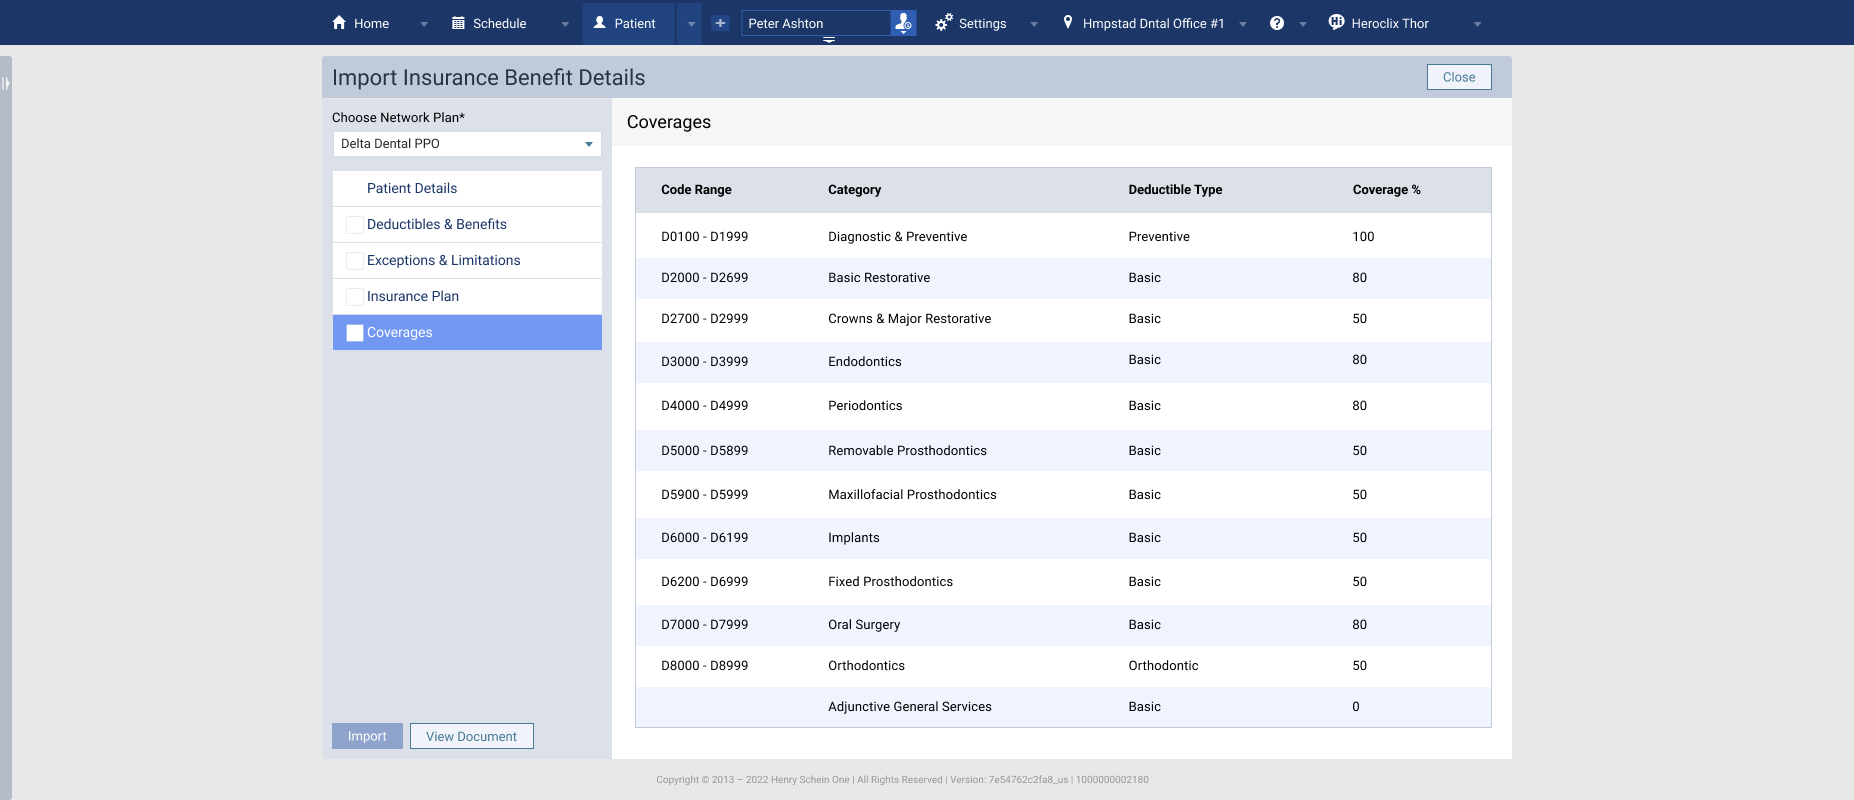
Click Coverages to see the proposed update to the plan's coverage table. Each category can be expanded for additional detail. Importing coverage information will affect all the patients tied to this insurance plan.
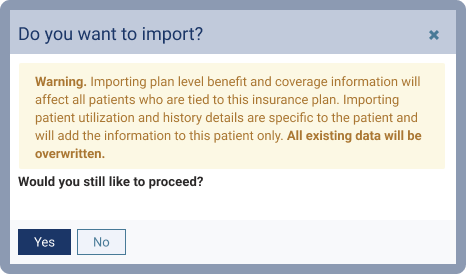
If you are ready to import Deductibles and Benefits, select the Deductibles and Benefits checkbox and click Import. At the confirmation prompt, click Yes.
When you exit the Import window without importing benefits, you'll be asked how you'd like Dentrix Ascend to handle the situation.
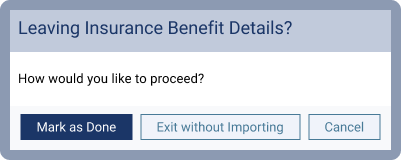
Mark as Done marks the import as complete, closes the window, and turns the E icon green.
![]()
Exit without Importing closes the window and leaves the E import icon so you can return to import later.
![]()
Cancel will exit from the import window and returns you to the import detail review.
An Eligibility Pro Usage Report details how many pro level responses your office receives each month.
1. Launch the Payor Connection Portal
In Dentrix Ascend, open Settings > Payer Connection Portal
2. Select the Eligibility Pro Usage Report tab.
For practices subscribed to an Eligibility Pro plan, the following columns are available:
Limit Status - indicates if your office is below, closely approaching, or exceeding the monthly allotment.
Usage - indicates the number of received Pro responses compared to the amount allotted each month.
Overage - indicates how many requests have been made exceeding the monthly allotment. These are billed as a separate charge above the monthly subscription price.
For practices subscribed to a Eligibility Essentials with Pro On Demand plan, the usage column will display the total pro requests made in that calendar month. The Limit Status and Overage columns will appear blank.
Responses included are only those that were requested as AND successfully returned as a Pro level response.
Responses that were returned at the Essentials level (EDI) do not count as Pro responses and will not be counted on the report.
If a Pro response was requested, but failed with any error, it is not reported or counted.
Example report of an office subscribed to an Eligibility Pro package with a monthly allotment of 300 Pro responses per month.
Example report of an office subscribed to an Eligibility Essentials with Pro On Demand, which does not include a monthly allotment of Pro responses.
Read the Eligibility Essentials and Pro FAQ.
View eligibility instructions in the Dentrix Ascend Help.
Use the Payer Search Tool to identify electronic connectivity for the Payers/Insurance companies you work with.