

|

Setting up printers 
Using the Document Center, you can print attached documents and images and a Document Center List. To learn more, click Printing documents or Exporting documents as files.
Note: To select a printer from the Document Center, you must install the printer in Microsoft Windows first.
To select a printer
1. In the Document Center, click Setup, and then click Printer.
The Printer Setup dialog box appears.
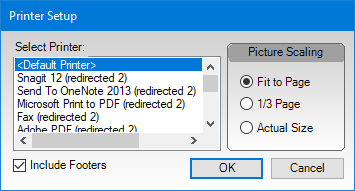
2. Select the printer that you want the Document Center to print to.
3. Select how you would like the Document Center to scale images.
· To fit the image to the whole page, click Fit to Page.
· To scale the image to 1/3 of the page, click1/3 Page.
· To print the image in the actual size that it was imported, click Actual Size.
Note: Printing in actual size may cause the document to be printed on more than one page.
4. To include footers on the printed page, select Include Footers.
Note: If you print from a patient’s Document Center, the footer will include the following information:
· The Reference Date
· The patient’s <last name>, <first name>, <middle initial>, (<preferred name>),(<Chart #>)
· The page number
This information will vary slightly based on the Document Center source selected ( provider/staff, dental insurance, patient, and so forth, for example.)
5. To save your selection, click OK.
The selected printer will remain the default for this computer until you choose another.