Setting up ePrescribe for a location
When you are setting up practice locations to use ePrescribe, you can choose from the locations entered in OMSVision. You can enable and disable access to ePrescribe for any location as needed.
Since ePrescribe uses the information as it is entered in OMSVision, if you are setting up a location to use ePrescribe, and there is missing or invalid information that is required, you must make the corrections to the location's information before you can set up ePrescribe for that location.
Also, for administrative purposes, each practice location that needs to have access to ePrescribe must be assigned to a group. Each group can have one main location and any number of satellite locations (members).
To set up ePrescribe for a location
Do one of the following:
From the Practice Locations Table window, click e-Rx Admin. The Administration- ePrescribe window opens to the Locations screen. Skip step 2.
From the Edit Practice Location dialog box, click e-Rx Admin. One of the following occurs:
If the location has not been assigned to a group yet, the Clinic Grouping dialog box appears. Proceed to step 2.
The Administration- ePrescribe window opens to the Location Details screen for the selected location. Skip steps 2 - 3.
If you are setting up the clinic for ePrescribe for the first time, complete this step.
Assign the clinic to a group:
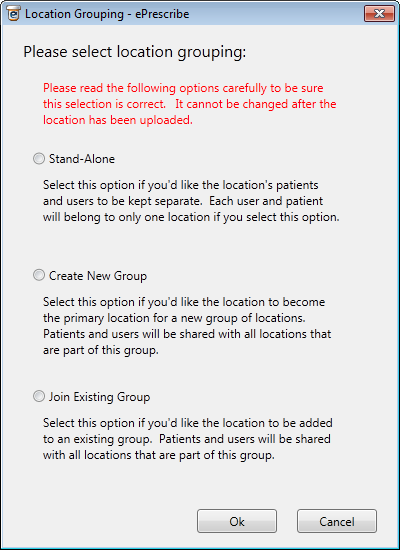
Select one of the following:
Stand-Alone - There is no cross-over of patients and providers between this location and other locations.
Create New Group - This is a primary location that can have cross-over of patients and providers between this and other locations. You will be able to associate other locations with this location's group. You must first create a group before you can add other locations to it. So, if no group has been created, and this location is not the primary one, click Cancel, and then return to this dialog box for the correct location to proceed.
Join Existing Group - This is a satellite location. You will be able to specify the group this location is a member of.
Click Ok.
The Administration- ePrescribe window opens to the Location Details screen for the location Skip step 3.
If you are viewing all locations on the Locations screen, complete this step.
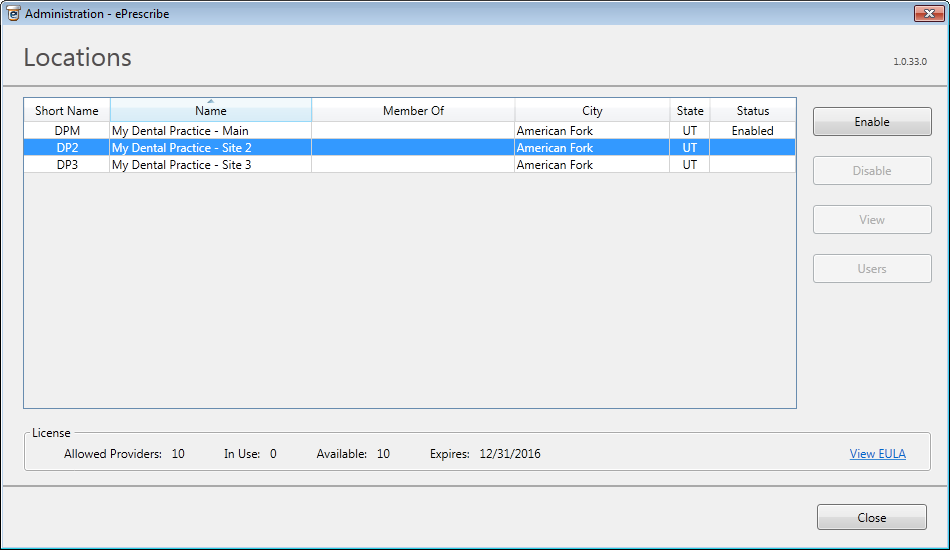
Select a location, and then do one of the following:
To enable the location to use ePrescribe, click Enable. The Location Details screen appears. Proceed to step 4.
To disable the location's access to ePrescribe if the location is enabled, click Disable. The Status changes to "Disabled." Ignore the steps that follow.
To view or edit the location details if the location is enabled, click View. The Location Details screen appears. Proceed to step 4.
To manage the users for ePrescribe at the location if the location is enabled, click Users.
If you are enabling a clinic or viewing a clinic's details on the Location Details screen, complete this step.
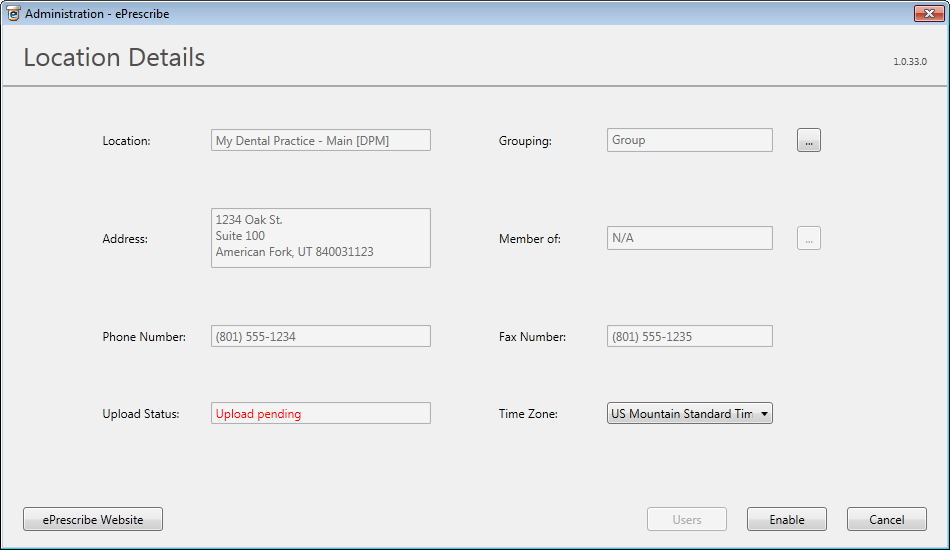
Set up or change the following options as applicable:
Grouping - If the location has not yet been enabled for ePrescribe, you can change the grouping. This option cannot be changed once a location has been enabled.
Member of - Click the search button  to select the group this clinic is a member of. This cannot be changed once a clinic has been enabled. For a primary or stand-alone clinic, this option is not available.
Time Zone - Select the time zone in which this location is situated.
Errors - You must correct any errors before you can save the clinic's details. So, if any field has an error icon ![]() next to it, click Cancel, correct the error, and then return to this screen.
next to it, click Cancel, correct the error, and then return to this screen.
Click one of the following buttons:
Disable/Enable - If the location has been enabled previously, to disable it, click Disable. If the location has never been enabled or has been disabled previously, to enable it, click Enable; and, on the message that appears and reminds you that the selected Grouping option cannot be undone once the location is enabled for ePrescribe, click Yes to upload the location's information to AllScripts.
Save - If you have changed the Time Zone for a location enabled previously, and if there are no errors, the Save button is available. Click it to upload the location information to AllScripts. This button is not available if the location is not enabled.
Users - To manage the users for ePrescribe at the location if the location is enabled, click this button. This button is not available if the location is not enabled.
Need more help?
You can visit our website or contact OMSVision Customer Support.