Adding and editing procedure (CPT) codes
A CPT code is a medical billing code that can be cross-coded with an ADA Procedure Code to bill a medical insurance carrier for that procedure. You can add and edit a CPT code as needed.
To add or edit a CPT code
1. From the File menu, point to Codes and Lists > Medical Codes, and then click Procedure (CPT) Codes.
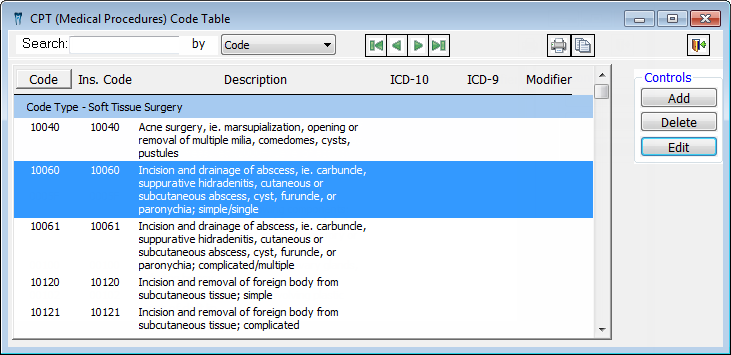
The CPT (Medical Procedures) Code Table window appears.

2. Do one of the following:
· To add a CPT code, click Add.
· To edit an existing CPT code, select a code, and then click Edit.
Tip: To quickly locate a CPT code, select whether you want to search by code or description, and then begin typing a code or description in the Search field. The first matching CPT code is selected in the list.
The Edit CPT Code dialog box appears.

Note: At the bottom of the Edit CPT dialog box, the number next to Posted allows you to see, at a glance, how many times an existing CPT procedure code has been posted.
3. Set up the following options:
· Code - Type the CPT code. If you are editing an existing CPT code, you cannot change this code. This field has a limit of five characters.
· Insurance Code - Type the code that you want to use to identify the CPT code. The insurance code can be the same as or different from the CPT code. This field has a limit of five characters.
· Description - Type the description for the CPT code.
· Fee Range - Type the starting and ending amounts for the fee schedule that pertains to the procedure in a $$$,$$$.$$ format.
· Global Surgical Package - Clear the check box to specify the number of days of follow-up treatment that is covered under the code without additional billing, and then select the number of Follow Up Days: 0, 7, 14, 30, 60, 90, or 120.
· Assistant surgeon allowed - Select this check box if an assistant surgeon is permitted to assist with this procedure.
· Defaults
· ICD-10
and ICD-9 Dx. Code - Next to ICD-10
Dx. Code, click the Search
button  to select and paste in a default diagnosis code (consisting of one ICD-10
code and/or one ICD-9 code). Click the Remove
button
  to remove any previous
selection.
· Modifier
- Click the Search button to select
and paste in a default medical modifier code. Click the Remove
button  to remove any previous
selection.
· Type - Select a default service type.
· RVUs - Enter the RVUs and Units/Minutes to set the default time values that will be used when scheduling an appointment for the procedure.
· Modifier - Specify whether the time value specified is in units (UN) or minutes (MJ).
· Pre-authorization
· Phone - Select this check box if you prefer the pre-authorization to be completed over the phone.
· Written - Select this check box if you prefer the pre-authorization to be completed on a written form.
4. Click OK.
Need more help?
You can visit our website, contact OMSVision Customer Support, or suggest a new feature or improvement on User Voice.


