

|
Aging Report
The Aging Report displays the total money owed to the office, broken down by the age of the debt: 0 - 30, 31 - 60, 61 - 90, 91 - 120, 121 - 150, 151 - 180, and 180 + days.
To run the Aging Report
1. From the Report menu, click Aging.
The Aging Report dialog box appears.

2. Click the desired report format:
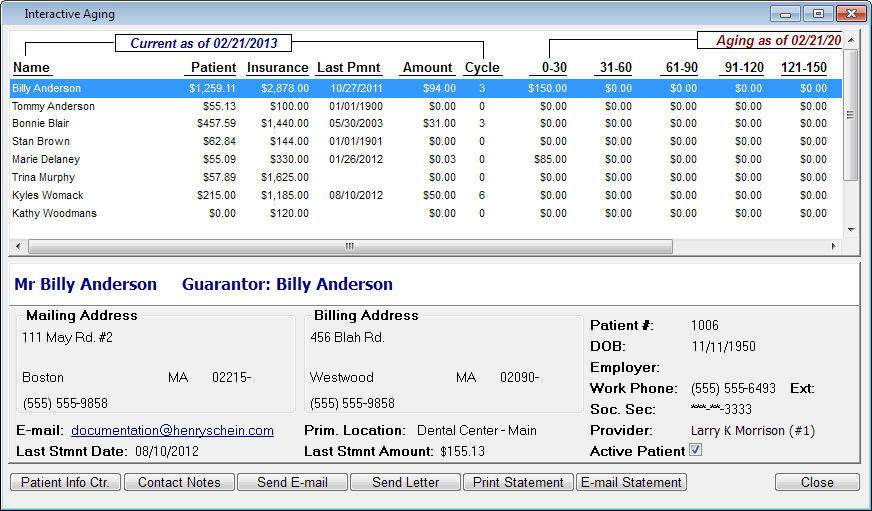
· Columnar displays a detailed break down by individual patient. This format includes the patient’s work and home phone numbers, patient and the insurance’s balances, patient type of the patient, patient’s guarantor and address, date and amount of the last payment, and cycle and aging of the debt.
· Summary displays only the grand total of all patient balances. Also, the totals of the patient and insurance's balances, aging, and total number of patients are included.
· The Interactive Aging report check box is available only when Columnar is selected. With this feature you can open a patient's Patient Information Center, enter contact notes, send an e-mail, open the Word Processor, print a quick statement, and send a quick statement by email.
3. In the Include which billing cycles list box you can select one or more billing cycles for which to filter the report (if All is cleared). To select all billing cycles, select All.
Note: You should select all the billing cycles except 4, which is for accounts that have been assigned to collections.
4. Under Include only patients with aged receivables over, in the Number of days box, enter the desired value to limit the report to only those patients owing balances over the indicated number of days. A value of zero indicates that this number is not factored into which patients appear on the Aging Report.
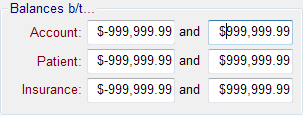
5. Under Balances b/t, enter the desired ranges of balances to limit the report to only those patients whose balances are within the specified ranges: Account (the patient owes the entire amount of completed work), Patient (the patient portion of charges billed to insurance), and Insurance (the insurance portion of charges billed to insurance).
Then, select one of the following options:
· Include both - To show patient and insurance balances.
· Include only patient - To include patients with balances in the specified ranges but not show insurance balances. Notice that with this option selected, the Insurance range is not available.
· Include only insurance - To include patients with balances in the specified ranges but not show patient balances. Notice that with this option selected, the Patient range is not available.
Notes:
· If you select the Ignore Credits option, any credits on the account are ignored when determining which accounts to include in the report.
· You should not change the ranges for Patient or Insurance. The range for both should be set to -999,999.99 and 999,999.99.
· To set up the aging report, use the following ranges:
· All balances and credits
· Balances only

· Credits only

6. Set up how you want to filter the reports using the standard filter tabs. If you filter the Aging Report by patient types, you can select From Patient to use the patient types on the General tab of patients' Patient Information Centers or From Ledger to use the patient types of patients when procedures were posted in patients' Ledgers.
7. Set up any of the following options:
· Sort, Group and Subtotal By - Select Alpha Sort, Provider, Location, or Transaction location to indicate how you want the report sorted, grouped, and subtotaled. If you backdate the Closing Date box on the Providers/Dates tab, the Transaction Location option becomes unavailable. All these options are unavailable if the Interactive check box is selected.
· Include contact notes - Select this check box if you want to include contact notes from the patients' records. This option is unavailable if the Interactive check box is selected.
· Include inactive patients - Select this check box if you want to include inactive patients on the report.
· Exclude terminated insurances - Select this check box if you want exclude from the report accounts where the patient's insurance has been terminated.
· Reverse order of aging buckets - Select this check box if you want the aging to appear in reverse order.
· Send letter - Select this check box if you want to generate letters for every patient that appears on the Aging Report. After the Aging Report is generated, the word processor opens.
· Add marker - Select this check box if you want to add a marker to accounts that show on the Aging Report. Select the desired marker from the list.
· Statement sent in last (number of days) - Select this check box to show only accounts on the Aging Report with statements that have been sent within a specified number of days. Set the number of days in the box.
· Save settings for next time - Select this check box if you want to save any options you have changed for the next time you run the Aging Report.
8. Click OK.
Need more help?
You can visit our website, contact OMSVision Customer Support, or suggest a new feature or improvement on User Voice.