Setting up field properties
You can customize the access level for many of the dialog boxes, buttons, fields, boxes, radio buttons, check boxes, and lists in the program.
Note: OMSVision Customer Support is not responsible for determining the access levels offices need to define for each software feature in order to maintain proper security and HIPAA compliance. Each office is responsible for their own security policy and HIPAA compliance.
To customize security for a dialog box or a button that opens a dialog box
From the File menu, click Security. This option is available only if your user account has an access level of nine.
Note: OMSVision Customer Support is not responsible for determining the access levels offices need to define for each software feature in order to maintain proper security and HIPAA compliance. Each office is responsible for their own security policy and HIPAA compliance.
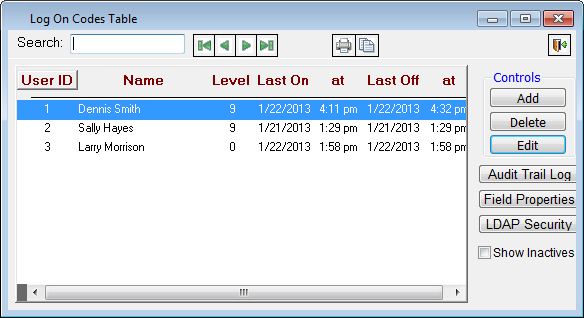
The Log On Codes Table window appears.
Open a dialog box that you want to add or change the access level for.
When a message appears, enter the minimum access level users need to have to open the dialog box.
Note: OMSVision Customer Support is not responsible for determining the access levels offices need to define for each software feature in order to maintain proper security and HIPAA compliance. Each office is responsible for their own security policy and HIPAA compliance.
Click OK to close the dialog box and return to the Log On Codes Table window.
Close the Log On Codes Table window.
When a message appears, click OK.
From the File menu, click Log On/Off to log off. Have all other users log off, too.
Notes:
The security changes will take effect once you log off and then back on.
When a user that does not meet the minimum access level requirement for a dialog box has logged on (depending on which dialog box has been restricted), the user will not see the toolbar button or menu bar option that corresponds to the dialog box that the user is prohibited from accessing, or a dialog box will appear that states that access is denied.
Note: OMSVision Customer Support is not responsible for determining the access levels offices need to define for each software feature in order to maintain proper security and HIPAA compliance. Each office is responsible for their own security policy and HIPAA compliance.
To customize security for fields, check boxes, lists, and other options
To set up the preference to allow or disallow the changing of access level for field properties, from the Utilities menu, click Preferences, click the Operation tab, locate the Security section, select Field Properties On, and then click Ok.
Note: OMSVision Customer Support is not responsible for determining the access levels offices need to define for each software feature in order to maintain proper security and HIPAA compliance. Each office is responsible for their own security policy and HIPAA compliance.
Open a dialog box or window that has a field that you want to add or change the access level for.
Click the desired option.
From the File menu, click Security. This option is available only if your user account has an access level of nine.
Note: OMSVision Customer Support is not responsible for determining the access levels offices need to define for each software feature in order to maintain proper security and HIPAA compliance. Each office is responsible for their own security policy and HIPAA compliance.
The Log On Codes Table window appears.
Click Field Properties.
The Set Field Properties dialog box appears if you can set an access level for the selected data entry option.
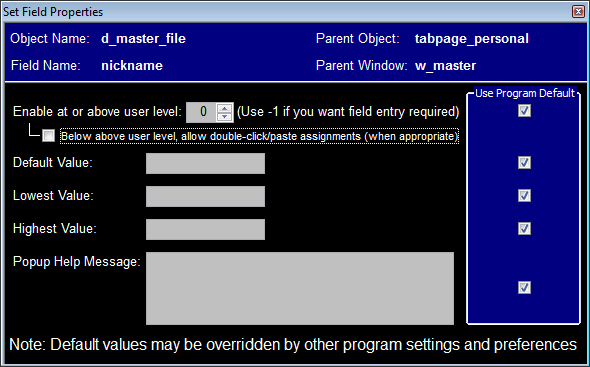
Tip: The top section contains information about the data entry option that you have chosen to set an access level for. The descriptions are programming codes used during the creation of the program. The Field Name description references which option you are accessing. Ignore the descriptions: Object Name, Parent Object, and Parent Window. Verify that you are setting the field properties for the correct data entry option.
Note: OMSVision Customer Support is not responsible for determining the access levels offices need to define for each software feature in order to maintain proper security and HIPAA compliance. Each office is responsible for their own security policy and HIPAA compliance.
Set up any of the following options:
Enable at or above user level – Clear the check box in the Use Program Default column to the right of Enable at or above user level to change the minimum access level required to use the chosen data entry option. Then, enter an access level in the Enable at or above user level box.
Note: OMSVision Customer Support is not responsible for determining the access levels offices need to define for each software feature in order to maintain proper security and HIPAA compliance. Each office is responsible for their own security policy and HIPAA compliance.
Note: In some cases, you might want to make data entry for a data entry option required before closing and saving information in a dialog box. Data entry options in that dialog box will be displayed with a yellow background if they are required. To make a data entry option required, type the number -1 as the value in the Enable at or above user level field.
Below above user level, allow double-click/paste assignments (when appropriate) – Select this check box to force users with an access level below the level set for Enable at or above user level to double-click in a field to select and paste in a value (if applicable). No typing will be allowed in the field for which you are setting the field properties.
Note: OMSVision Customer Support is not responsible for determining the access levels offices need to define for each software feature in order to maintain proper security and HIPAA compliance. Each office is responsible for their own security policy and HIPAA compliance.
Default Value – Clear the check box in the Use Program Default column to the right of Default Value to change the value that you want the data entry option to default to. Then, type the a value in the Default Value field.
Lowest Value – Clear the check box in the Use Program Default column to the right of Lowest Value to specify the lowest value the data entry option can have. Then, type a value in the Lowest Value field.
Highest Value – Clear the check box in the Use Program Default column to the right of Highest Value to specify the highest value the data entry option can have. Then, type a value in the Highest Value field.
Popup Help Message – Clear the check box in the Use Program Default column to the right of Popup Help Message to create or append text to a tooltip (a message that appears when you position the mouse pointer over a data entry option). Then, type a value in the Popup Help Message field.
Note: Whether or not tooltips will appear in the program is controlled by the preference Use Help Tips (on the Operation tab of the Preferences dialog box). Also, there are some preferences and program settings that can override the values you change in the Set Field Properties dialog box.
Close the Set Field Properties dialog box. Changes are saved automatically.
To set the access level for other data entry options that are in the same dialog box you were in when you changed the last data entry option, click the desired option, and then repeat steps 6–7.
Note: OMSVision Customer Support is not responsible for determining the access levels offices need to define for each software feature in order to maintain proper security and HIPAA compliance. Each office is responsible for their own security policy and HIPAA compliance.
Tip: There is no need to close the Log On Codes Table window in between each change in an access level for a data entry option if those options are in the same window.
Close the window or dialog box in which you have been changing access levels.
When a message appears, click OK.
From the File menu, click Log On/Off to log off. Have all other users log off, too.
Note: The security changes will take effect once all users log off and then back on.
Need more help?
You can visit our website or contact OMSVision Customer Support.