Registering new patients
In OMSVision, you can register new patients when they arrive at your office. Registering a patient creates a Patient Information Center (patient record) for that patient. You can register a new patient without pre-registering him or her first.
To register a patient
From the File menu, click Patient Processing.
The Patient Lookup dialog box appears.
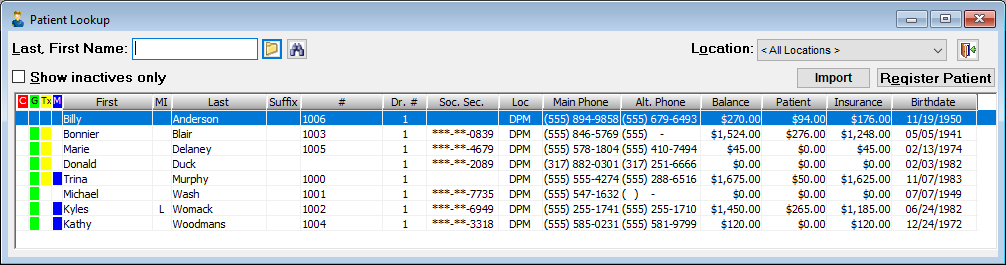
Search for the patient to verify that the patient is not already registered.
Do one of the following:
If the patient exists in the database, do not attempt to register the patient. Ignore the steps that follow.
If the patient does not exist in the database, click Register Patient. Proceed to step 4.
The Register New Patient dialog box appears.
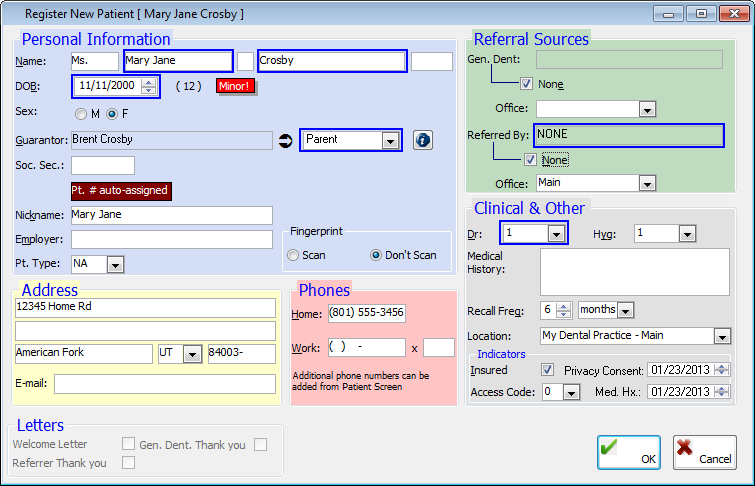
Set up the options in each section:
Personal Information:
Name - If the patient is pre-registered and is a brand new patient, double-click in the field to select and paste in the patient name and any other information that was entered previously for the pre-registered patient. Otherwise, type the patient's first and last name. If applicable, type a middle initial, select a prefix, and select a suffix or title.
DOB - Type the patient's date of birth in a dd/mm/yyyy format.
Sex - Select M (Male) or F (Female) to specify the patient's gender.
Guarantor - If the guarantor is not the current patient, double-click in the field to select and paste in the patient's guarantor. Then, select the guarantor's relationship to the patient.
If the guarantor is not a patient, create a non-patient guarantor record.
Soc. Sec. - Type the patient's Social Security number.
Nickname - Type the patient's nickname, if different than the first name.
Employer - Type the patient's employer, or if the patient is a full-time student, type the name of the school the patient is attending.
Pt. Type - Select a patient type.
Fingerprint - Select Scan to allow fingerprint scanning to be used to access the patient's account or Don't Scan if fingerprint scanning is not going to be used.
Address
Home address - Type the patient's street address, city, state, and ZIP Code. Each street address field is limited to 50 characters. If you double-click in the ZIP Code field to select and paste in a ZIP Code, the city and state fields will be populated automatically.
E-mail - Type the patient's email address. This field has a limit of 50 characters.
Phones
Home - Type the patient's home phone number.
Work - Type the patient's phone number and extension (if applicable).
Referral Sources
Gen. Dent – To attach the referring general dentist, double-click in the Gen. Dent field to select and paste in the general dentist, and then select the general dentist's Office (the office where he or she works). If a general dentist selection is available and required (according to the preference settings), but there is no general dentist, select the None check box.
Note: The selected general dentist, contact phone number (if entered for the general dentist), and office are included in the Comments field of the Edit Appointment dialog box of the patient's appointment (if one is scheduled) and carry over to the patient's record during the registration process.
Referred By – To attach the referral source, double-click in the Referred By field to select and paste in the referral source, and then select the referrer's Office (the office where he or she works). If there is not a referral source, select the None check box.
Note: The selected location will carry over to the patient's record during the registration process.
Clinical & Other
Dr - Select the patient's provider.
Hyg - Select the patient's hygienist.
Med Hx Alert - Type the patient's important medical history, or double-click in the field to select and paste in a medical history code.
Recall Freq - Enter the patient's recall frequency to set the number of days, weeks, months, or years in which the patient is to return to the office, and then select Days, Weeks, Months, or Years. Enter 0 if you are not tracking recall for the patient. The default recall frequency is determined by a preference setting.
Location - Select where the patient is being seen. By default, the location you are currently logged on to is selected.
Insured - Select this check box if the patient has insurance.
Access Code - Select the appropriate access level to allow only users that meet the minimum security access requirement to view this patient's Patient Information Center. By default, 0 is selected, which means all users may access the account.
Note: OMSVision Customer Support is not responsible for determining the access levels offices need to define for each software feature in order to maintain proper security and HIPAA compliance. Each office is responsible for their own security policy and HIPAA compliance.
Privacy Consent - Enter the date the privacy consent form was signed by the patient in a mm/dd/yyyy format. By default, the current date is entered.
Med. Hx. - Enter the date the medical history form was filled out and signed by the patient in a mm/dd/yyyy format. By default, the current date is entered)
Select the check boxes of any Letters that you want to print for the patient: Welcome Letter, Referrer Thank you, and/or Gen. Dent. Thank you.
Click OK to register the patient and open the Patient Information Center.
Need more help?
You can visit our website or contact OMSVision Customer Support.