
Case notes
You can attach case notes to a patient's record.
To add or edit the case notes
In a patient's Patient Information Center, on the Control Panel, under Actions, click Case notes.
The Case Notes window appears.
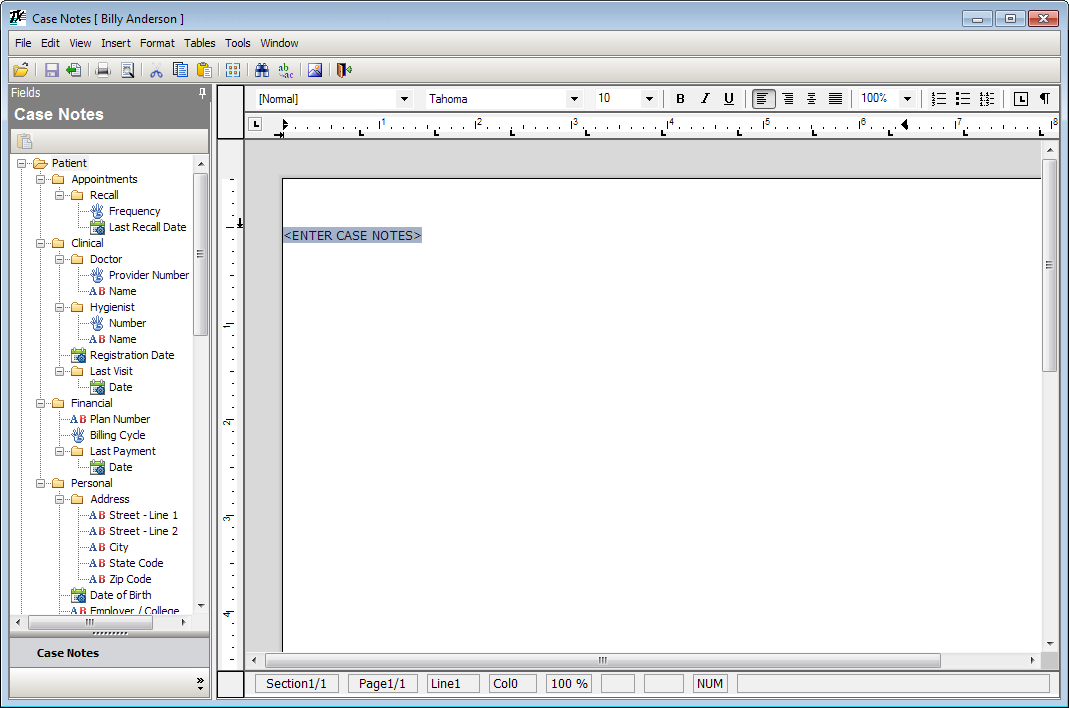
Type any notes on the page.
With the text cursor located where you want to insert information on the page, from the Fields panel, double-click a merge field to insert the corresponding value into the document. The following data is available:
|
Patient's Last Recall Date Patient's Recall Frequency Provider Number of Patient's Regular Doctor Name of Patient's Regular Doctor Provider Number of Patient's Regular Hygienist Name of Patient's Regular Hygienist Patient's Registration Date Patient's Last Visit Date Patient's Plan Number Patient's Billing Cycle Patient's Last Payment Date Patient's Street Patient's City Patient's State Patient's ZIP Code Patient's Date of Birth Patient's Employer or College Patient's First Name Patient's Last Name Prefix to Patient's Name Patient's Nickname Patient's Middle Initial Suffix to Patient's Name Patient's Patient Number Prefix to Name of Patient's Guarantor First Name of Patient's Guarantor |
Last Name of Patient's Guarantor Patient's Social Security Number Patient's Home Phone Patient's Work Phone Patient's Work Phone Extension First Name of Patient's Referrer Last Name of Patient's Referrer Nickname of Patient's Referrer Practice of Patient's Referrer Credentials of Patient's Referrer UPIN of Patient's Referrer Specialty of Patient's Referrer Prefix to Name of Patient's Referrer First Name of Patient's General Dentist Last Name of Patient's General Dentist Nickname of Patient's General Dentist Practice of Patient's General Dentist Credentials of Patient's General Dentist UPIN of Patient's General Dentist Specialty of Patient's General Dentist Prefix to Name of Patient's General Dentist Current Date Current Time Current Date (Short Format) Current Day of the Week |
Repeat this step as needed to insert any additional information.
Do any of the following as needed:
To change any selected font, from the first list, select [Normal] or [Use Paragraph Font]. To change the font family of any selected font, from the second list, select the desired font family. To change the font size of any selected text, from the third list, select the desired value. To change the character attributes of any highlighted text, click B, I, or U to bold, italicize, or underline the text.
To change the alignment of any highlighted text, click the left align, center align, or right align button.
To change to zoom amount, type the desired percentage in the field provided in the upper-right corner.
To copy text to the document, highlight any text, and then click Copy to copy the text to the Windows Clipboard. Next, put the text cursor at the desired place on the page, and then click Paste to insert text from the Windows Clipboard into the document.
To insert a graphic, put your text cursor at the desired place on the page, and then click Insert Picture to browse for and insert a graphic from your computer or a networked computer into the document.
Type the desired value, in inches, for the margins in the Left and Right fields.
To change the indentation for any highlighted lines of text, type the desired value, in inches, in the Indent field. Line and Character indicate the position of the text cursor in the document.
Click Print to preview the document.
Click Save Changes to save the document.
When you are finished viewing or editing the document, close the Case Notes window.
Need more help?
You can visit our website or contact OMSVision Customer Support.