Customizing insertable tables
You can customize the tables for merging patient information into narratives.
To customize an insertable table
In the EHR Narrative Edit window, under EHR Case Fields, right-click an insertable table merge variable, and then click Edit Option.
The Insertable Tables window appears.
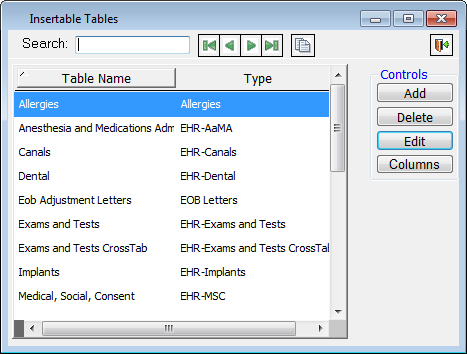
Select a table, and then click Edit.
The Edit Insertable Table dialog box appears.
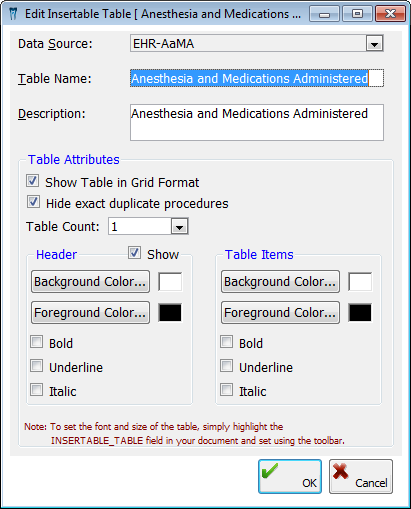
Note: You cannot change the selected source.
Set up the following options:
Table Name - Type a name for the table. This field has a limit of 30 characters.
Description - Type a description for the table.
Table Attributes:
Show Table in Grid Format - Select this check box to show the table in a grid format (a table with borders around the cells).
Hide exact duplicate procedures - Bundles duplicate procedure codes (such as anesthesia codes) so they appear in a narrative only once followed by the quantity.
Note: The bundling of anesthesia codes may simplify the narrative by showing a given anesthesia code once and specifying how many of that code there are. For example, in EHR, if you enter anesthesia code A at the beginning of anesthesia and then enter code B at each 15-minute interval of anesthesia, when you insert the anesthesia table into the EHR narrative, code B will appear once with the number of times that code was used.
Table Count - If 1 (the default) is selected, the table will appear on one line of the narrative and might not all fit on the page. To allow the table to break to a second line if it reaches the right margin of the narrative document and more columns need to be displayed, select 2.
Header:
Show - Select this check box to allow the header to be shown at the top of the table.
Background Color and Foreground Color - Click these buttons to choose the background and foreground colors of the header.
Bold, Underline, and Italic - Select any of these check boxes to set the font attributes of the header text.
Table Items:
Background Color and Foreground Color - Click these buttons to choose the background and foreground colors of the table items.
Bold, Underline, and Italic - Select any of these boxes to set the font attributes of the table items.
Click OK.
Need more help?
You can visit our website or contact OMSVision Customer Support.