Adding and editing configurations
A configuration is an appointment book that consists of a group of columns. Think of each configuration as a separate appointment book (for example, two practice locations would have an appointment book for each location). You can have a configuration for a particular doctor, hygienist, or location to view the Appointment Book in different ways.
To add or edit a configuration
In the Appointment Book, from the Tools button menu, click Configurations.
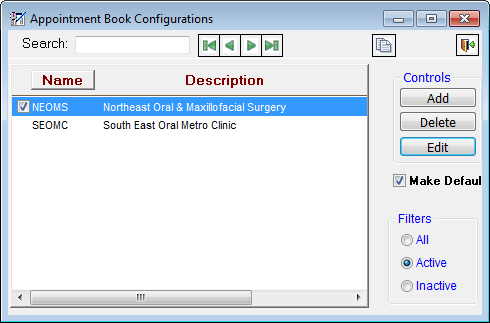
The Appointment Book Configurations window appears.
Do one of the following:
To add a configuration, click Add.
To edit an existing configuration, select a configuration, and then click Edit.
The Appointment Book Configuration dialog box appears.
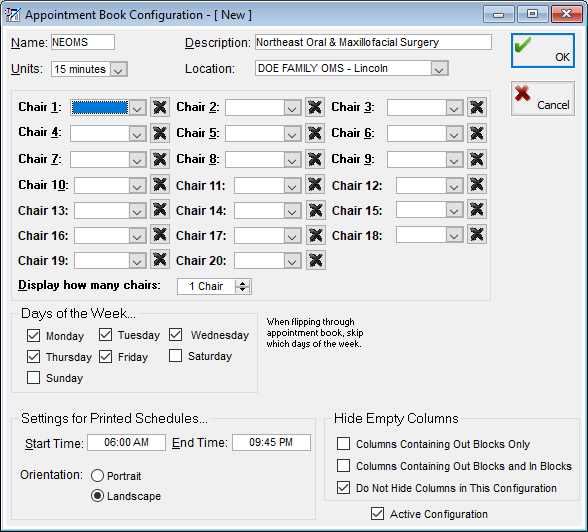
Set up the following options:
Name – Type the name for the configuration. This field has a limit of 10 characters.
Description – Type the description for the configuration. This field has a limit of 40 characters.
Units – Select the scheduling increments to use for the columns associated with this configuration. You can split Appointment Book time slots into 5-minute, 10-minute, 15-minute, or 30-minute increments.
Location – Select the location to associate with the configuration. To set up a configuration with columns from any location, select "<All Locations>" from the list.
Column 1 – 20 – For each column, select a column that has been set up previously. A configuration can have up to 20 columns.
Display how many columns – Enter the number of columns that you want to have displayed for the configuration in the Appointment Book.
Days of the Week – Select the days of the week that you want to use this configuration. The days that are not selected will be skipped as you flip through the Appointment Book; however, you can still access those days by entering the corresponding dates in the date field in the Appointment Book.
Settings for Printed Schedules:
Start Time – This is the starting time that you want to use when printing the Appointment Book. Double-click in the field to choose the time. This does not affect the times that are visible in the Appointment Book.
End Time – This is the ending time that you want to use when printing the Appointment Book. Double-click in the field to choose the time. This does not affect the times that are visible in the Appointment Book.
Orientation – Select whether you want to print the schedule with a portrait or landscape page orientation.
Hide Empty Chairs - Specify the default display option for this configuration if any columns do not have appointments scheduled in them:
Chairs Containing Out Blocks Only - Hide columns without appointments only if those columns contain only "out" blocks.
Chairs Containing Out Blocks and In Blocks - Hide columns without appointments only if those columns contain "out" blocks and "in" blocks.
Do Not Hide Chairs in This Configuration - Show all columns (with or without appointments).
Active Configuration - If this configuration is to be used in the Appointment Book, select the check box. If you inactivate a configuration by clearing this check box, you will still be able to view the configuration.
Click OK.
Need more help?
You can visit our website or contact OMSVision Customer Support.