

|
Related transactions
You can open a Ledger entry to view more information and options.
To view related transactions
1. On the Ledger tab, select the procedure that you want to view related transactions for.
2. Double-click that procedure on the Ledger, or right-click the procedure item and then click Magnify on the shortcut menu.
Note: If more than one procedure item is selected, the Magnify option is not available.
The Related Transactions dialog box appears. The procedure and all of the Ledger transactions related to that procedure are shown.
![]()
3. Perform any of the following actions:
· Edit - Click the procedure that you want to edit, and then click Edit.
The Edit Procedure dialog box appears.
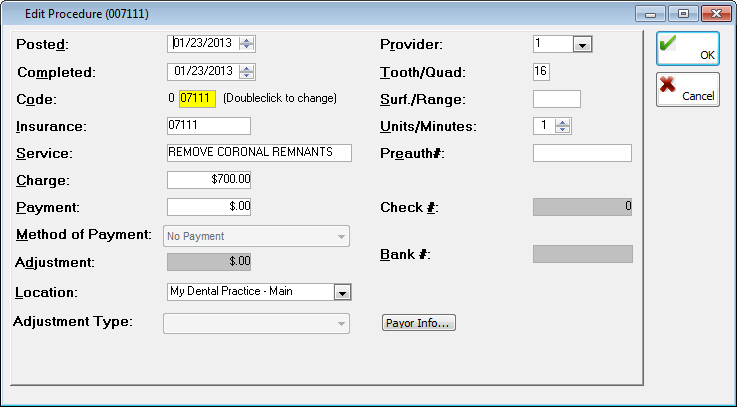
You can change the following information:
· Posted date - After highlighting a month, day, or year, increase or decrease the value of the date the transaction was posted.
· Completed date - After highlighting a month, day, or year, increase or decrease the value of the date the procedure was completed.
· Code - Double-click in the field to select and paste in a different procedure code from the fee schedule. If you change the Code, the amount in the Charge field changes automatically to the correct fee (the fee that corresponds to the selected procedure code).
· Insurance - By default, the appropriate five-digit insurance code associated with the internal procedure code appears in this field, but you can type a different code that you might want to appear on claims.
· Service - By default, the appropriate service description for the code appears in this field, but you can type a different description. The maximum length for the service is 35 characters.
· Charge - By default, the appropriate charge for the service appears in this field, but you can type a different charge in a $$,$$$,$$$.$$ format.
· Payment - If needed, type a different payment amount in a $$,$$$,$$$.$$ format.
· Method of Payment - Select the desired method of payment: Dental Credit Card, Master Card, Visa, Cash, Check/Money Order, ACH, Other, No Payment, HUHS Insurance Pmnt, or <None>.
· Adjustment - If an adjustment has been made, this field is available. You can type a different adjustment amount in a $$,$$$,$$$.$$ format.
· Location - Select the location for the transaction.
· Adjustment Type - By default, the appropriate adjustment type for any adjustment previously entered is selected, but you can expand the list to select a different type.
· Provider - Select the desired provider.
· Tooth/Quad - Type a tooth number or quadrant.
· Surf./Range - Type a tooth surface or range.
· Time Units - By default the appropriate appointment units for the service appears, but you can increase or decrease the number of units.
· Preauth# - Type a pre-treatment authorization number.
· Check # - If a payment was made by check, you can type a different check number.
· Bank # - If desired, type the bank number from the payment check. Any number entered in this field will appear on deposit slips.
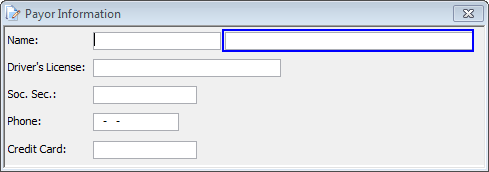
· Payor Info - Depending on the transaction, this button will be may be available. Click this button to type a name, driver's license number, Social Security number, phone number, and credit card number.
If you edit a transaction that was entered in the past, the accuracy of your day sheets, production reports, allocation reports, and so on are affected. You will need to re-generate the appropriate reports. Also, you may need to resubmit the claim for the procedure.
· Delete - Click the procedure that you want to delete, and then click Delete.
A message appears and informs you that some reports are affected if the transaction was entered in the past. Then, another message appears with an explanation that all payments and adjustments related to the procedure will be deleted and asks you to confirm that you want to delete the procedure. Click Yes on both of those dialog boxes to delete the procedure.
If you delete a transaction that was entered in the past, the accuracy of your day sheets, production reports, allocation reports, and so on will be affected. You will need to re-generate the appropriate reports. Also, you may need to resubmit the claim for the procedure.
· Adjust - Click this button to make an adjustment for the transaction. An adjustment can only be applied to a patient balance. So, for a patient without a patient balance and who has an outstanding claim, once an insurance payment is received and an amount is transferred to the patient balance, any adjustment amount will be applied to the patient balance.
· Resubmit - Click this button to open the Resubmit Procedure dialog box.

You can set up the following options:
· Select a method to send claim - Click Printed or Electronic, and select Print now and/or Update claim.
· Use which carriers - Click Current, Original, or Choose. If you select Choose, a dialog box appears from which you can select the carriers for the claim.
· Select what to submit - Select Primary, Secondary, Tertiary, and/or Quaternary (all options might not be available), and/or Submit all completed work for this claim.
· Customize claim - From the Place of Service list, select the desired service code. Select what to show in box 49 on the ADA claim form. Click Claim Extras to open a dialog box from which you can further customize the claim. Click Narrative to open a dialog box from which you can add, append, or change the narrative that is to be attached to the claim.
· Attachments - To add attachments to the claim for this procedure, click this button.
Click OK to save any changes.
· Pre-Authorization # - Type the pre-authorization number.
· Transfer - If there is an amount from a balance available for transfer, click this button to open the Insurance Transfer for dialog box to move an amount from the insurance's balance to the patient's balance or vice versa.
![]()
The following options are available:
· Transfer to - Select where the amount from the balance is to be moved: Insurance or Patient.
· Which Carrier - Select which carrier the amount from the balance will be transferred to or from (All options might not be active).
· Amount - Enter the amount from the balance that you want to move.
· Create Claim - Select this check box if you want a claim to be generated automatically. If you transfer a balance for a transaction that was entered in the past, the accuracy of your day sheets, production reports, allocation reports, and so on will be affected. You will need to re-generate the appropriate reports.
Note: Transfers between patients and insurance appear as line items in patient's ledgers (on the Ledger tab of the PIC). If a certain preference is enabled, a Display transfers check box appears at the top of the Ledger Card section that allows you to show or hide transfers by clearing or selecting that check box.
Click OK to save any changes.
· Claim Stat. - Click this button to open the Change Claim Status dialog box, from which you can view or change the current status of the claim for the primary, secondary, tertiary, and quaternary coverages. The status is automatically updated when a claim is sent to the batch or printed. To change the status of the claim from Not Submitted to Queued, then to Sent, select the corresponding Change check box, and then click OK. To change the status of the claim from Sent to Queued, select the corresponding Change check box, and then click OK.
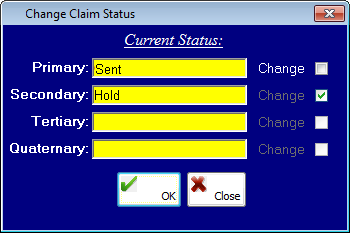
Changing the status of the claim does not automatically resubmit the claim.
· Med. Codes - Click this button to open a dialog box from which you can cross-code dental procedures to medical codes. See "Medical cross-coding" for more information.
· Allocate - Click this button to open a dialog box from which you can view the providers and their allocation amounts, net allocation amount, and total positive and negative amounts. Select Suspended to suspend allocations for the transaction, or clear the check box to remove the suspension.
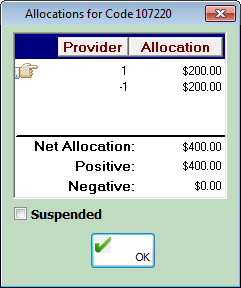
Allocated amounts for providers for up to the past three years are viewable.
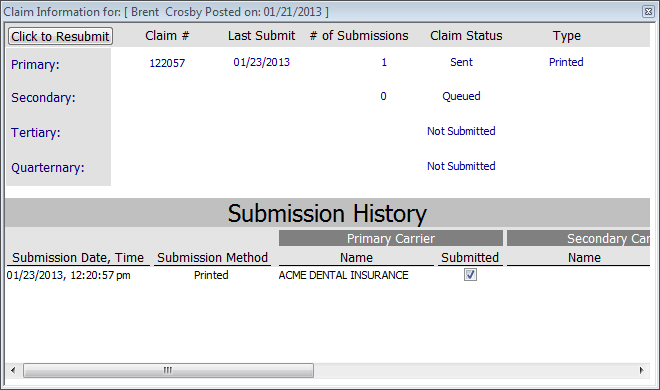
· Show Claim - Click this button to open a dialog box from which you can view the claim information for each carrier (primary, secondary, tertiary, and quaternary): claim number, date of the last submission, number of submissions, claim status, output type, and submission history. Click Click to Resubmit to resubmit the claims.
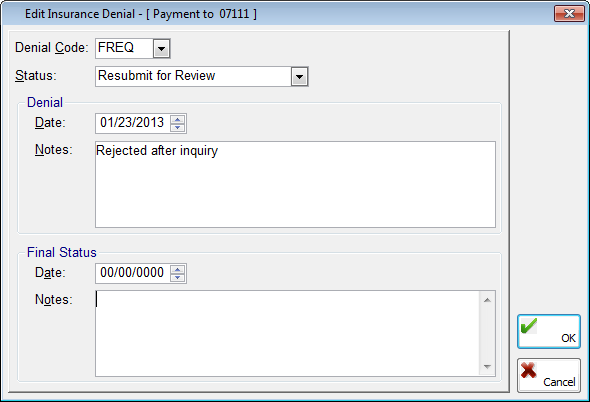
· Denial - If there is a denial for the claim, click this button to view related information for the denial.
4. When you are finished, close the Related Transactions dialog box.
Need more help?
You can visit our website, contact EndoVision Customer Support, or suggest a new feature or improvement on User Voice.