Dentrix Enterprise integrates with Electronic Dental Service (EDS), which is a clearinghouse used by Henry Schein One, for the submitting and processing of 837i (institutional) claims electronically.
Notes:
An EDS account is required and must be obtained separately from Dentrix Enterprise and Henry Schein One.
You must have the EDS connection settings entered in Dentrix Enterprise.
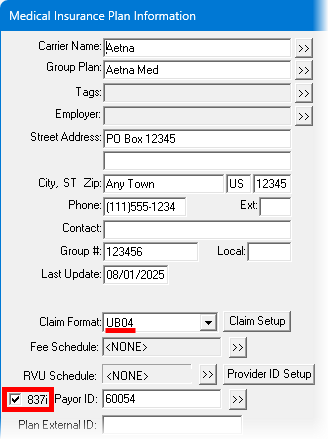
Allowing claims to be flagged as 837i claims and sent electronically to a payor through EDS requires the medical insurance plan in Dentrix Enterprise to be configured a certain way. In the plan's Medical Insurance Plan Information dialog box, UB04 must be selected as the Claim Format, and the 837i checkbox to the left of Payor ID must be selected.
You can also submit an individual medical insurance claim in Ledger.
To submit 837i claims in Office Manager
To create and batch insurance claims, create medical insurance claims individually, sending each directly to the Batch Processor.
Notes:
If you need to edit a medical insurance claim after creating it, do so in Ledger, and then send (or resend) it to the Batch Processor.
You can create a secondary medical insurance claim only after you receive the adjudication on the primary medical insurance claim.
In the Batch Processor, "[837i]" or "Medical" at the end of a medical claim's description indicates whether the claim is an 837i claim or not, respectively.

In Office Manager, if you want to send specific claims, select them in the Batch Processor.
Do one of the following:
Click the EDS button ![]() on the toolbar.
on the toolbar.
On the File menu, click EDS.
If applicable, do one of the following:
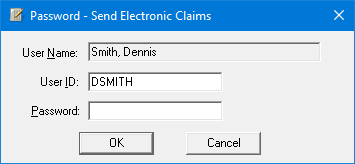
If the Password - Send Electronic Claims dialog box appears, user verification has been assigned to the "Send Electronic Claims" task. Do one of the following:
If your user account has been granted the "Send Electronic Claims" security right, enter your credentials in the User ID and Password boxes, and then click OK.
If your user account has not been granted the "Send Electronic Claims" security right, have a user with permission temporarily override this restriction so you can send claims this one time. The overriding user enters his or her credentials in the User ID and Password boxes and then clicks OK.
If a message appears, informing you that you do not have rights to this operation, your user account has not been granted the "Send Electronic Claims" security right. To have a user with permission temporarily override this restriction so you can send claims this one time, do the following:
On the message, click Yes.
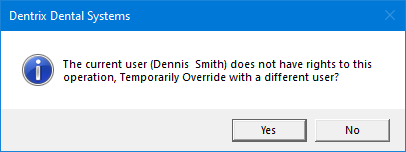
In the Password - Send Electronic Claims dialog box, the overriding user enters his or her credentials in the User ID and Password boxes and then clicks OK.
The EDS Submission dialog box appears.
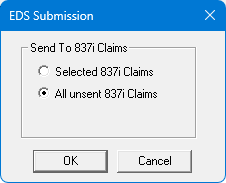
Select Selected 837i Claims or All unsent 837i Claims (this option is selected by default).
Click OK.
One of the following may occur:
If you used the Selected 837i Claims option to send claims, and if one or more of the selected claims are not 837i claims:
If 837i and non-837i claims are selected, a message appears and states that some of the selected claims are not 837i claims and will be skipped.
If only non-837i claims are selected, a message appears and states that no claims will be processed because none of the selected claims are 837i claims.
If you used the All unsent 837i Claims option to send claims, and there are no unsent 837i claims, a message appears and states that there are no unsent 837i claims to process. Ignore the remaining steps.
If you used the Selected 837i Claims option to send claims, and if one or more of the selected claims were already sent, for each sent claim, a confirmation message appears and asks if you want to resubmit the claim. To resubmit the claim, click Yes. To skip the claim, click No.
If a claim has a procedure that requires an attachment for e-claims, but the claim does not have an attachment, the claim will not be sent. In this case, the Claim Review dialog box (or message box) appears. Do one of the following:
To send the claims that are not listed, click Send Remaining Claims. On the confirmation message that appears, click Yes.
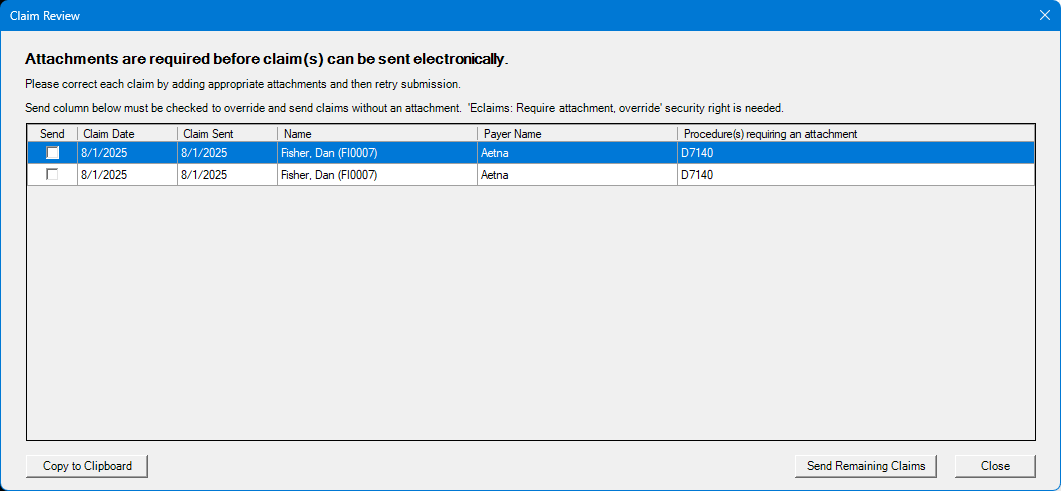
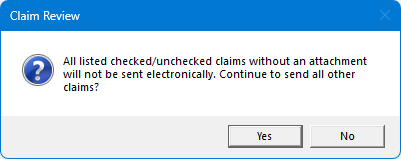
Note: Clicking No returns you to the Claim Review dialog box.
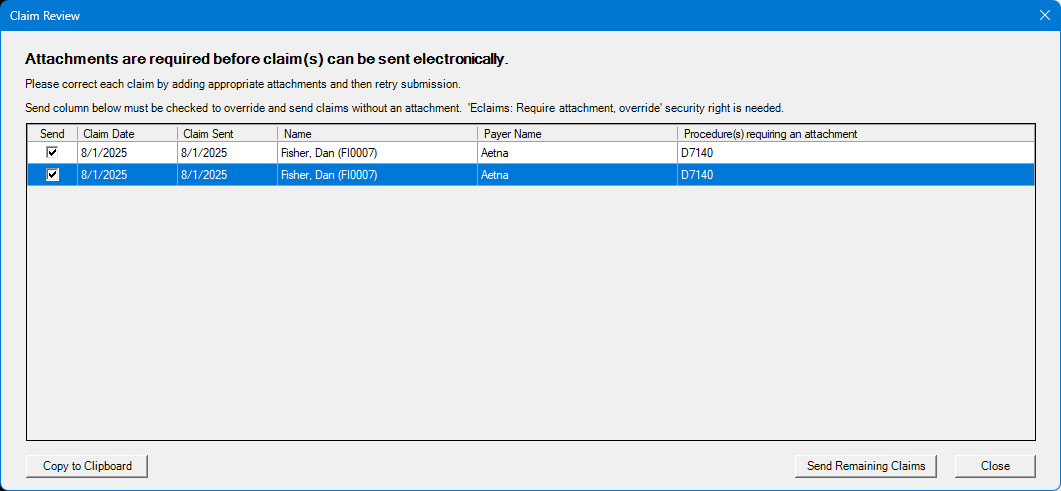
To send the claims that are not listed and claims that are listed, select the Send checkbox of each claim that you want to override the attachment requirement for and send without attachments (this requires the "Eclaims: Require attachment, override" security right), and then click Send Remaining Claims. On the confirmation message that appears, click Yes.
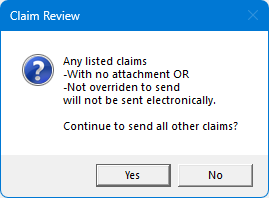
Note: Clicking No returns you to the Claim Review dialog box.
The eClaims Pre-Submission Summary dialog box appears.
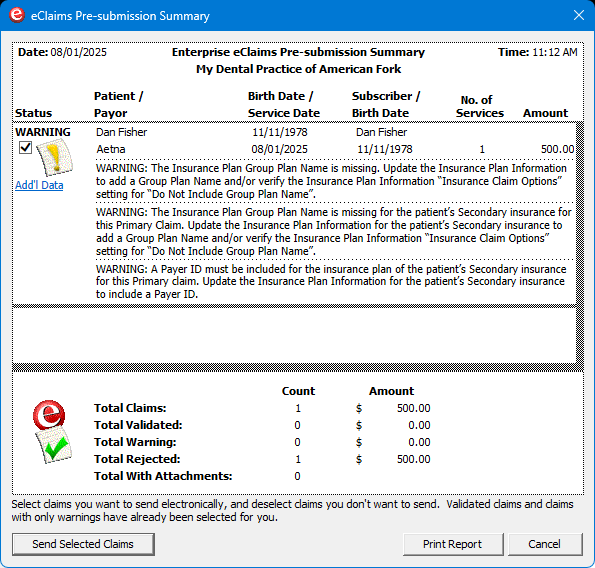
Note: EDS performs a check on all of the claims you are sending, and each claim is given one of three statuses:
Validated - This status is assigned to claims that contain all the required information and are ready to be sent electronically.
Warning - This status is assigned to claims that are missing information (such as payor ID numbers, insurance plan numbers, and so forth). This status is also assigned to claims that require attachments (such as X-rays, panoramic films, periodontal charting information, and so forth). You can send claims with a Warning status to the insurance company (payor), but it is recommended that you correct the information on the claim before you send it.
Rejected - This status is assigned to claims that have an error that would cause the insurance company to reject the claim. If the error is caused by information included on the claim, delete the claim from both the Batch Processor and Ledger, correct the errors, recreate the claim, and re-send it to the Batch Processor for processing with your next batch of claims.
If there are any claims with a status of Warning or Rejected, to add missing information and/or edit incorrect information, do the following for each claim:
Click the link in the Status column.
The Edit Missing Claim Information dialog box appears.
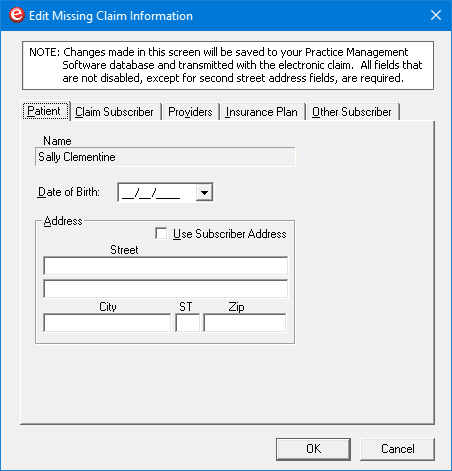
Notes:
Add or edit the necessary information on each tab.
All options are required except for the second Street box on a given tab.
Changes you make in this dialog box are saved in Dentrix Enterprise.
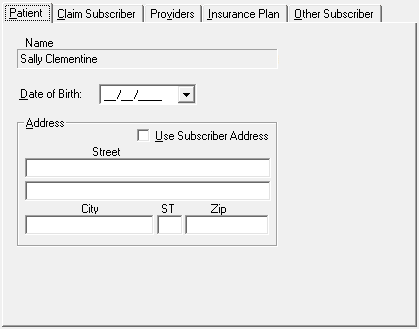
On the Patient tab, set up the following options:
Date of Birth - The patient's birth date.
Address - Do one of the following:
Enter the patient's address.
To use the subscriber's address, select the Use Subscriber Address checkbox to populate the boxes with the claim subscriber's address.
Note: This checkbox is available only if all the required boxes of the Address are not populated, if the Use Patient Address checkbox is not selected on the Claim Subscriber or Other Subscriber tab, and if there is an address for the claim subscriber.
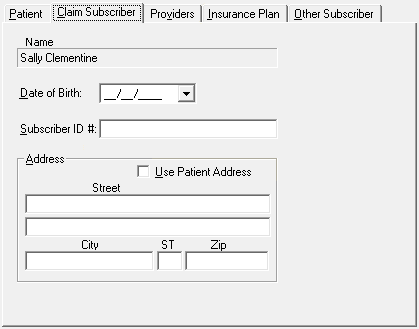
On the Claim Subscriber tab, set up the following options:
Date of Birth - The subscriber's birth date.
Subscriber ID # - The ID of the subscriber on the claim (primary or secondary, whichever appears).
Address - Do one of the following:
Enter the subscriber's address.
To use the patient's address, select the Use Patient Address checkbox to populate the boxes with the patient's address.
Note: This checkbox is available only if all the required boxes of the Address are not populated, if the Use Subscriber Address checkbox is not selected on the Patient tab, and if there is an address for the patient.
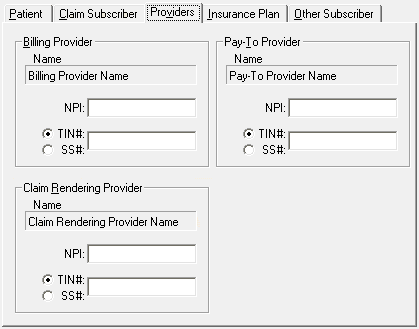
On the Providers tab, set up the following options:
Billing Provider - The billing provider's NPI, and the billing provider's TIN# or SS#.
Pay-To Provider - The pay-to provider's NPI, and the pay-to provider's TIN# or SS#.
Claim Rendering Provider - The claim rendering provider's NPI, and the claim rendering provider's TIN# or SS#.
Note: You do not need to enter dashes (-) for any of the numbers.
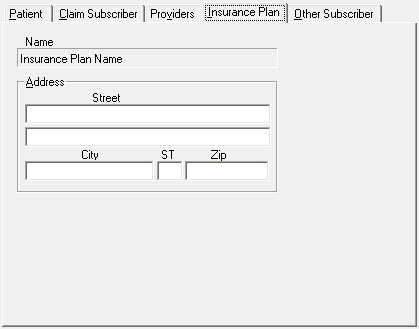
On the Insurance Plan tab, enter the Address where claims are sent for the insurance plan.
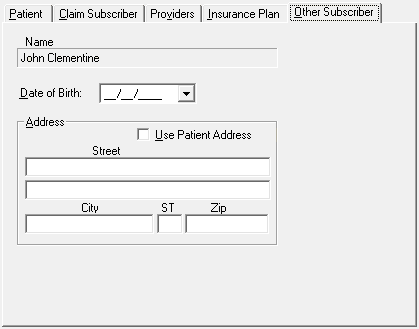
On the Other Subscriber tab - Set up the following options for the other subscriber (the secondary subscriber if this is a primary claim; or the primary subscriber if this is a secondary claim):
Date of Birth - The subscriber's birth date.
Subscriber ID # - The ID of the subscriber on the claim (primary or secondary, whichever appears).
Address - Do one of the following:
Enter the subscriber's address.
To use the patient's address, select the Use Patient Address checkbox to populate the boxes with the patient's address.
Note: This checkbox is available only if all the required boxes of the Address are not populated, if the Use Subscriber Address checkbox is not selected on the Patient tab, and if there is an address for the patient.
Click OK.
You are returned to the eClaims Pre-submission Summary dialog box.
Note: If additional electronic claims were sent to the Batch processor from another computer while you were editing a claim, those additional claims now appear in the eClaims Pre-submission Summary dialog box.
If you need to leave the eClaims Pre-submission Summary dialog box to make corrections, such as add missing attachments, to generate a report that you can refer to as you make those corrections, click Print Report. Click Cancel, make corrections, add attachments as needed, and then attempt to submit the claims again. The eClaims Pre-submission Summary dialog box appears again.
Note: If the Place of Service code or Service Facility TIN is missing on a medical insurance claim, you must fix the error in Ledger.
Again, check for claims with a status of Warning or Rejected, and make changes as needed.
Select the checkbox of each claim that you want to send electronically.
Notes:
Make sure that you carefully review the claims before submitting any of them.
By default, claims with a status of Validated or Warning are selected; claims with a status of Rejected are not.
Click Send Selected Claims.
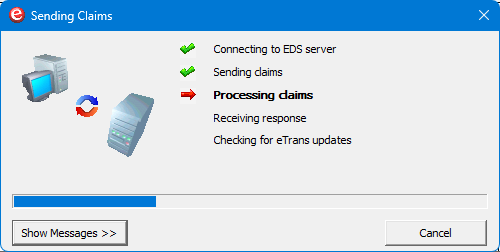
The Sending Claims dialog box appears and displays the progress of the submission.
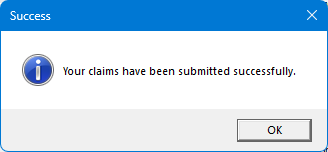
Click OK on message that appears when the submission is successful.
You are returned to the Sending Claims dialog box.
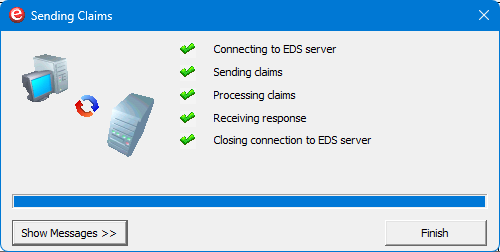
Note: If you want to view a detailed log of the transmission, click Show Messages.
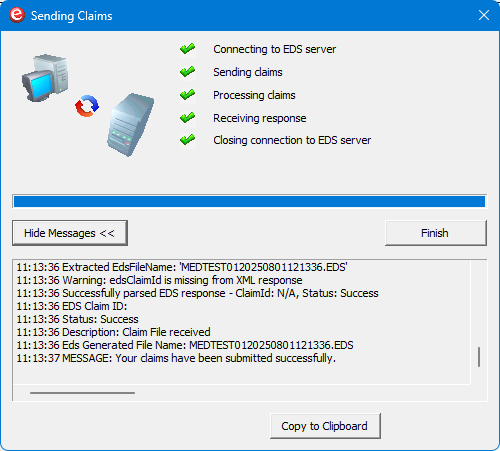
The expanded dialog box provides the following options for the log:
Copy to Clipboard - If you want to copy the output log to the Windows Clipboard so that you can paste it into another program, click Copy to Clipboard. (This is only necessary if there is a problem and a support representative needs the information for troubleshooting.)
Email - If you want to send a message containing the output log, click Email.
Click Finish.
Notes:
For 837i claims that have been transmitted successfully "Sent" appears in the Status column of the Batch Processor. For 837i claims that have not been transmitted successfully, "Failed" appears in the Status column of the Batch Processor.
After you send 837i claims, the eClaims Pre-submission Summary Report appears in the Batch Processor.
Once the claims have been successfully transmitted, delete them from the Batch Processor.
Note: Deleting a claim from the Batch Processor does not delete the corresponding claim in Ledger.