This guide provides information about the new software release. This guide includes a brief description of the new features and enhancements available in this release and instructions on how to use the new features and enhancements.
Notes:
For a complete list of features and fixes in this Dentrix Enterprise release, refer to the release notes.
Before installing or upgrading Dentrix Enterprise, make sure your computers comply with the latest system requirements.
According to Microsoft, mainstream support for Windows Server 2019 ended on January 9, 2024. Currently, Henry Schein One still provides support for Dentrix Enterprise on Windows Server 2019 as indicated in the system requirements.
This release includes the following new features and enhancements:
Install Manager enhancements - Install Manager now supports upgrading from 11.0.43 or later to 11.0.49, enabling or updating Active Directory authentication during the install or upgrade process, and modifying the installations of all Dentrix Enterprise components.
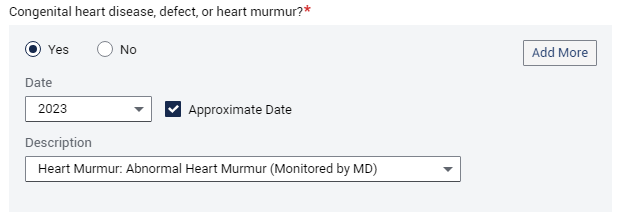
OHSM enhancement - (for IHS facilities only) When you are completing an oral health status survey for a patient, an option for #6. Caries Risk may be selected automatically.
NPIRS enhancements (for IHS facilities only):
Requiring additional patient information - You can now require Current Community, Indian Blood Quantum, Tribe of Membership Code, and/or Beneficiary Classification Code to create patient records in Family File.
Selecting additional patient information - In the Patient Additional Information dialog box that you access from Family File, the boxes for the following options have been replaced with lists so you can quickly select the correct IHS standard code definitions instead of having to manually type them: Current Community, Indian Blood Quantum, Tribe of Membership, and Beneficiary Classification.
Searching for IHS standard code definitions - In the IHS Standard Codes Definitions dialog box, a search box has been added to help you quickly locate a definition.
Editing Blood Quantum definitions - In the IHS Standard Codes Definitions dialog box, for the Blood Quantum (SCB) definition type/category, an Edit button now appears when a definition in that category is selected. Also, for each blood quantum definition, there is a new box: Indian Blood Quantum Field.
Editing Community definitions - In the IHS Standard Codes Definitions dialog box, for each Community (SCB) definition, there is a new box: Current Community Field.
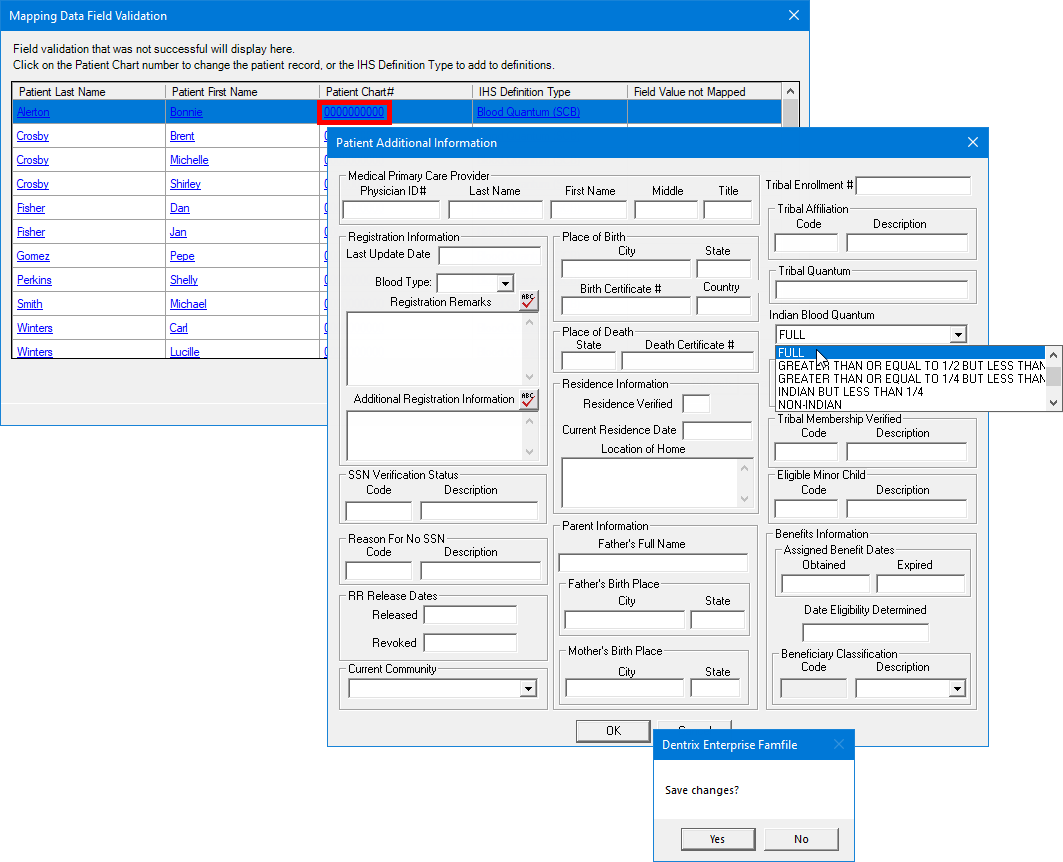
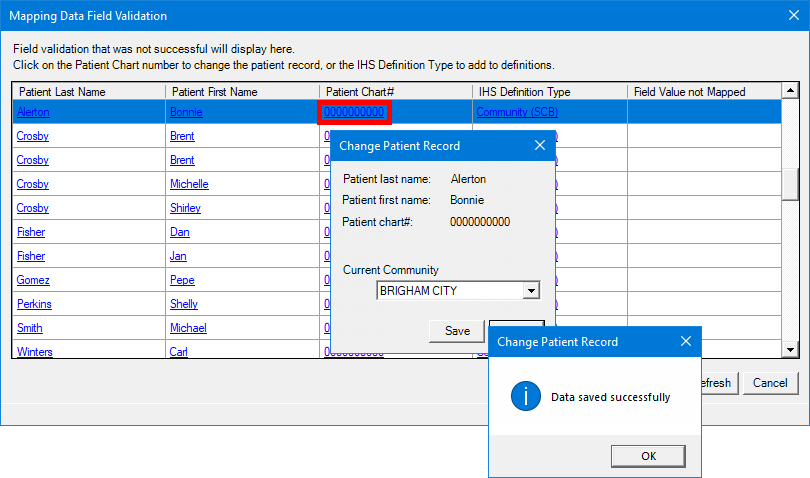
Viewing/updating additional patient information during validation - In the Mapping Data Field Validation dialog box of the NPIRS data extraction utility, for blood quantum, when you click a link in the Patient Chart # column, the Patient Additional Information dialog appears. Also, for beneficiary classification, community, or tribe, when you click the link in the Patient Chart # column, in the Change Patient Record dialog box that appears, there is now a list to select an option.
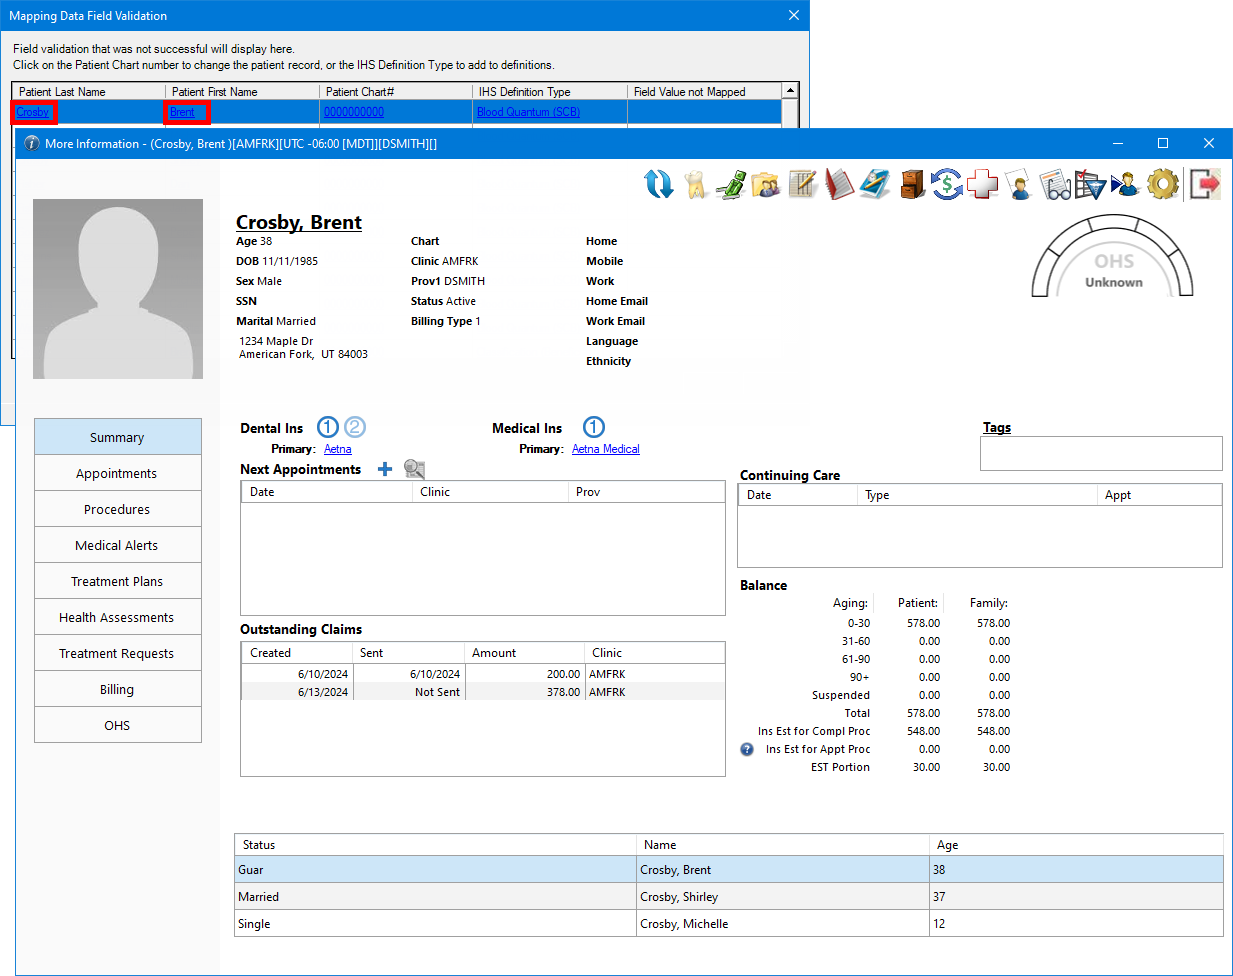
Viewing More Information during validation - In the Mapping Data Field Validation dialog box of the NPIRS data extraction utility, the first and last name of a patient that appears in the list are now links. You can click the link in either the Patient Last Name or Patient First Name column to open the patient's More Information window appears.
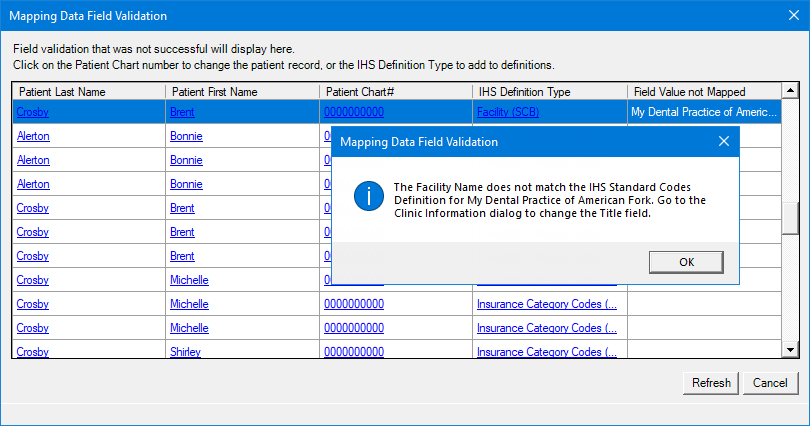
New wording of unmatched-facility message during validation - In the Mapping Data Field Validation dialog box of the NPIRS data extraction utility, if a clinic title appears in the Field Value not Mapped column, if you click in the link in the Patient Chart # column, a message appears. The wording of that message has been updated to explain how you should handle an empty or an unmatched value (the clinic title does not match the facility name in the IHS standard code definitions).
Selecting a unique patient ID for extractions - On the Setup tab of the NPIRS data extraction utility, a list has been added: Unique Patient ID to use in files.
New security right: With the NPIRS global setting enabled, there is a new security right: "NPIRS Unique Patient ID, Edit." This right allows a user to change the Unique Patient ID to use in files. This new right appears in the "Central Clinic Only" category. This right is not selected by default for any user.
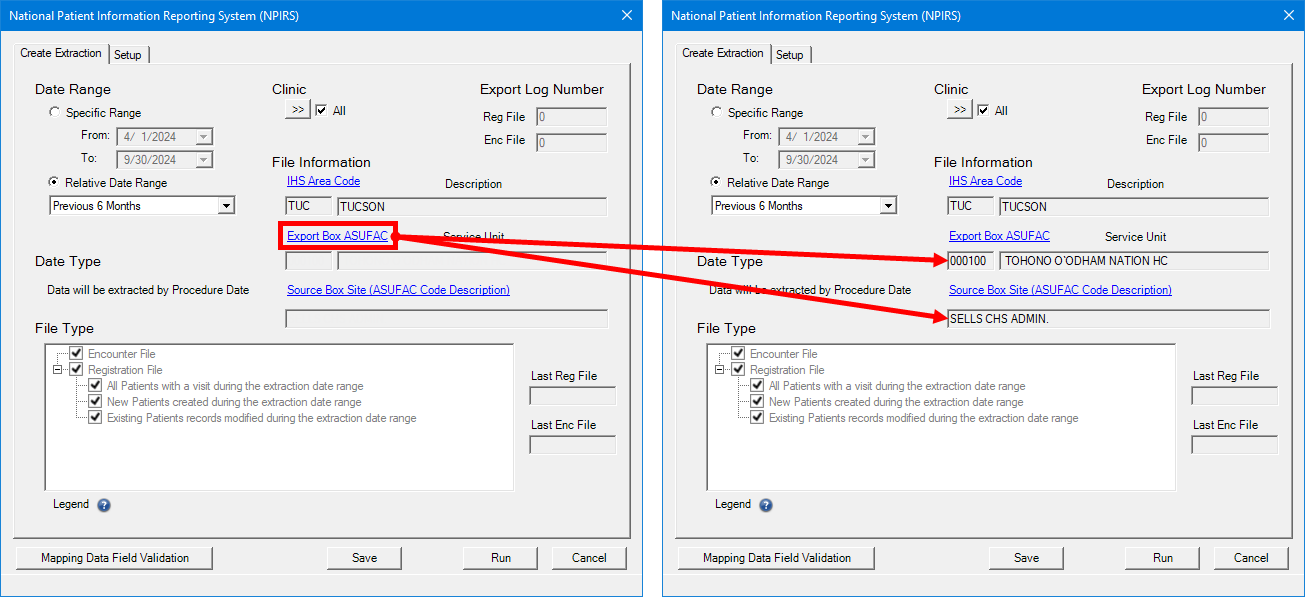
Automatic selection of Source Box Site - On the Create Extraction tab of the NPIRS data extraction utility, when you select an option for Export Box (ASUFAC), the Source Box Site (ASUFAC Code Description) is now selected automatically.
Medical health history assessment enhancements (for IHS facilities only):
Semi-independent module - Dental Patient Medical Assessment is now a semi-independent module; it can remain open even if you close other modules. Also, if patient A's assessment is not finished, and you try to open the Dental Patient Medical Assessment window for patient B, a confirmation message appears.
Saved selections - Selections are saved as you progress through the assessment, so if you change an answer from Yes to No and then back to Yes again, you don't have to re-enter data.
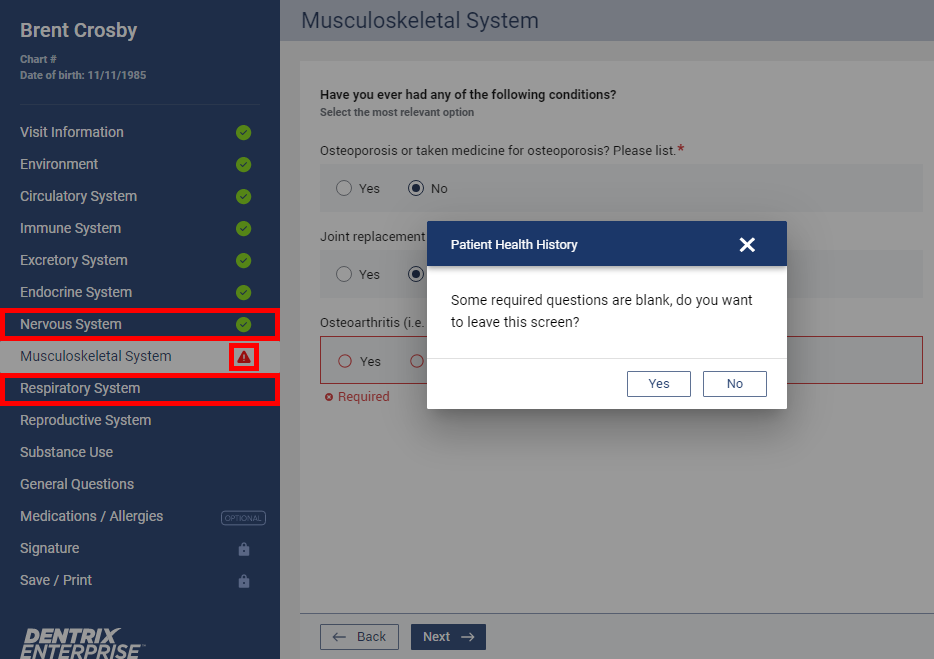
Red triangle icon - A red triangle icon appears for tabs with missing required information.
"I" icon for No Updates button - On the Circulatory System tab, there is now an "i" icon next to the No Updates button.
Green checkmark icons - Now, as you complete a section of the assessment, a green checkmark appears on the left to help you see your progress.
"Optional" for Medications/Allergies - Now, the text "OPTIONAL" appears on the Medications/Allergies tab.
Lock icons - Lock icons appear on the Signature and Save/Print tabs on the left to indicate that the assessment is incomplete:
Signature tab changes - On the Signature tab, the Next button has been replaced with a Finish button. On the Signature tab, there is now an "i" icon next to the Finish button. Now, after you click Finish on the Signature page, the assessment is saved to the database, and a copy is saved to Document Center automatically. Then, you are taken to the Save/Print tab automatically.
Note: The "Health History Form, Save" security right is required to save the assessment. If you have not been granted this right, a message appears: "Access denied. Health History Form, Save right is required."
Save/Print tab changes - On the Save/Print tab, the Finish and Save button has been removed. Also the Exit button has been replaced with a Close button.
Report changes - The .pdf copy of the assessment has been changed. In the signature section, for the patient and provider signature lines, the date/time is displayed in a12-hour format and contains AM/PM and the system time zone. In the upper-left corner of each page, the text "IHS-42-1 (Rev 4/2021)" now appears.
Database performance improvements (EN-93870).
The following sections contain instructions about how to use the new features and enhancements of this release.
Install Manager now supports upgrading from 11.0.43 or later to 11.0.49, enabling or updating Active Directory authentication during the install or upgrade process, and modifying the installations of all Dentrix Enterprise components.
Note: For complete instructions on installing, upgrading, modifying, or uninstalling Dentrix Enterprise, refer to the Dentrix Enterprise Installation Guide.
To upgrade Dentrix Enterprise using Install Manager
With SQL Update Scripts selected (which is the default), enter the SQL Server Connection details.
If users are authenticated automatically through Active Directory when they open Dentrix Enterprise, select the Active Directory Authentication checkbox. If users enter a user name and password to access Dentrix Enterprise (SQL authentication), clear this checkbox.
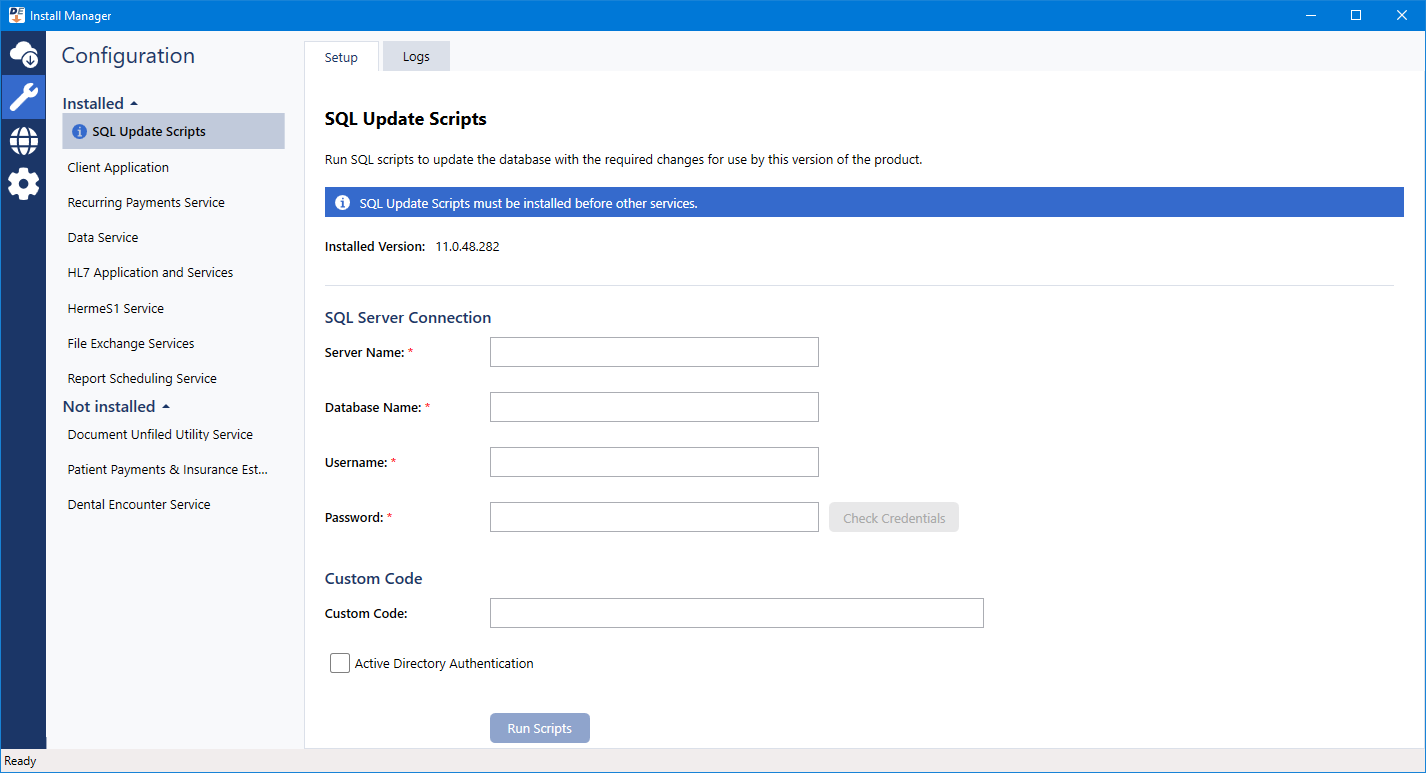
Click Run Scripts.
After the database update scripts run, check the log for errors.
Upgrade the following components as applicable for your installation:
Client Application - Click Modify/Upgrade.

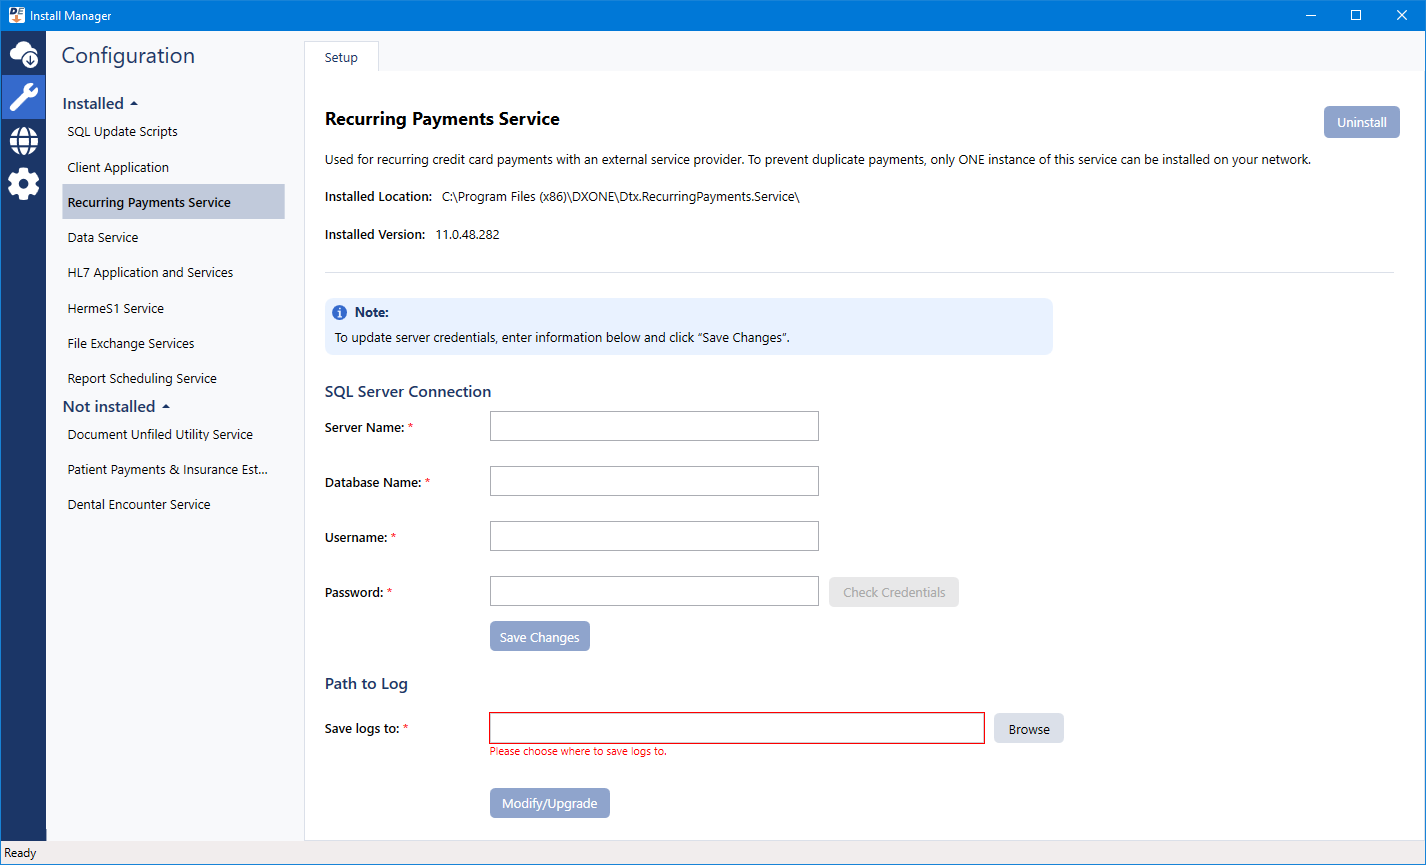
Recurring Payments Service - Enter the SQL Server Connection details. Select the folder where you want to Save logs to. Click Modify/Upgrade.
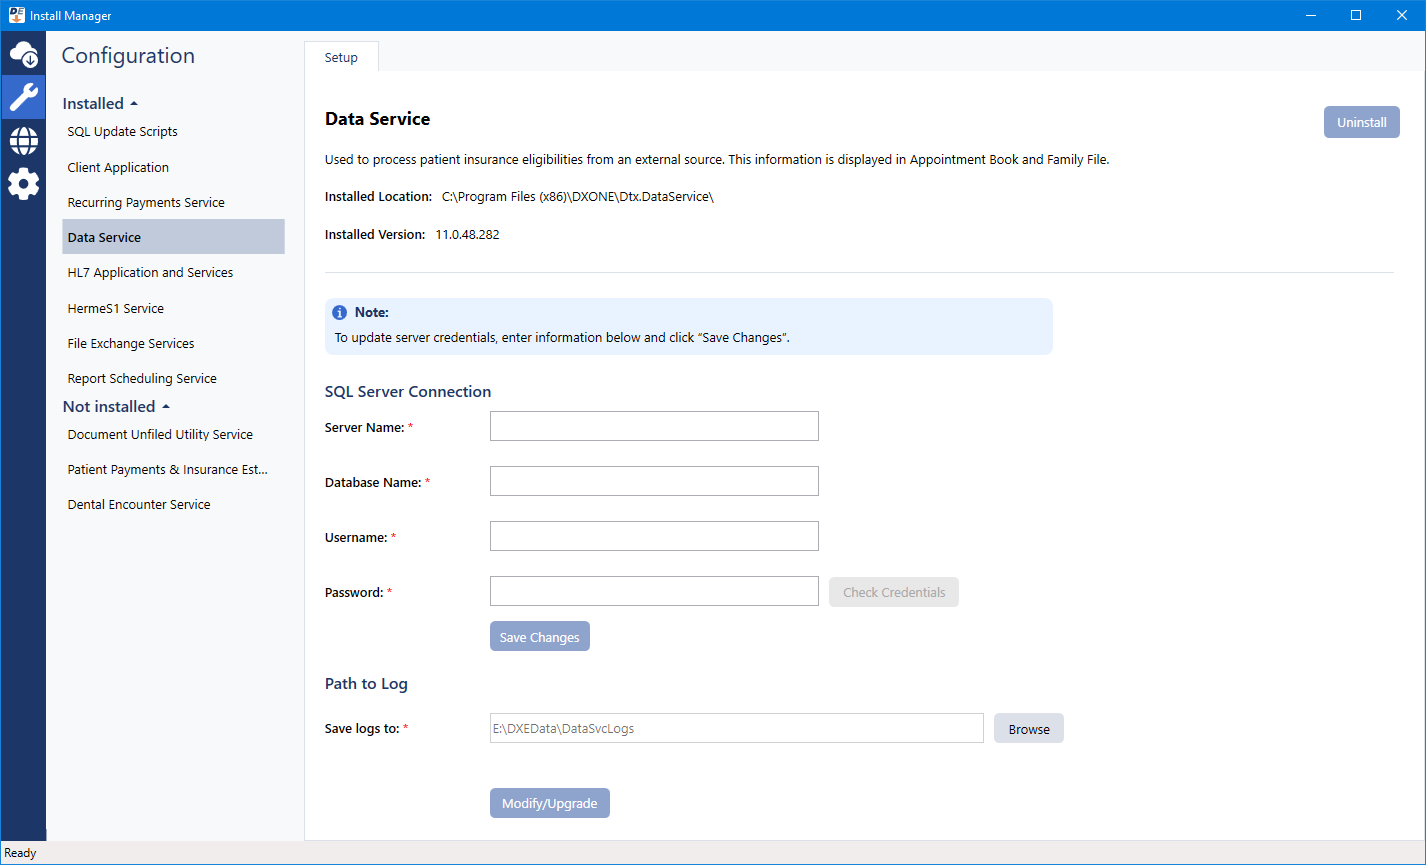
Data Service - Enter the SQL Server Connection details. If necessary, change the folder where you want to Save logs to. Click Modify/Upgrade.
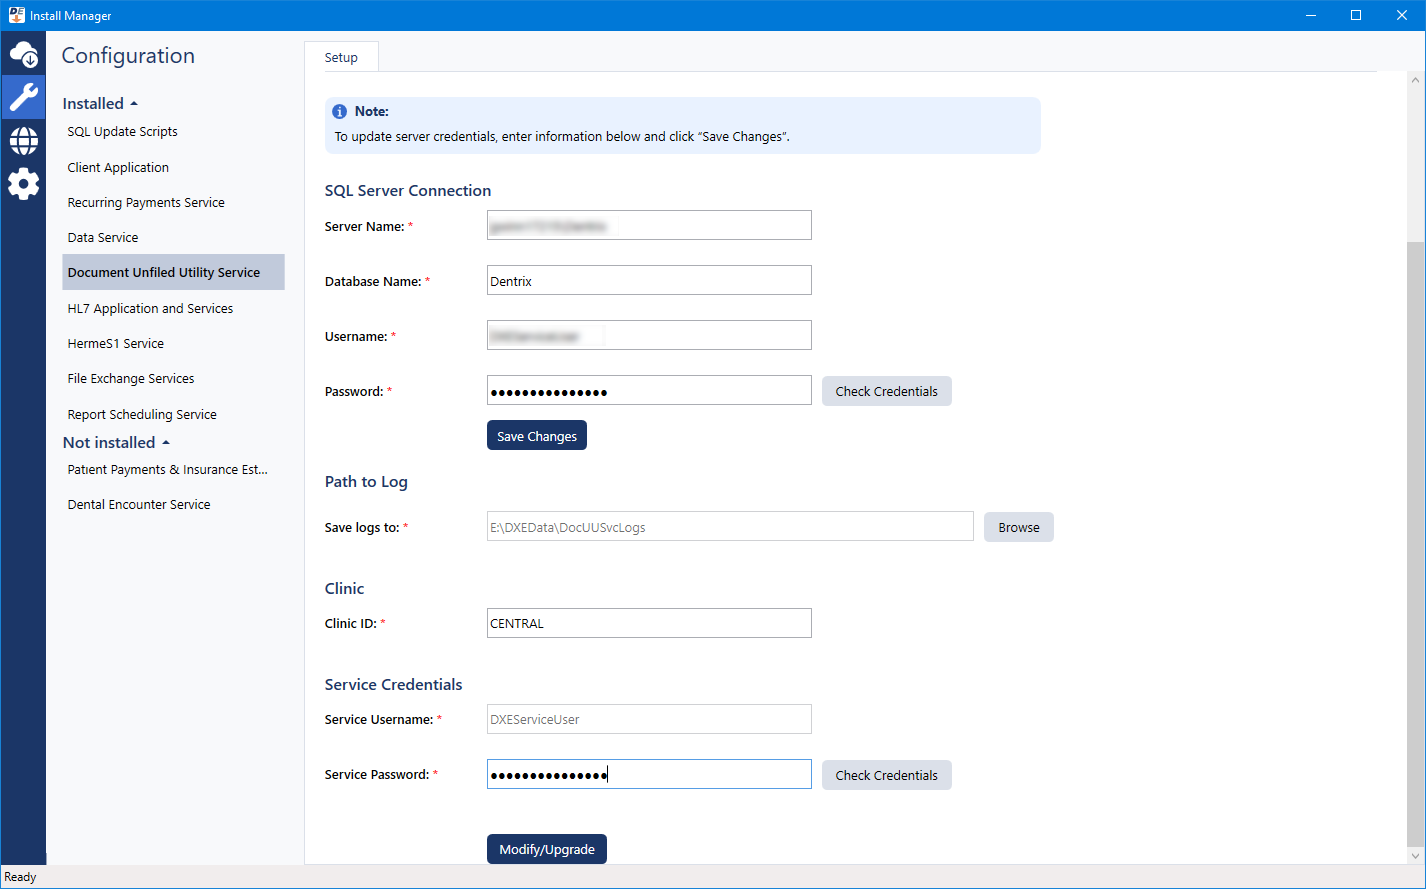
Document Unfiled Utility Service - Enter the SQL Server Connection details. If necessary, change the folder where you want to Save logs to. Enter the Clinic ID. Click Modify/Upgrade.
HL7 Application and Services - Enter the SQL Server Connection details. If necessary, for Path to Portal Questionnaire, change the folder where you want to store portal questionnaire data. Click Modify/Upgrade.
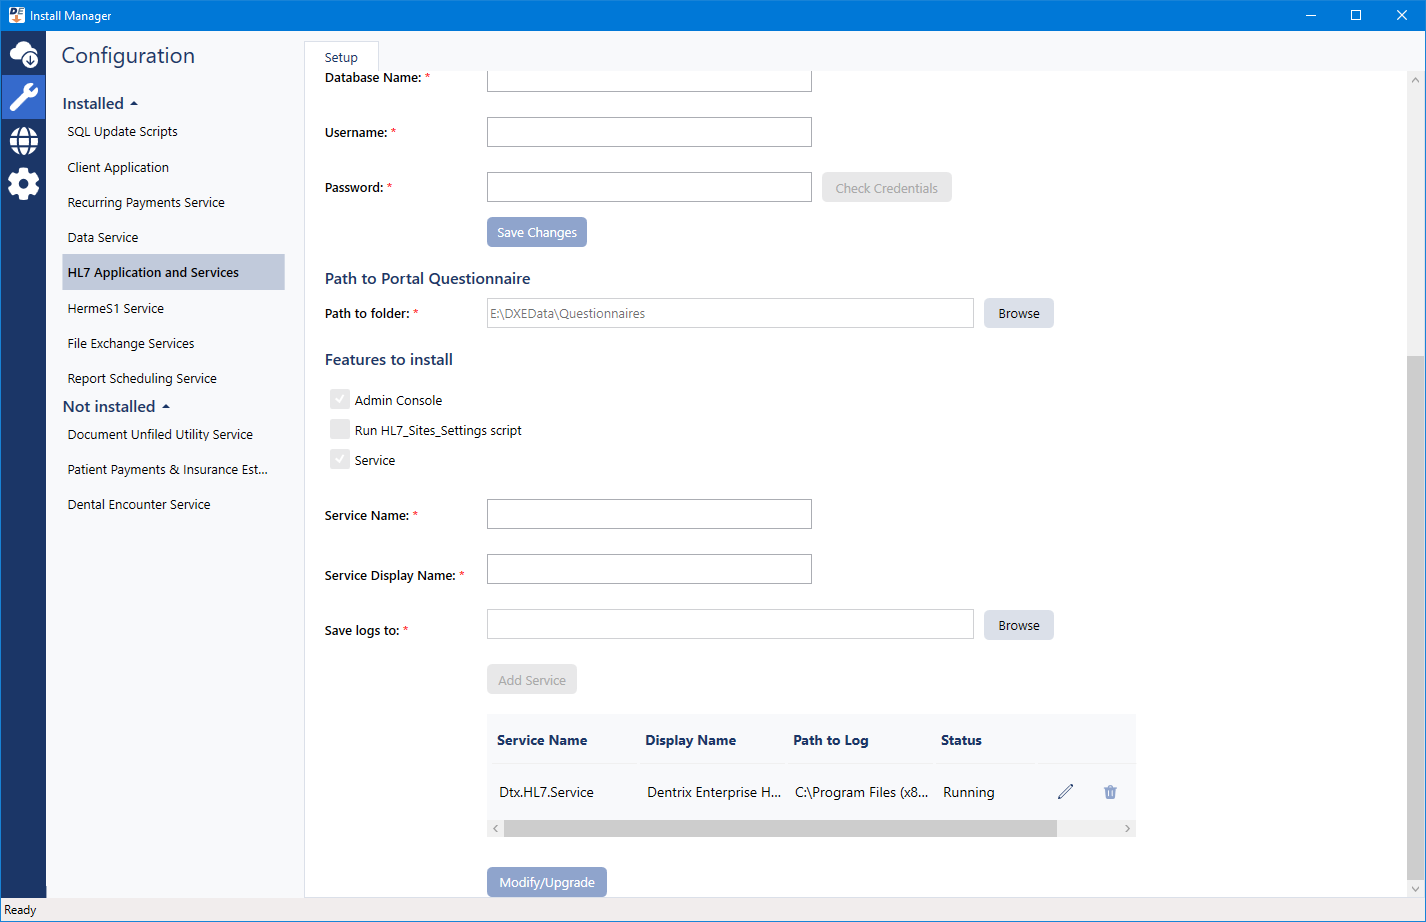
Notes:
The Admin Console and Run HL7_Sites_Settings script options are not available.
All installed HL7 services must be on the same version.
After you upgrade the HL7 services that are already installed, you can install additional HL7 services, change the Path to Log for any installed HL7 services, and remove any additional installed HL7 services (the original/first service cannot be removed unless you uninstall the HL7 application and services).
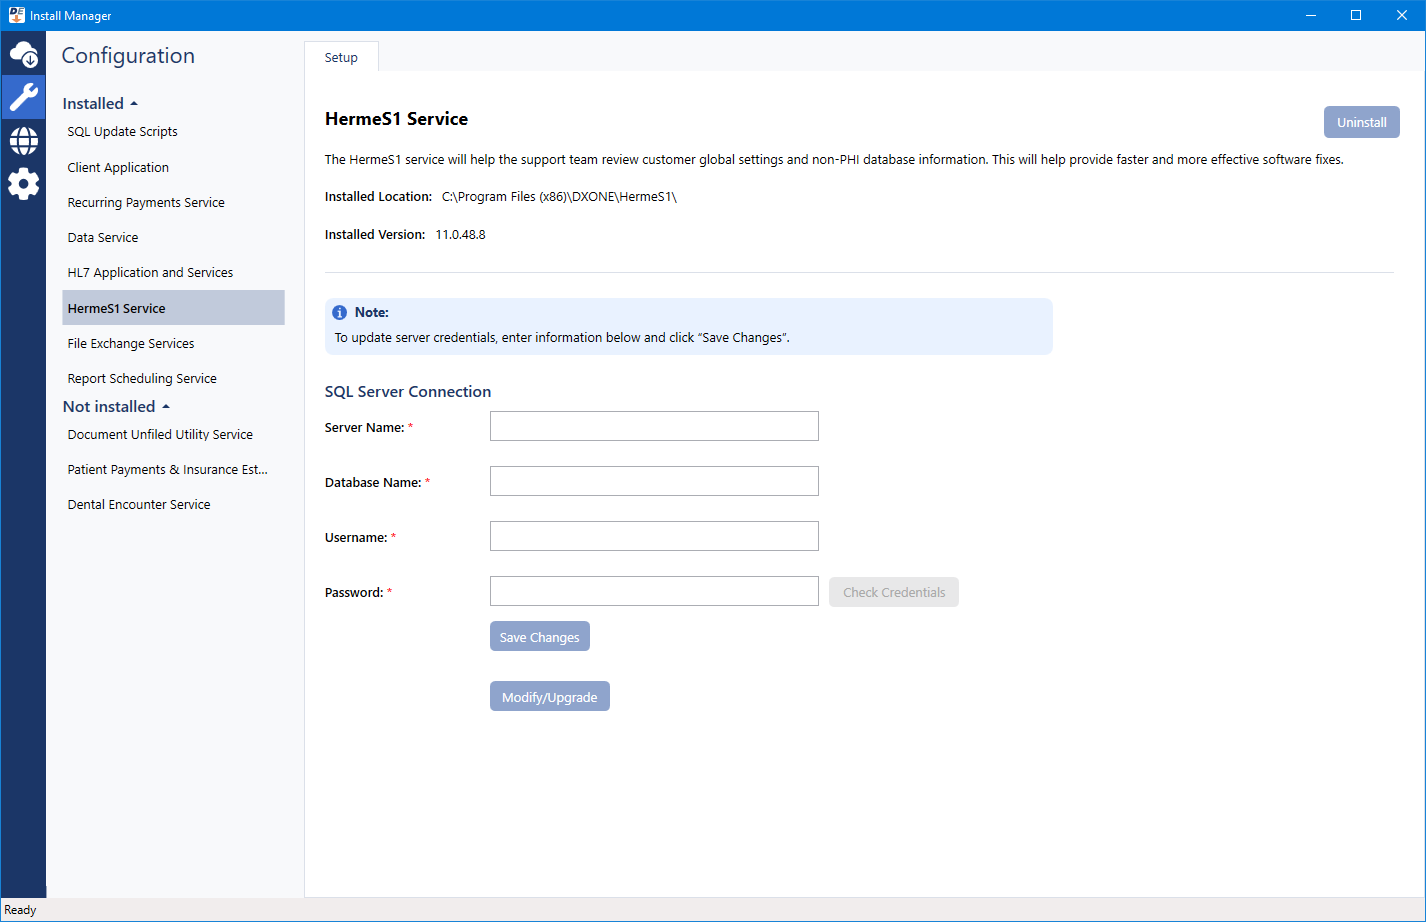
HermeS1 Service - Enter the SQL Server Connection details. Click Modify/Upgrade.
File Exchange Services - Enter the SQL Server Connection details. Click Modify/Upgrade.
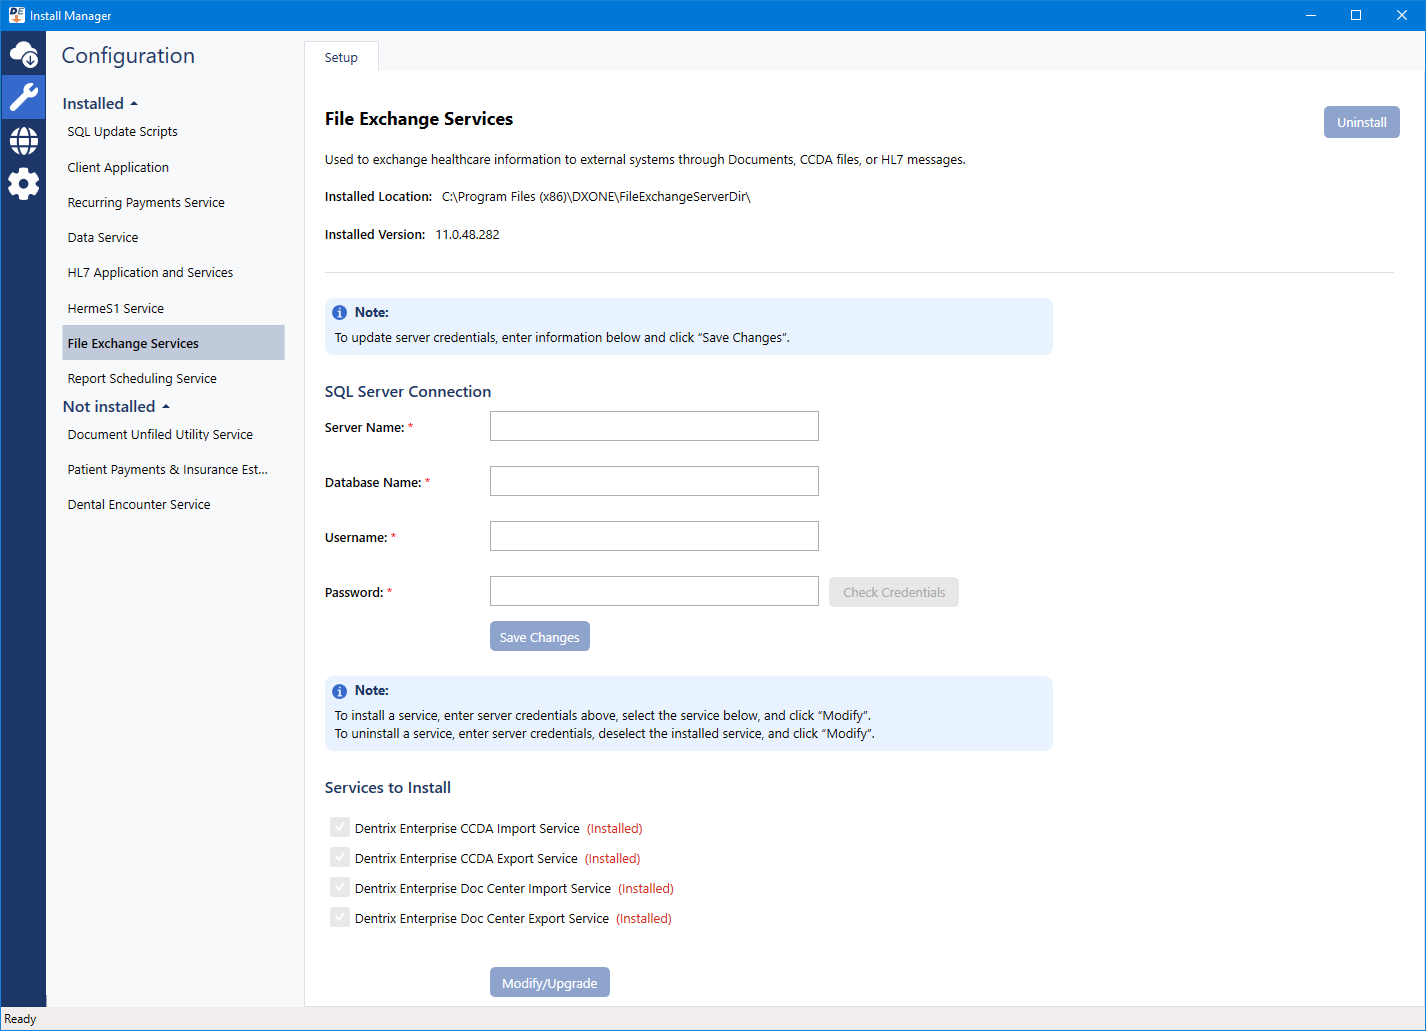
Note: After you upgrade the services that are already installed, you can remove or add services as needed.
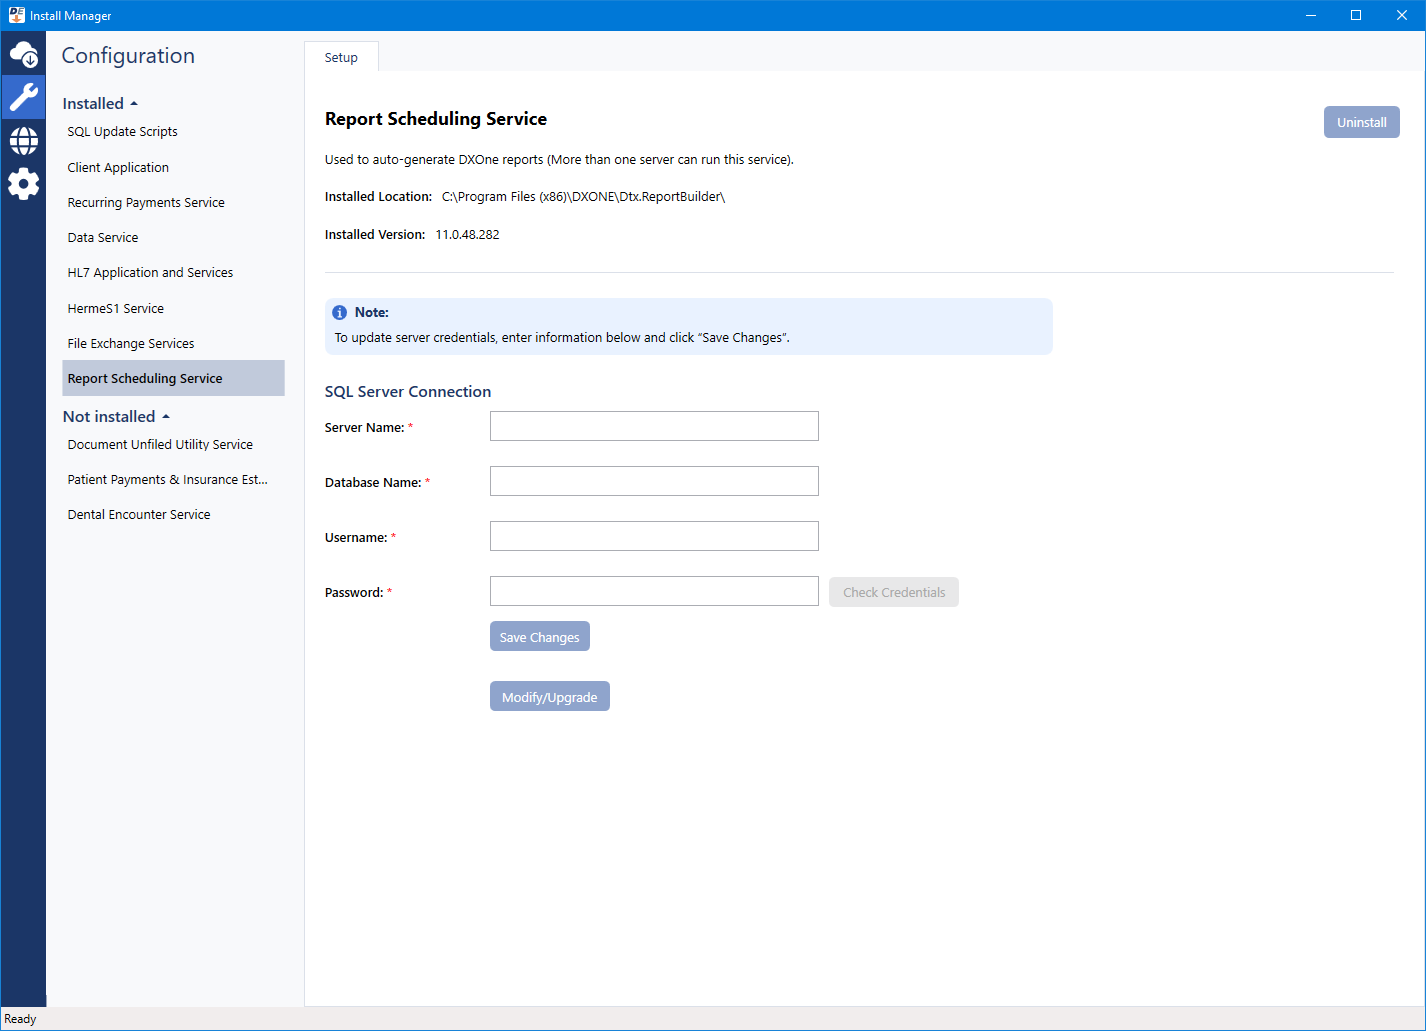
Report Scheduling Service - Enter the SQL Server Connection details. Click Modify/Upgrade.
Dental Encounter Service - Enter the SQL Server Connection details. Enter the Service Password under Service Credentials. Click Modify/Upgrade.

Note: The Service Username is "DXEServiceUser" and cannot be changed.
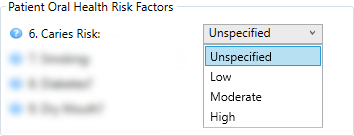
When you are completing an oral health status survey for a patient, an option for #6. Caries Risk is selected automatically according to the following criteria:
If one of the following procedure codes was posted in the past six months:
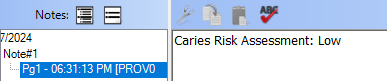
D0601 (Caries risk assessment - Low) - The Low option is selected automatically for #6. Caries Risk on the survey.
D0602 (Caries risk assessment - Mod) - The Moderate option is selected automatically for #6. Caries Risk on the survey.
D0603 (Caries risk assessment - High) - The High option is selected automatically for #6. Caries Risk on the survey.

If a procedure code determines which option is selected for #6. Caries Risk on the survey, the Enter Procedure icon appears to the right of the corresponding list.

If a clinical note was entered using a template with the "Caries Risk assessment" clinical note prompt in the past six months and contains one of the following values:
Caries risk assessment: Low - The Low option is selected automatically for #6. Caries Risk on the survey.
Caries risk assessment: Moderate - The Moderate option is selected automatically for #6. Caries Risk on the survey.
Caries risk assessment: High - The High option is selected automatically for #6. Caries Risk on the survey.
If a clinical note determines which option is selected for #6. Caries Risk on the survey, the Clinical Notes icon appears to the right of the corresponding list.

Notes:
If multiple applicable procedure codes and/or clinical notes exist within the past six months, the most recent one is used. However, if the most recent cannot be determined by date because multiple applicable procedure codes and/or clinical notes exist on the same date, whichever one of those was entered into the system last on that date is used.
If an applicable procedure code or clinical note does not exist within the past six months, the Unspecified option is selected by default for #6. Caries Risk on the survey.
There is now a Patient Additional Information option under Family File Settings on the Organization Settings tab of the central clinic's Clinic Information dialog box (in Office Manager, go to Maintenance > Practice Setup > Clinic Resource Setup, and then click Edit under Clinic Information).
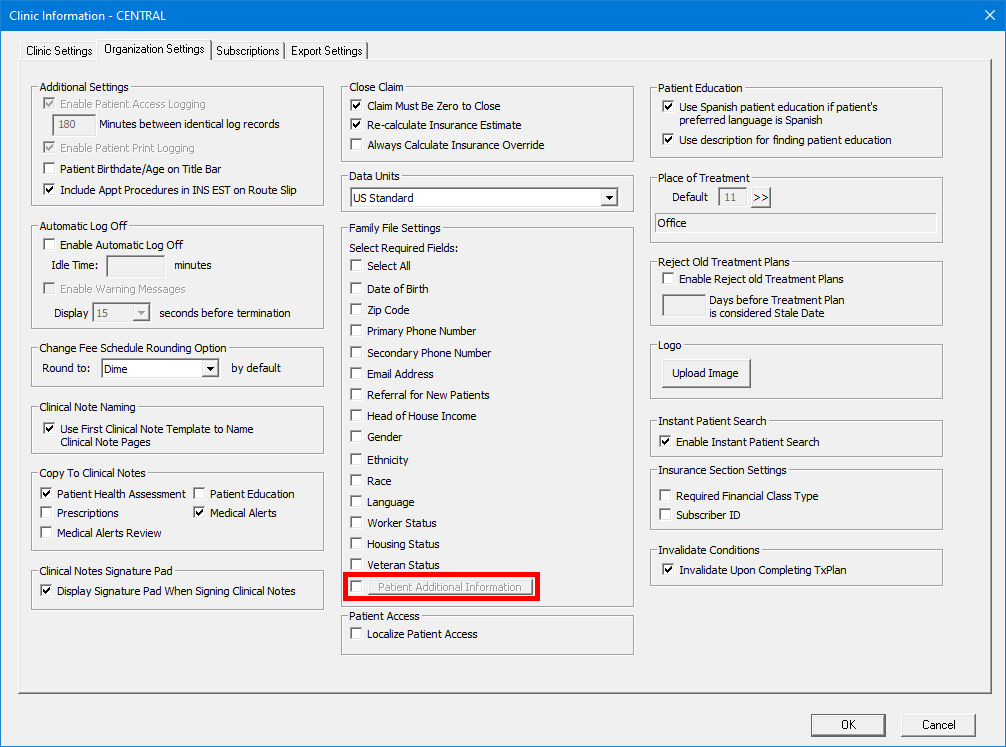
Note: The checkbox and button are visible only if the global setting PatExtraInfo_0 (on the ALL_2 tab) is set to Allow Edit.
Select the checkbox next to the Patient Additional Information button. The button becomes available. Click the button to specify which information is required to add a patient record.

The Patient Additional Information dialog box appears.
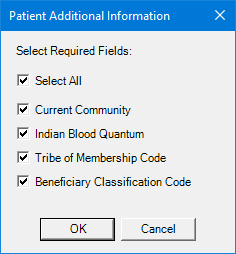
Do one of the following:
Leave the Select All checkbox selected to require Current Community, Indian Blood Quantum, Tribe of Membership Code, and Beneficiary Classification Code.
Clear the checkboxes of the fields that should be optional.
Click OK.
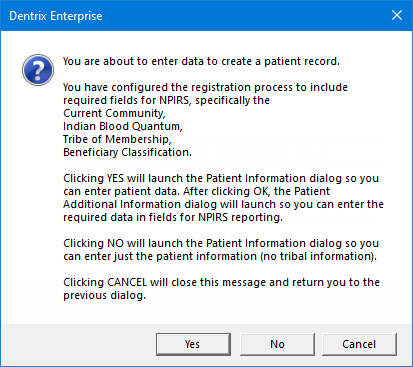
In Family File, if you attempt to create a new patient record (head of house or family member), a confirmation message appears and informs you that you have configured the registration process to include required fields for NPIRS and displays the required fields.
Clicking Yes opens the Patient Information dialog box. After you enter the patient's information and then click OK, the Patient Additional Information dialog box opens so you can enter the required information for NPIRS reporting.
Clicking No opens the Patient Information dialog box so you can enter just the patient information (no tribal information) and then click OK. Later, you can edit the patient's record to enter the required information for NPIRS reporting.
Clicking Cancel returns you to Family File.
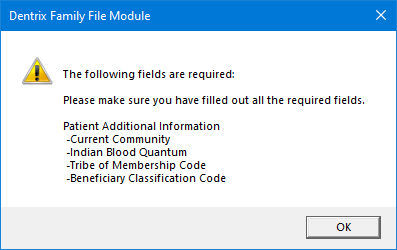
In Family File, if you attempt to save a new or existing patient record with the required information not specified, a message appears and informs you what information is missing; you must specify all the required information before you can save the patient record.
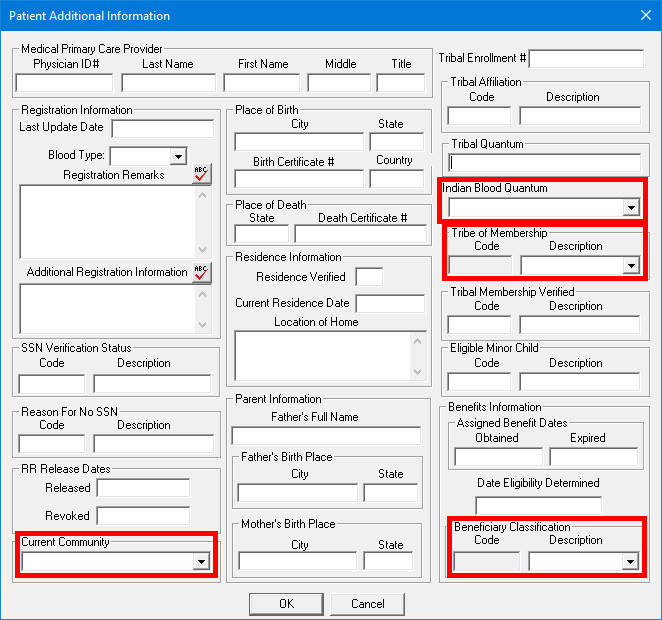
In the Patient Additional Information dialog box that you access from Family File (in a patient's Family File record, double-click the Patient Information block, and then click Additional Information), the boxes for the following options have been replaced with lists so you can quickly select the correct IHS standard code definitions instead of having to manually type them:
Current Community - This comes from the Community (SCB) definition type/category.
Indian Blood Quantum - This comes from the Blood Quantum (SCB) definition type/category.
Tribe of Membership - This comes from the Tribe (SCB) definition type/category.
Beneficiary Classification - This comes from the Classification (Beneficiary) (SCB) definition type/category.
In the IHS Standard Codes Definitions dialog box (In Office Manager, go to Maintenance > Practice Setup > IHS Standard Codes Definitions), a search box has been added to help you quickly locate a definition. With a Definition Type selected, begin typing a code or description in the Search box. The first match is selected as you type.
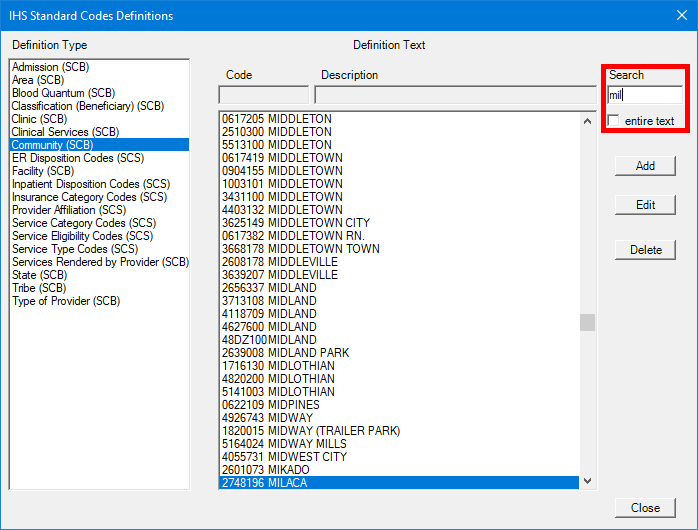
Note: To find a code or description that starts with your search text, leave the entire text checkbox clear. To find a code or description that has your search text anywhere in the code or description, select the entire text checkbox.
In the IHS Standard Codes Definitions dialog box (In Office Manager, go to Maintenance > Practice Setup > IHS Standard Codes Definitions), for the Blood Quantum (SCB) definition type/category, an Edit button now appears when a definition in that category is selected. With a blood quantum definition selected, click Edit.
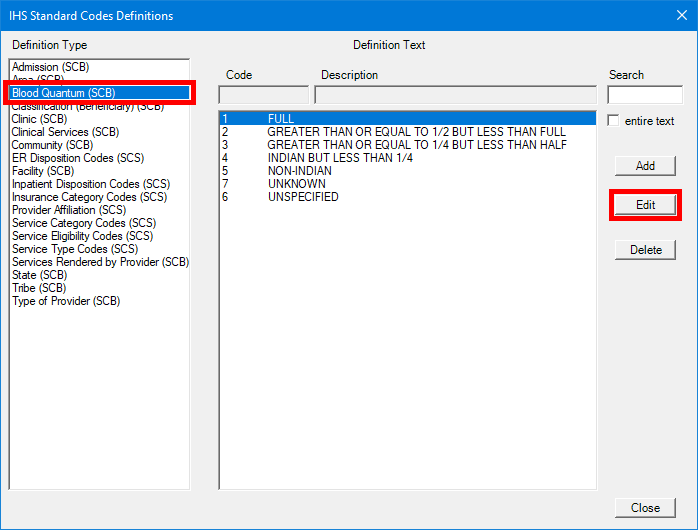
The Blood Quantum Standard Code Book dialog box appears.
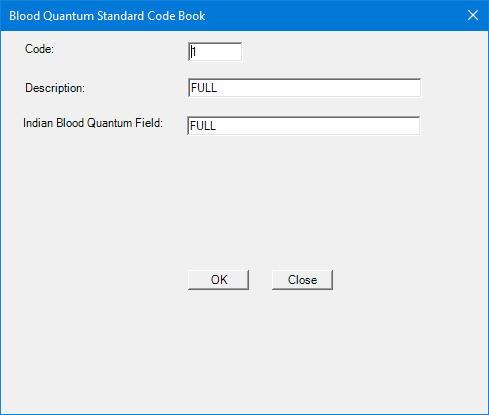
There is a new box: Indian Blood Quantum Field. You can change the text as needed. This option is required to save the definition.
Click OK.
In the IHS Standard Codes Definitions dialog box (In Office Manager, go to Maintenance > Practice Setup > IHS Standard Codes Definitions), with the Community (SCB) definition type/category selected, select a definition, and then click Edit.
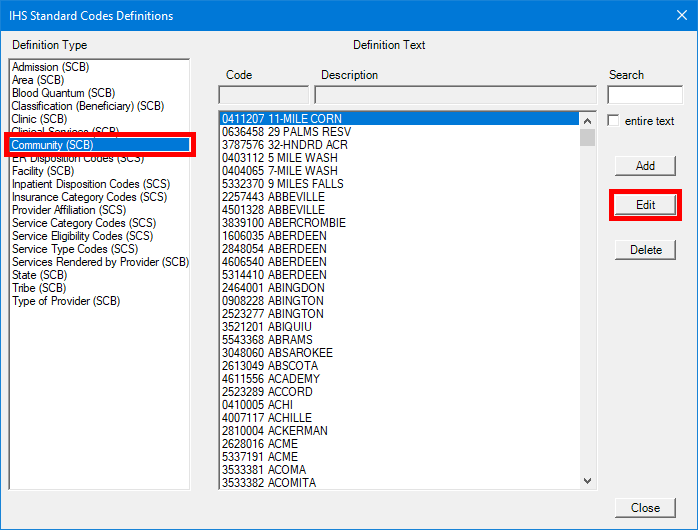
The Community Standard Code Book dialog box appears.
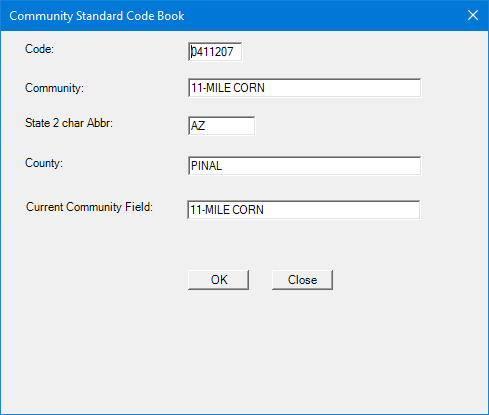
There is a new box: Current Community Field. You can change the text as needed. This option is required to save the definition.
Click OK.
The new fields (Indian Blood Quantum Field and Current Community Field) for the Blood Quantum and Community definitions are validated against patient records when you run the NPIRS data extraction utility (in Office Manager, go to Data Extraction > National Patient Information Reporting System (NPIRS)). If blood quantum and community values exist in a patient's record, in the Mapping Data Field Validation dialog box (in NPIRS, click Mapping Data Field Validation), entries for the patient for those definition types will not appear; otherwise, entries for the patient for those definition types will appear.

As in previous versions, in the Mapping Data Field Validation dialog box of the NPIRS data extraction utility, you can click a patient's chart number (which is a link) in the Patient Chart # column to modify the patient's additional information as needed. However, be aware of the following changes:
For blood quantum, the Patient Additional Information dialog appears when you click the link, so you can now select the correct blood quantum and update other information.
For beneficiary classification, community, or tribe, when you click the link, in the Change Patient Record dialog box that appears, there is now a list to select an option.
In the Mapping Data Field Validation dialog box of the NPIRS data extraction utility, the first and last name of a patient that appears in the list are now links. When you click the link in either the Patient Last Name or Patient First Name column, the patient's More Information window appears.
In the Mapping Data Field Validation dialog box of the NPIRS data extraction utility, if a clinic title appears in the Field Value not Mapped column, if you click in the link in the Patient Chart # column, a message appears. The wording of that message has been updated to explain how you should handle an empty or an unmatched value (the clinic title does not match the facility name in the IHS standard code definitions).
Old text: "The Descriptive ID does not match the IHS Standard Codes Definition for [Clinic Title]. Go to the Clinic Information dialog to change the Descriptive ID."
New text: "The Facility Name does not match the IHS Standard Codes Definition for [Clinic Title]. Go to the Clinic Information dialog to change the Title field."
On the Setup tab of the NPIRS data extraction utility, a list has been added: Unique Patient ID to use in files. From the list, select the ID type to use for the patient export (Pat Image ID, Pat External ID, Chart Number, Social Security #, or Other ID).
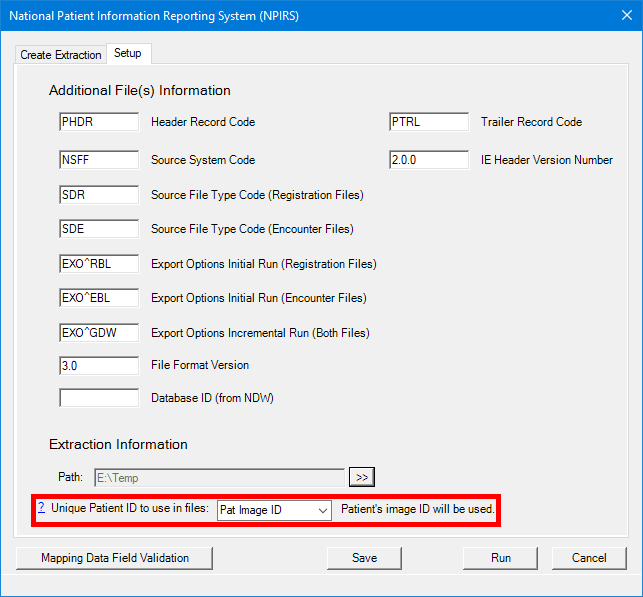
Note: The selected unique ID must correspond to the ID that is used to identify patients in records sent and received through the HL7 interface so the patient in the Dentrix Enterprise practice management system matches the patient in the medical system or EHR. The Unique Registration Code field in Registration and Encounter files are populated with the selected unique ID.
A "?" link appears next to the Unique Patient ID to use in files list. You can click the link to view an explanation regarding this option. Also, the same explanation appears any time you select a different option from the list.
"Are you sure you want to change the Patient Unique ID? If you are changing to match your EHR’s patient unique ID, please make sure that the patient unique ID is used to create the NPIRS Registration file from the EHR. If this ID is not in both Enterprise NPIRS Encounter file and the EHR NPIRS Registration file, the records in the Encounter file from Enterprise will not match to patients from the EHR NPIRS Registration file.
If you are changing this Patient Unique ID to use in both NPIRS files generated from Enterprise, just note that files already sent to NPIRS will have the current patient unique ID, so duplicate patient registration records may be added to the NDW database or an existing patient record may be overwritten by another patient's record due to unique ID collision."
New security right: With the NPIRS global setting enabled, there is a new security right: "NPIRS Unique Patient ID, Edit." This right allows a user to change the Unique Patient ID to use in files. This new right appears in the "Central Clinic Only" category. This right is not selected by default for any user.
On the Create Extraction tab of the NPIRS data extraction utility, when you select an option for Export Box (ASUFAC), the Source Box Site (ASUFAC Code Description) is now selected automatically.
Dental Patient Medical Assessment is now a semi-independent module. As in previous versions, you open the module from Family File, More Information, Chart, or Ledger. But now, the module can remain open even if you close other modules.
Also, if you open the Dental Patient Medical Assessment window for patient A from Family File, More Information, Chart, or Ledger, and then change from patient A to B in Family File, More Information, Chart, or Ledger, the Dental Patient Medical Assessment window for patient A remains open. However, if you then try to open the Dental Patient Medical Assessment window for patient B, a confirmation message appears if patient A's assessment is not finished.
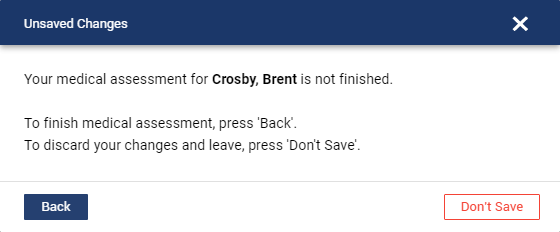
Do one of the following:
Click Don't Save to close the window for patient A and open the window for patient B.
Click Back to close the message and keep the window for patient A open.
Selections are saved as you progress through the assessment, so if you change an answer from Yes to No and then back to Yes again, you don't have to re-enter data. For example, do the following:
Select Yes, and then make selections.
Select No.

Select Yes. The previous selections (from step 1) appear.
A red triangle icon appears for tabs with missing required information:
If there is missing required information on the current tab, and you click Back or Next, you stay on the current page, and the unanswered required questions are given a red outline (this is existing functionality); now a red triangle icon also appears on the left (this is new functionality).
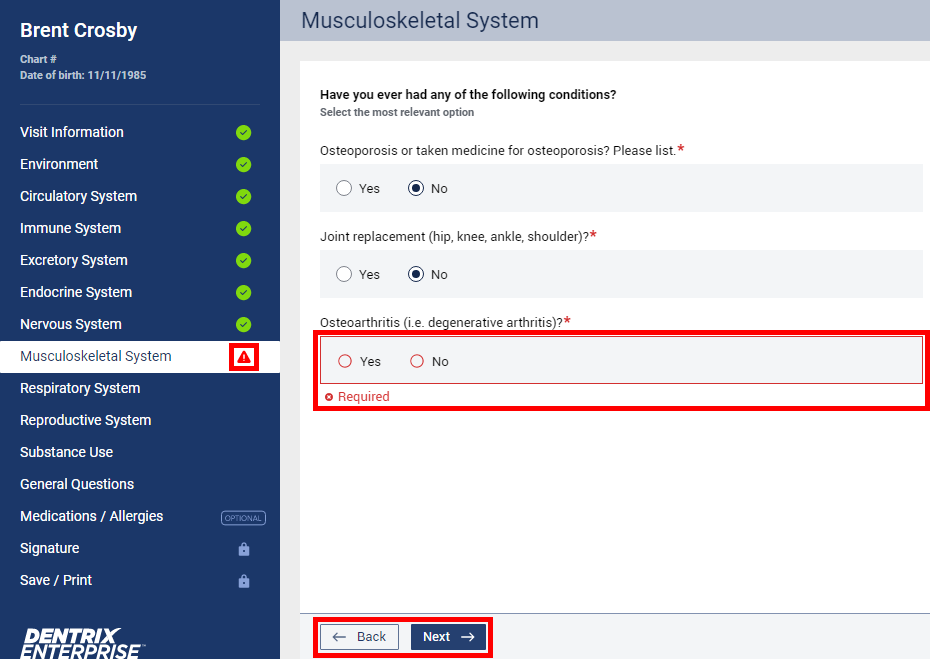
If there is missing required information on the current tab, and you select a different tab on the left, a message appears, and you must click Yes to proceed or No to remain on the current tab (this is existing functionality); now a red triangle icon now also appears on the left (this is new functionality).
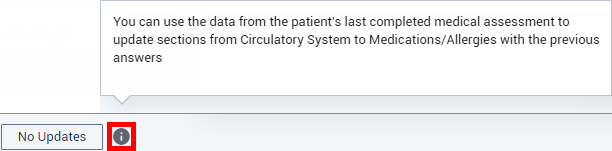
On the Circulatory System tab, there is now an "i" icon next to the No Updates button. When you click the icon a tooltip appears, explaining the functionality of the button: "You can use the data from the patient's last completed medical assessment to update sections from Circulatory System to Medications/Allergies with the previous answers."
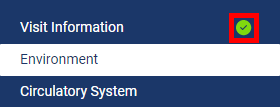
Now, as you complete a section of the assessment, on the left, a green checkmark appears on the corresponding tab to help you see your progress.
Now, the text "OPTIONAL" appears on the Medications/Allergies tab.
![]()
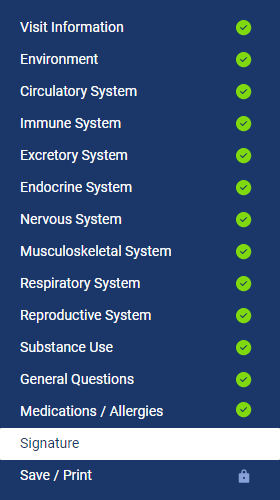
Lock icons appear on the Signature and Save/Print tabs on the left to indicate that the assessment is incomplete:
While Visit Information through General Questions are incomplete, a lock icon appears for Signature and Save/Print. You cannot visit those pages yet.
![]()
When all the required information exists for Visit Information through General Questions, the lock icon for Signature disappears.
After you click Finish on the Signature tab, its lock icon disappears and becomes a green checkmark.
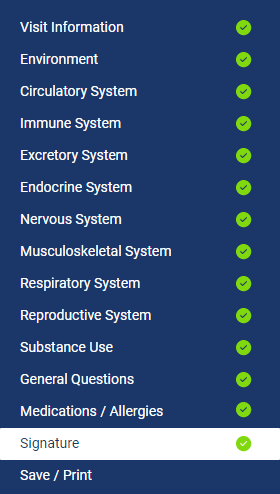
Then, the lock icon for Save/Print disappears and becomes a green checkmark or red triangle.
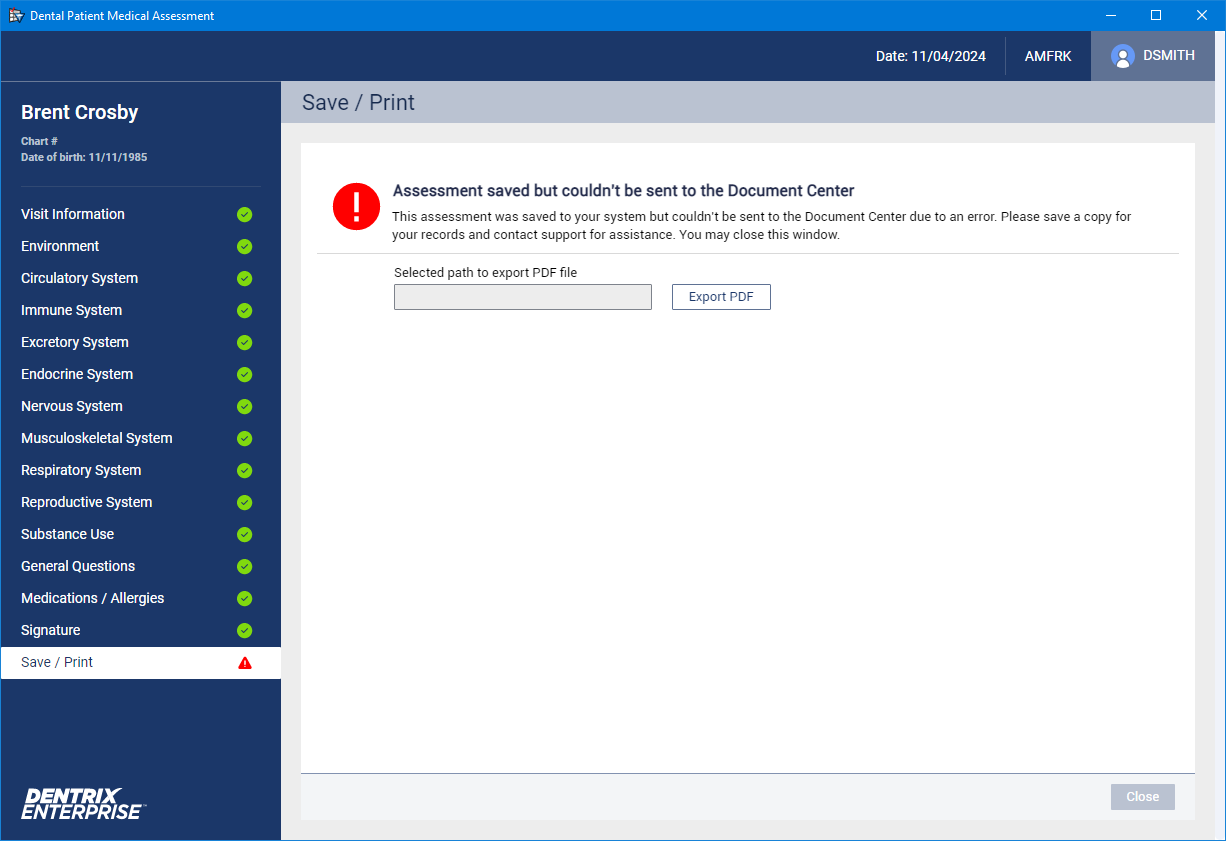
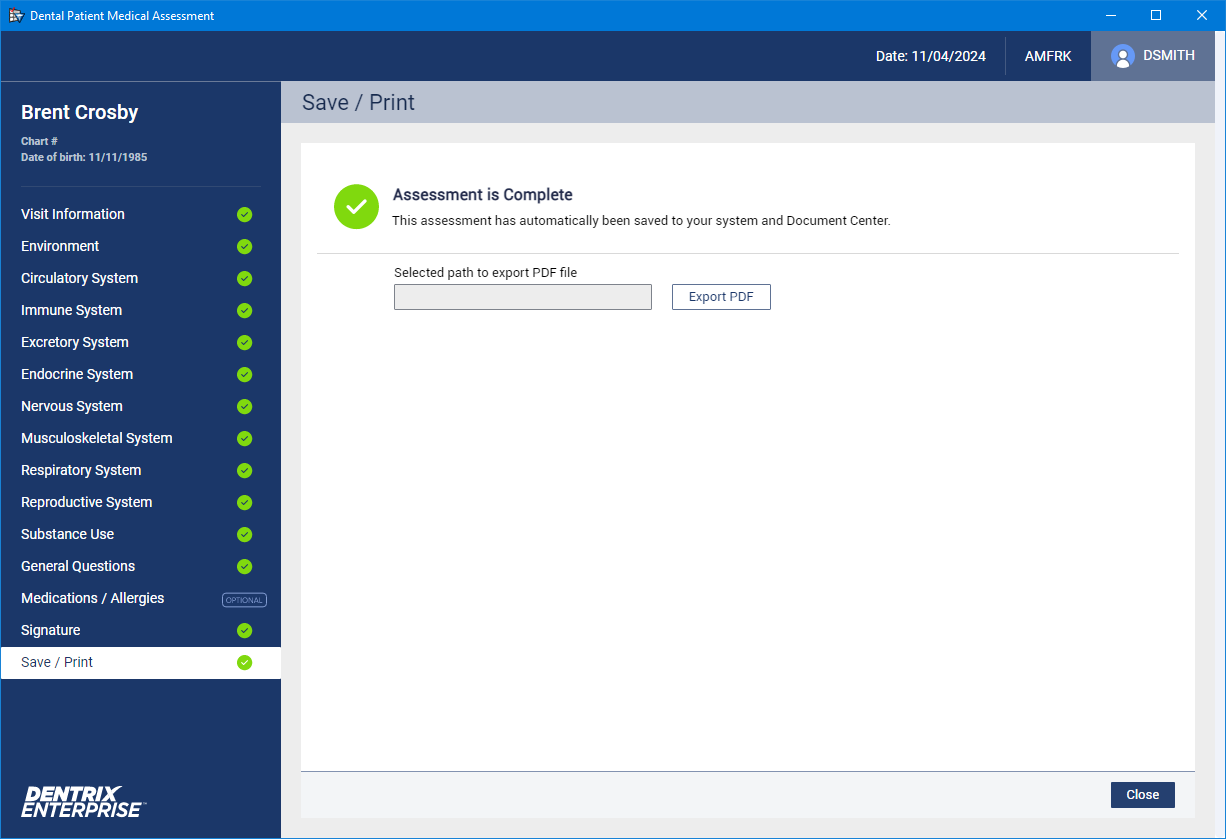
A green checkmark indicates that the assessment was saved in the database, and a .pdf copy of the assessment was saved in the patient's Document Center record.

A red triangle indicates that the assessment was saved in the database, but a .pdf copy was not saved in the patient's Document Center record.
On the Signature tab, the Next button has been replaced with a Finish button.
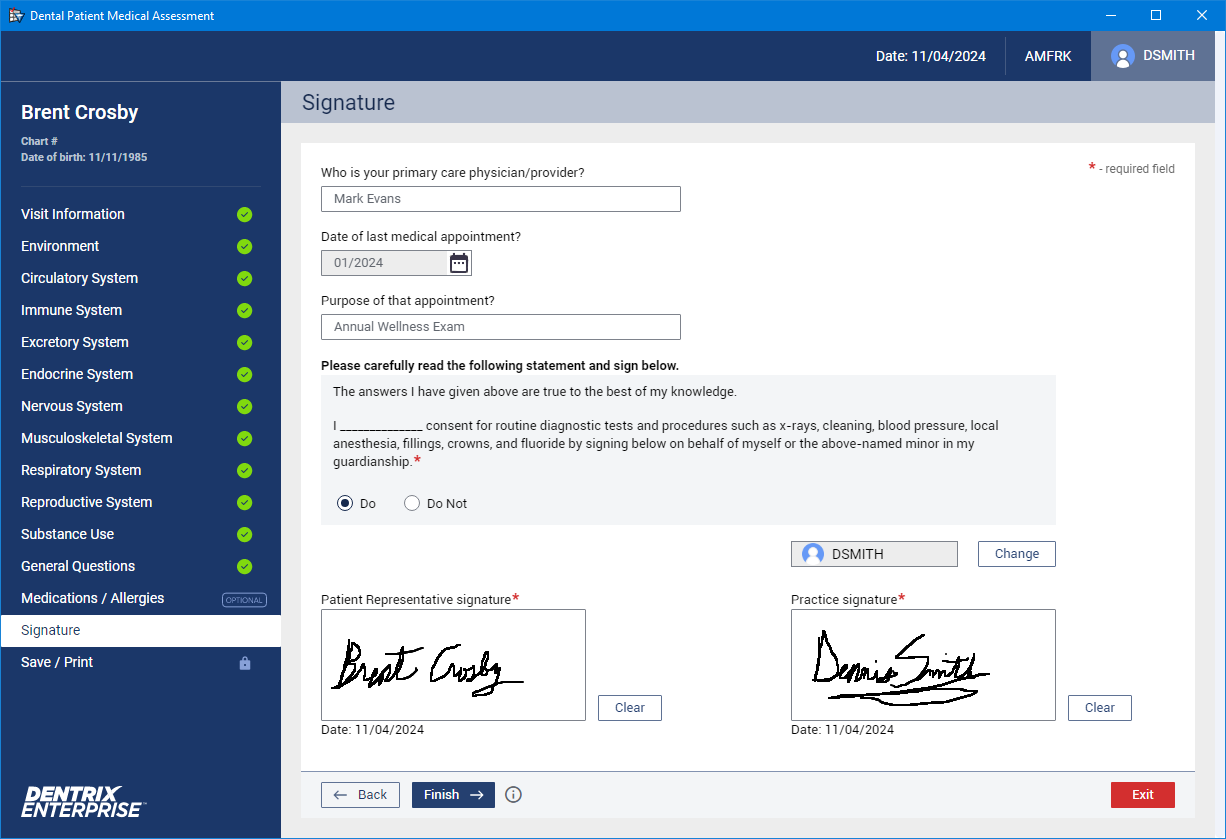
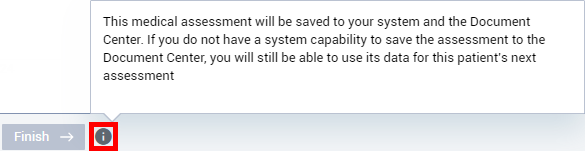
On the Signature tab, there is now an "i" icon next to the Finish button. When you click the icon a tooltip appears, explaining the functionality of the button: "This medical assessment will be saved to your system and the Document Center. If you do not have a system capability to save the assessment to the Document Center, you will still be able to use its data for this patient’s next assessment."
Note: The "Health History Form, Save" security right is required to save the assessment. If you have not been granted this right, a message appears: "Access denied. Health History Form, Save right is required."
Now, after you click Finish on the Signature page, the assessment is saved to the database, and a copy is saved to Document Center automatically. Then, you are taken to the Save/Print tab automatically.
On the Save/Print tab, the Finish and Save button has been removed. Also the Exit button has been replaced with a Close button.
The .pdf copy of the assessment has been changed:
In the signature section, for the patient and provider signature lines, the date/time is displayed in a12-hour format and contains AM/PM and the system time zone (for example "Date/Time: 11-04-2024 / 11:32 AM MST").

In the upper-left corner of each page, the text "IHS-42-1 (Rev 4/2021)" now appears.
