The data entry controls allow you to input data specific to different sites on the selected tooth. From the data entry controls, you can input pocket depths, bleeding and suppuration points, gingival margins, clinical attachment levels, and muco gingival junction measurements. You can use the keypad to enter measurements if you are using a mouse, light pen, touch screen, or writing tablet.
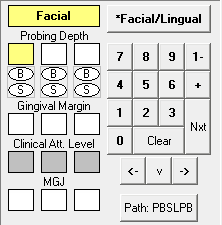
The following controls are available:
Facial/Lingual - Click this button to switch from the facial side to the lingual side of a tooth (or vice versa).
Probing Depth - These boxes allow for the entry of pocket depth measurements. Dentrix Enterprise automatically advances through the boxes according to your path settings. (Depending on which calculation option is selected in the Perio Entry Setup dialog box, this option might not be available.)
B (Bleeding) - Click a B oval to specify a bleeding point on the tooth. A red oval that corresponds to the selected tooth and site appears on the data chart. (Pressing B on your keyboard at the correct point in the path, accomplishes the same task.)
S (Suppuration) - Click an S oval to specify an infection point on the tooth. A yellow oval that corresponds to the selected tooth and site appears on the data chart. (Pressing S on your keyboard at the correct point in the path accomplishes the same task.) To add both suppuration and bleeding to the same tooth, hold down the CTRL key and press B on your keyboard.
Gingival Margin - These boxes allow for the entry of gingival margin measurements. Dentrix Enterprise automatically advances through the boxes depending on your path settings. (Depending on which calculation option is selected in the Perio Entry Setup dialog box, this option might not be available.)
Clinical Att. Level - These boxes allow for the entry of the clinical attachment level. Dentrix Enterprise automatically advances through the boxes depending on your path settings. (Depending on which calculation option is selected in the Perio Entry Setup dialog box, this option might not be available.)
MGJ - These boxes allow for the entry of the muco gingival junction measurements. Dentrix Enterprise automatically advances through the boxes depending on your path settings. (Depending on which calculation option is selected in the Perio Entry Setup dialog box, this option might not be available.)
0 - 9 - Click these buttons to enter charting measurements.
1- - There are occasions when a measurement is greater than nine millimeters. This button is used for values 10 and above (for example, to enter a pocket depth of 12 millimeters, click the 1- button followed by the 2 button). Measurements greater than nine millimeters appear as a greater than sign (>) on the data chart.
+ - There are times when the gingival margin is above the CEJ. In these cases, enter the measurement as a positive number. To enter a positive value in the data chart, click the + button followed by the appropriate number. This button only works when entering a GM measurement. To show that the GM is a positive number, the number appears on the data chart as a white number in a black square.
Nxt - Click this button to move from the current site to the next site in the path or script.
Clear - Click this button to clear all entries on the current tooth.
Left, Down, and Right Arrows (<-, v, ->) - Click these buttons to move around the data entry area (Probing Depth, B, S, Gingival Margin, Clinical Att. Level, and MGJ) without advancing to another tooth.
Path - This button always displays which path is in use while charting (for example, PBSL, PBSR, or none). To manually switch between paths while charting, click the button until the desired path is displayed.