This guide provides information about the new software release. This guide includes a brief description of the new features and enhancements available in this release and instructions on how to use the new features and enhancements.
Notes:
For a complete list of features and fixes in this Dentrix Enterprise release, refer to the release notes.
Before installing or upgrading Dentrix Enterprise, make sure your computers comply with the latest system requirements.
According to Microsoft, mainstream support for Windows Server 2019 ended on January 9, 2024. Currently, Henry Schein One still provides support for Dentrix Enterprise on Windows Server 2019 as indicated in the system requirements.
This release includes the following new features and enhancements:
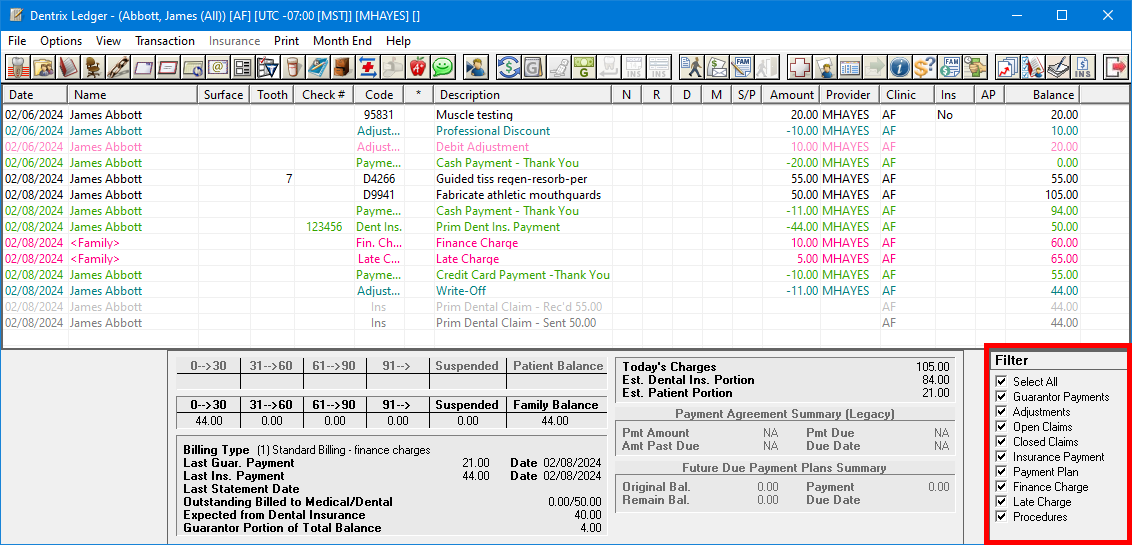
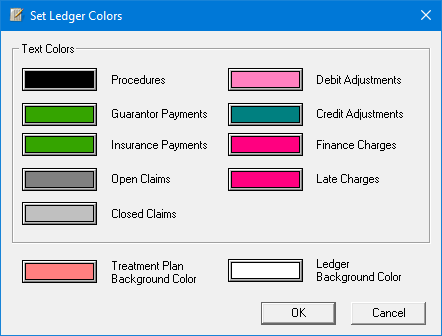
Ledger Filters and Colors - You can now filter the transaction list in Ledger to show only certain transaction types and claims. Also, you can now associate colors with open claims and closed claims like you can with transaction types.
Localized Patient Access - There is a new organization-level setting that prevents all users from accessing patient information across clinics in Appointment Book.
Bulk Email Address and Phone Number Changes - When you save changes to a patient's email address, home phone number, and/or mobile phone number, Dentrix Enterprise now prompts you to choose which, if any, of those changes you want to update for the patient's entire family.
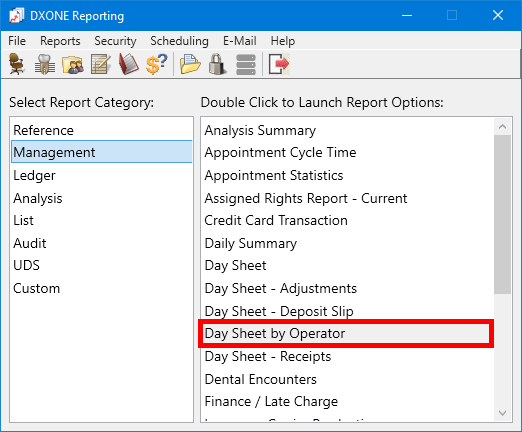
Operator Day Sheet - The Operator Day Sheet is now available in DXOne Reporting.
Patient Route Slip - The Patient Route Slip is now available in DXOne Reporting.
UDS reports - You can now choose to hide patient names on the UDS reports in DXOne Reporting.
Providers in Report Headers - The number of provider IDs that can appear next to "Provider" in the header of a DXOne Reporting report has been limited.
Patient Health Exchange Enhancements for the Cures Act - Dentrix Enterprise can now read notes for problems, medications, allergies, treatment-planned procedures, and completed procedures from C-CDA files to update patient records.
Including Consultation Notes - In previous versions, consultation notes were always included in an exported C-CDA file, but now you can choose whether to include the consultation notes or not.
Procedure Code Categories - In Practice Definitions the maximum number of categories that you can define is now 24. In previous versions, the maximum was 16.
Duplicate Procedure Warnings - For a given procedure code or multi-code, you can now specify whether to allow a duplicate procedure warning message to appear or to suppress the message if that code is posted more than once in a patient's record for the same date/encounter.
ePrescribe Expiration - The expiration date for an ePrescribe subscription has been removed from Dentrix Enterprise.
Install Manager - Install Manager is a new standalone program for managing Dentrix Enterprise installations.
Medical Health History Assessments: (For IHS facilities only)
Enhancements - Several enhancements have been made to medical health history assessments.
New Security Rights - There are new security rights to restrict who can open, sign, export, and save assessments. There is also a new security right to control whether a patient signature is required or not.
Provisioning Multiple Users:
New Feature - You can now import a batch of providers or staff from a .csv file.
New Security Right - There is a new security right that allows a user to import a batch of users. The "User Import" security right is under the "Central Clinic Only" category.
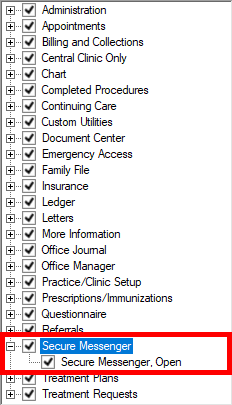
New Security Right for Opening Messenger - There is a new security right "Secure Messenger, Open" that allows a user to open Messenger.
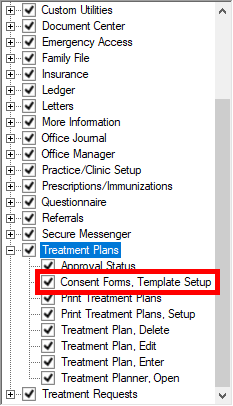
New Security Right for Consent Form Template Setup - There is a new security right "Consent Forms, Template Setup" that allows a use to access the consent form (enhanced) template setup in Treatment Planner.
New Security Right for XRayVision - There is a new security right "Integration Settings, XRayVision" that allows a user to edit the XRayVision settings.
New Security Right for Deleting Closed Claims - There is a new security right "Insurance Claims, Delete Received/Closed" that allows a user to delete claims with attached payments or adjustments.
eClaims Enhancements:
Retrying Electronic Claim Submissions - If your eTrans account is locked by another user when you attempt to submit electronic claims, the message that appears now provides options to clear the lock and retry the submission.
New Global Setting for eClaims Security Override Setting - There is a new global setting that controls the e-claims security override setting on the Options tab of the Security Rights Setup dialog box.
Skipped Electronic Claims - When you send e-claims from the Batch Processor, if any claims are skipped, messages appear as applicable to inform you that claims were skipped and the reasons why.
Multiple Data Service Accounts for Electronic Claims - If a set of e-claims are being sent using multiple Data Service (eTrans) accounts, a message appears and states that the claims will be validated and sent in batches according to the Data Service account.
Insurance Claim Note Enhancements - While you are modifying an insurance claim note, the total number of characters appears for your reference. Also, if you are inserting procedure notes into the claim note, if any procedure has associated tooth and/or treatment areas, those appear for your reference.
2024 Version of Standard ADA Printed Claim Form - The ADA maintains the standardized claim form used for insurance billing. The ADA updates the codes annually, and the claim format occasionally. The updates (which include four new fields) for 2024 printed claim forms are now available in Dentrix Enterprise.
Locum Tenens Treating Provider - To help you maintain a consistent claim acceptance rate with payers, Dentrix Enterprise now allows you to designate providers as Locum Tenens treating providers. This designation appears in a new field on printed ADA 2024 claim forms if applicable.
The following sections contain instructions about how to use the new features and enhancements of this release.
You can now filter the transaction list in Ledger to show only certain transaction types and claims. Under Filter (in the lower-right corner), clear any checkboxes to hide those items; or clear the Select All checkbox to quickly hide all items, and then select the checkboxes of only the items you want to view.
Notes:
If not all transaction types and claims are being viewed, the filter options header Filter changes to Filter Applied, and the Balance column of the transaction list does not show any amounts.
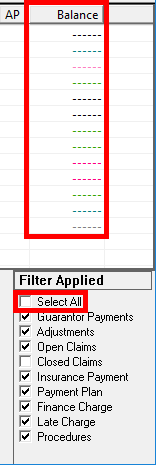
Ledger reverts back to showing all transaction types and claims once you select a different patient or close the window.
Also, you can now associate colors with open claims and closed claims like you can with transaction types. In previous versions, you could associate only one color to claims. To customize the Ledger colors, on the File menu, click Set Ledger Colors.
There is a new organization-level setting that prevents all users from accessing patient information across clinics in Appointment Book.
To enable localized patient access
Open Office Manager while logged in to the Central clinic. On the Maintenance menu, point to Practice Setup, and then click Enterprise Setup. Select the Central clinic, and then click Edit.
In the Clinic Information dialog box, select the Organization Settings tab, and then select the new Localize Patient Access checkbox.

Click OK.
With this setting enabled, the following restrictions apply:
When you start the scheduling of an appointment from various areas of Dentrix Enterprise (such as More Information, Treatment Request Manager, and Scheduling Assistant), the Select View dialog box that appears displays only the Appointment Book views that have been assigned the same clinic as the selected patient's preferred clinic.
In Appointment Book, if the current Appointment Book view includes operatories for multiple clinics, you can schedule appointments only in the operatories of the clinic that has been assigned to the current view.
Note: As in previous versions, if the current view includes operatories for multiple clinics, Appointment Book displays all the operatories that are associated with that view.
In Appointment Book, if the current Appointment Book view includes operatories for multiple clinics, you can access patient-specific areas of Dentrix Enterprise (such as Family File) from an appointment only if the appointment was scheduled in the clinic that has been assigned to the current view.
Note: As in previous versions, if the current Appointment Book view includes operatories for multiple clinics, you can open an appointment only if the appointment was scheduled in an operatory of the clinic that has been assigned to the current view.
When you save changes to a patient's email address, home phone number, and/or mobile phone number, Dentrix Enterprise now prompts you to choose which, if any, of those changes you want to update for the patient's entire family.
To update a family's contact information
With a patient selected in Family File, double-click the Patient Information block to open the Patient Information dialog box.
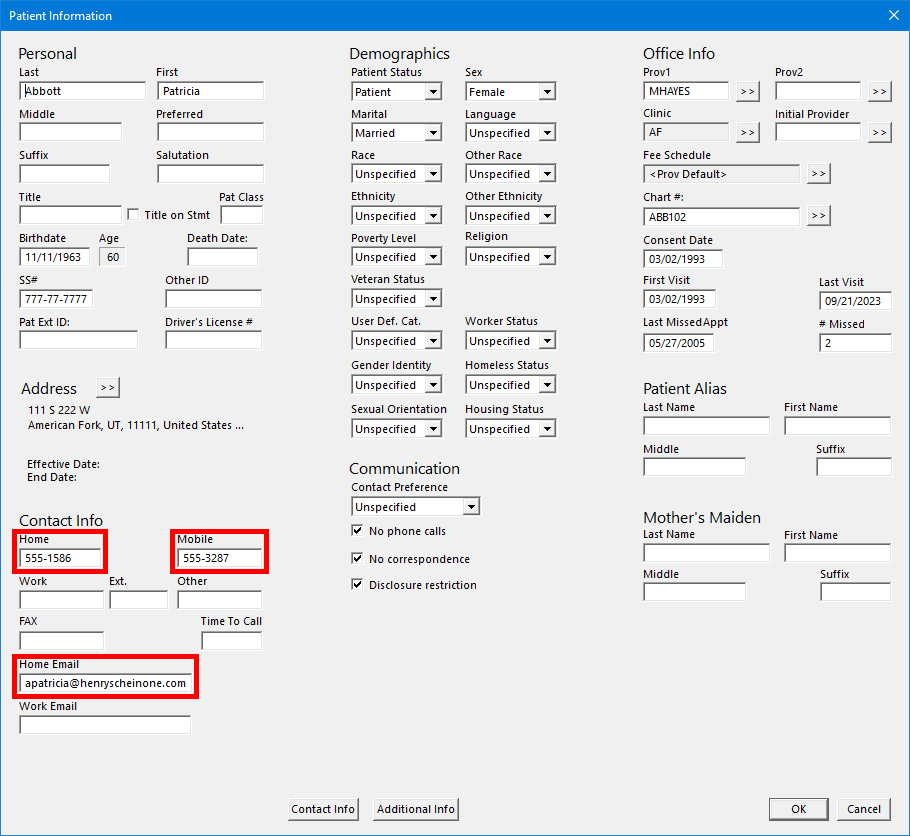
Under Contact Info, change any of the following options: Home, Mobile, and/or Home Email.
Click OK.
The Contact Information Change dialog box appears.
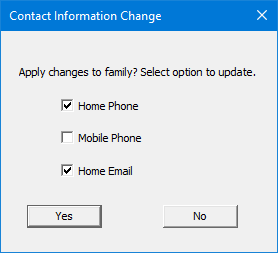
Select the checkbox of any of the items that you want to update for all other family members.
Note: The options that are available depends on which information you changed.
Click Yes.
The operator day sheet is now available in DXOne Reporting.
Notes:
The toolbar button  and menu option for the report have been removed from Office Manager.
You can view reports generated before this release that are in the Batch Processor.
To generate the Day Sheet by Operator
In DXOne Reporting, select Management on the left, and then double-click Day Sheet by Operator on the right.
The Day Sheet by Operator dialog box appears.
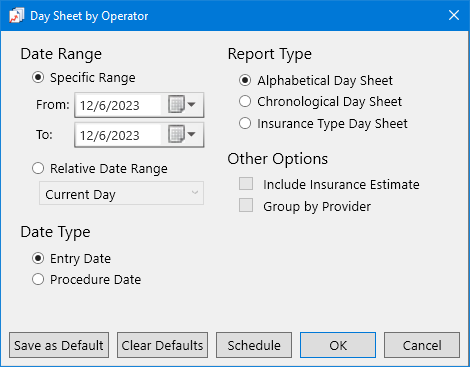
Set up the Date Range and Date Type for the report as needed.
Set up the following options for the report as needed:
Report Type - Select one of the following options:
Alphabetical Day Sheet - To sort the transactions alphabetically by the last names of patients.
Chronological Day Sheet - To sort the transactions by date (based on the Date Type).
Insurance Type Day Sheet - To sort the transactions by the type of insurance coverage (such as commercial, self pay, and Medicaid).
Other Options - Select or clear the following checkboxes as needed:
Include Insurance Estimate - With this checkbox clear, the estimated insurance portions of procedures are not included. With this checkbox selected, the estimated insurance portions of procedures are included.
Group by Provider - With this checkbox clear, transactions are not grouped by provider, and the report displays grand totals without a breakdown by provider. With this checkbox selected, the transactions are grouped by provider, totals are broken down by provider, and the report displays grand totals.
Note: The report displays a charge with its associated rendering provider. The report displays an applied credit with the rendering provider of the charge that it's applied to.
Click OK to preview the report.
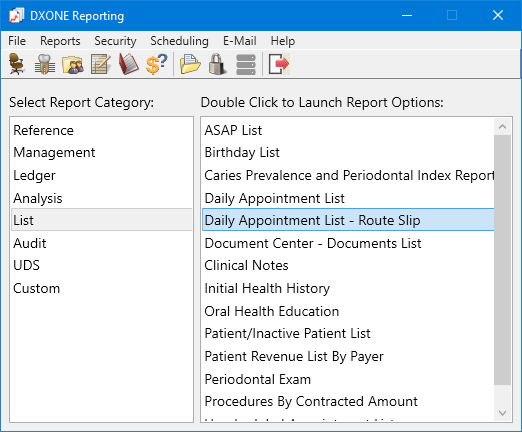
The Patient Route Slip is now available in DXOne Reporting.
Notes:
The Patient Route Slips checkbox has been removed from the Daily Appointment List dialog box (in Office Manager, go to Reports > Lists > Daily Appointment List).
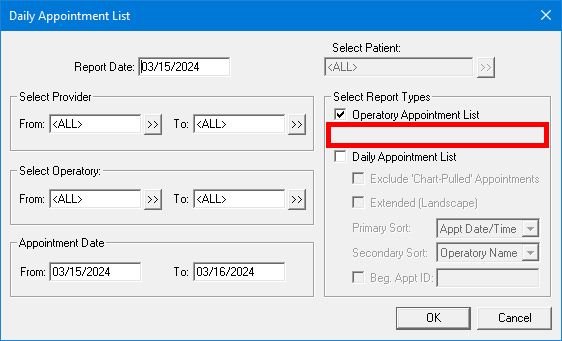
You can view reports generated before this release that are in the Batch Processor.
To generate the Patient Route Slip
In DXOne Reporting, select List on the left, and then double-click Daily Appointment List - Route Slip on the right.
The Daily Appointment List - Route Slip dialog box appears.
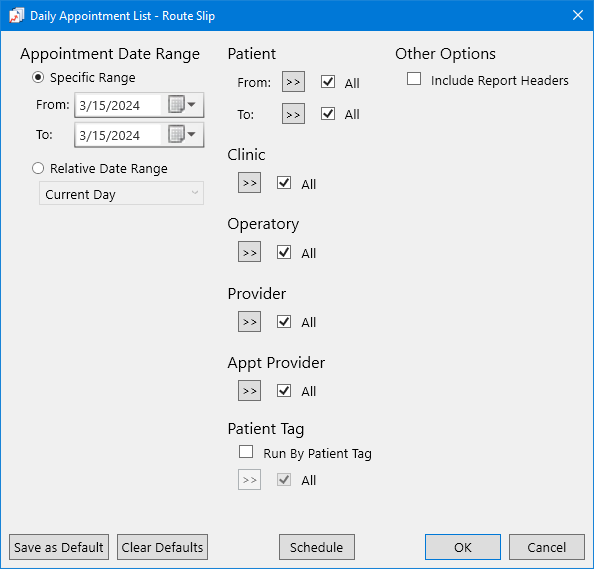
Set up the options for the report as needed.
Click OK to preview the report.
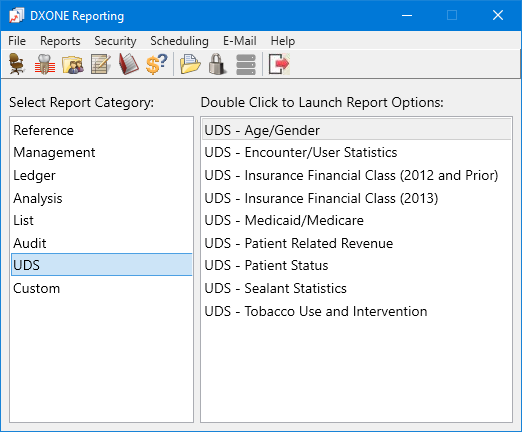
You can now choose to hide patient names on the UDS reports in DXOne Reporting:
UDS - Age/Gender Report
UDS - Encounter/User Statistics Report
UDS - Insurance Financial Class Report (2012 and Prior)
UDS - Insurance Financial Class Report (2013)
UDS - Medicaid/Medicare Report
UDS - Patient Related Revenue Report
UDS - Patient Status Report
UDS - Sealant Statistics Report
UDS - Tobacco Use and Intervention Report
To generate a UDS report without names
In DXOne Reporting, select UDS on the left, and then double-click a report on the right.
The corresponding report options dialog box appears (such as the UDS - Age/Gender dialog box).
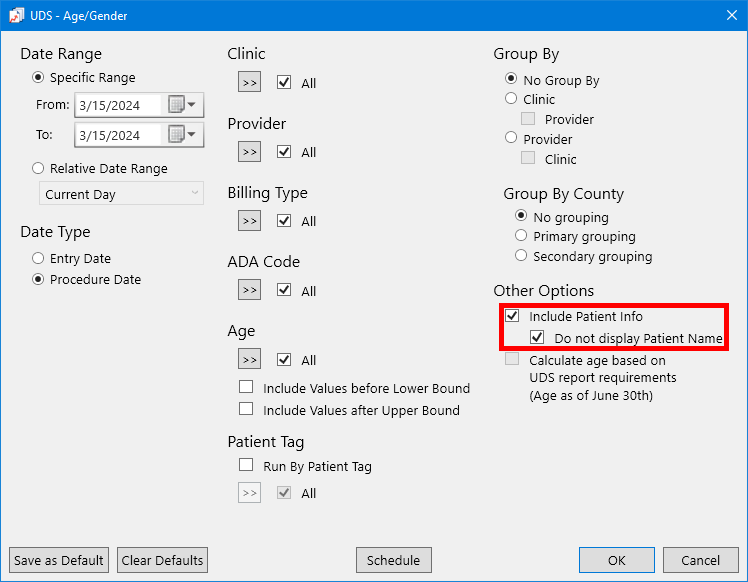
Under Other Options, select the Include Patient Info checkbox, and then select the Do not display Patient Name checkbox.
Set up other options as needed.
To save these settings as the default for the next time you generate this report, click Save as Default.
Click OK.
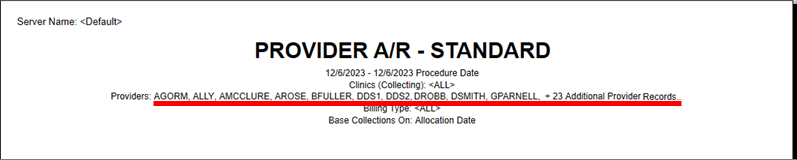
The number of provider IDs that can appear next to "Provider" in the header of a DXOne Reporting report has been limited.
If all providers are selected for a DXOne Reporting report, next to "Providers" in the report's header, "<ALL>" appears.
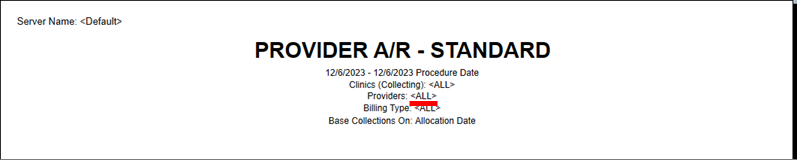
If specific providers are selected for a DXOne Reporting report, next to "Providers" in the report's header, up to 200 provider IDs can appear and then, if needed, "+ [the number of] Additional Provider Records."
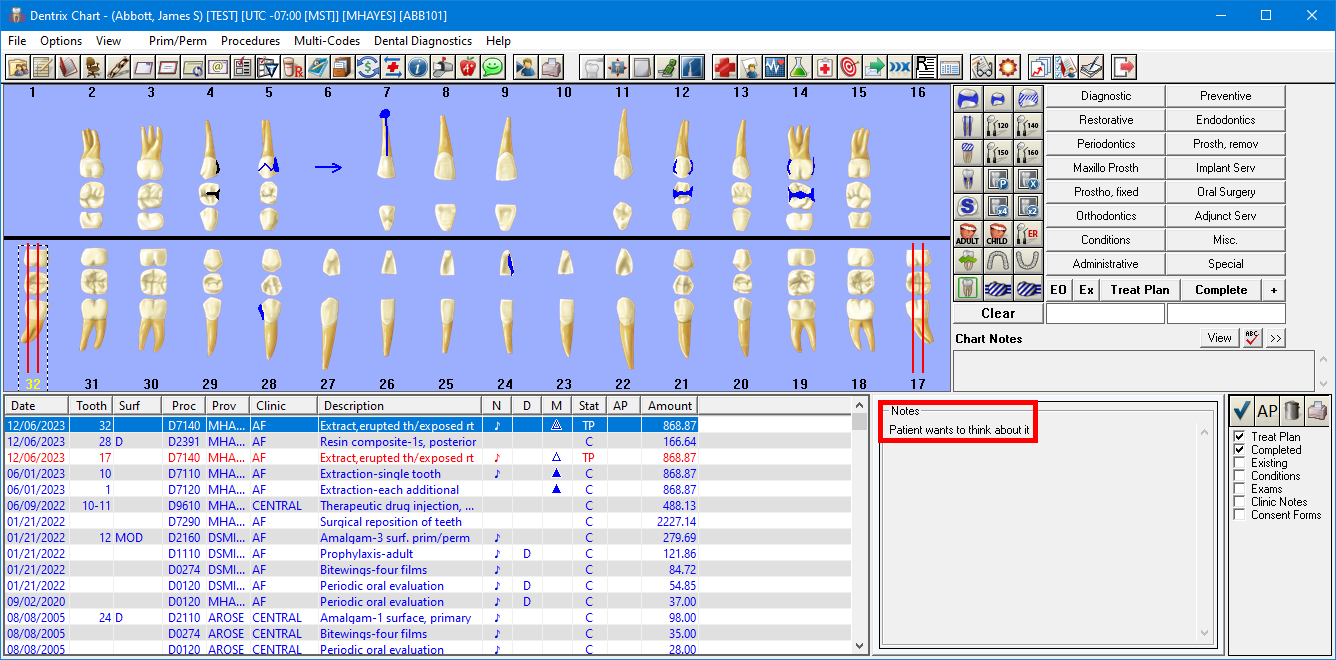
Dentrix Enterprise can now read notes for problems, medications, allergies, treatment-planned procedures, and completed procedures from C-CDA files to update patient records.
A Notes column now appears on the Problems, Medications, Allergies, Procedures, and Tx Plans tabs of the Comparison dialog box that appears after you import a C-CDA file and then click Update Patient Info.
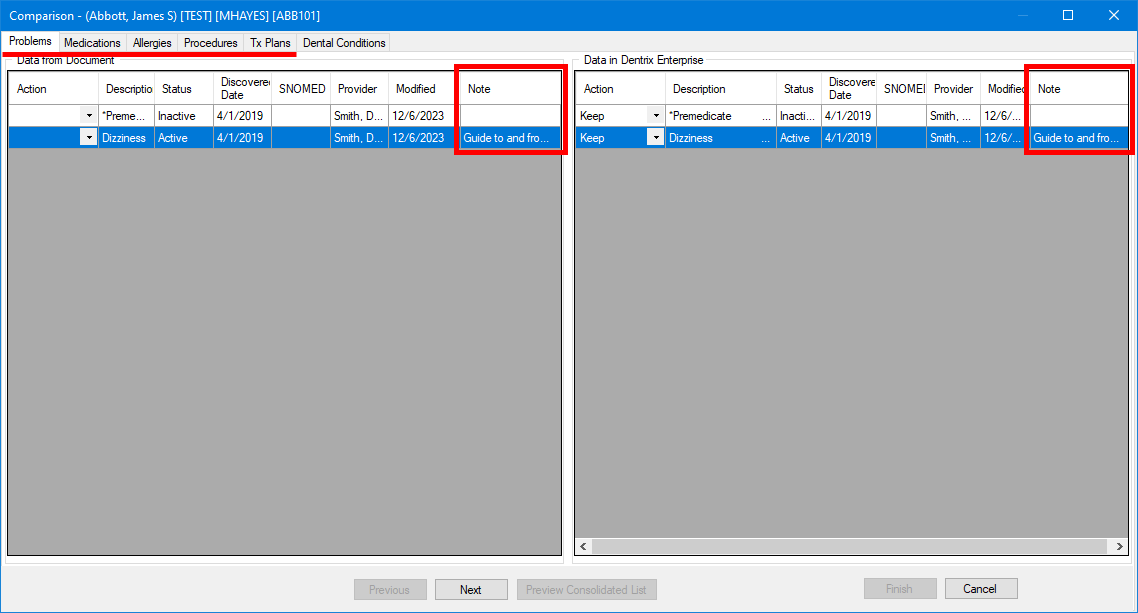
In Medical Alerts, notes appear for imported problems, medications, and allergies.

In Chart, notes appear for imported treatment-planned and completed procedures in the progress notes.
In previous versions, consultation notes were always included in an exported C-CDA file, but now you can choose whether to include the consultation notes or not.
To include consultation notes in an exported C-CDA file
With a patient selected in Family File, click the Patient Health Exchange button  on the toolbar.
In the Patient Health Exchange dialog box, select the Export tab.
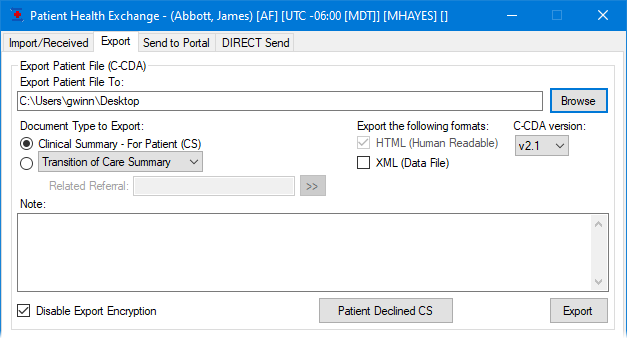
With the Clinical Summary - For Patient (CS) option selected, set up the other options as needed.
Click Export.
The Clinical Summary Options dialog box appears.
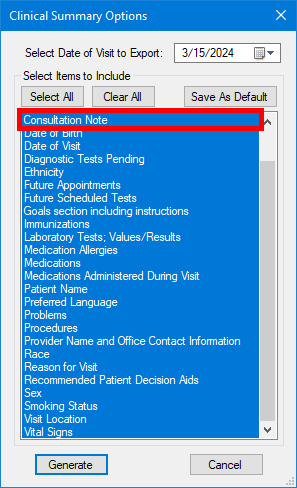
Select or clear Consultation Note in the list.
Click Generate.
In Practice Definitions, the maximum number of categories that you can define is now 24. In previous versions, the maximum was 16.
Note: Chart is still limited to 16 procedure code category buttons.
To add a procedure code category
While logged in to the Central clinic in Office Manager, on the Maintenance menu, point to Practice Setup, and then click Definitions.
In the Practice Definitions dialog box, select Procedure Code Categories on the left to view the corresponding definitions on the right.
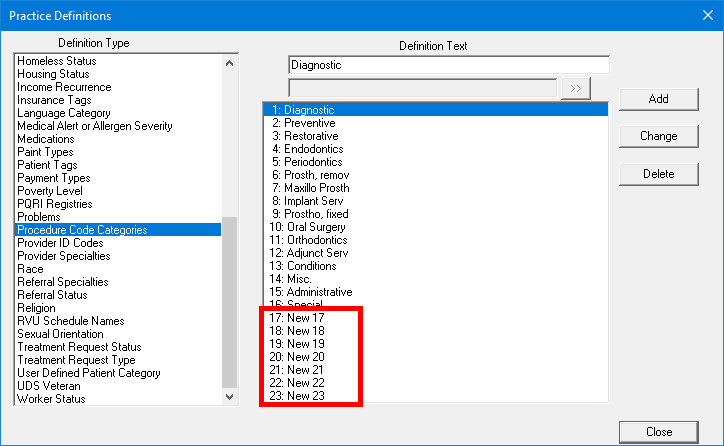
Change the Definition Text, and then click Add.
Repeat step 3 as needed to add up to 24 categories.
For a given procedure code or multi-code, you can now specify whether to allow a duplicate procedure warning message to appear or to suppress the message if that code is posted more than once in a patient's record for the same date/encounter.
To allow duplicates of a procedure without a warning message
In Office Manager, on the Maintenance menu, point to Practice Setup, and then click Procedure Code Setup. In the Procedure Code Setup dialog box, select a Procedure Code Category, and then double-click a procedure on the right.
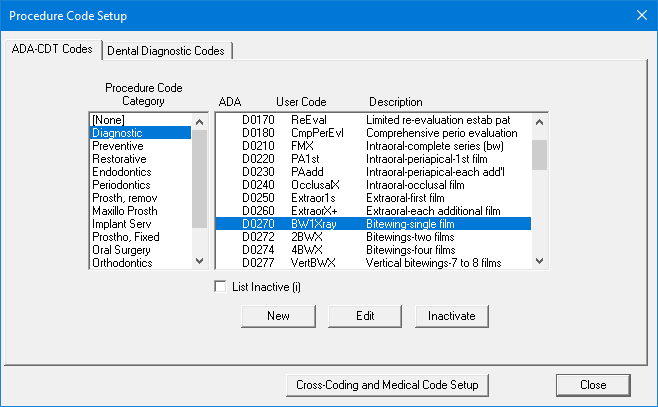
The Procedure Code Editor - Existing dialog box appears.
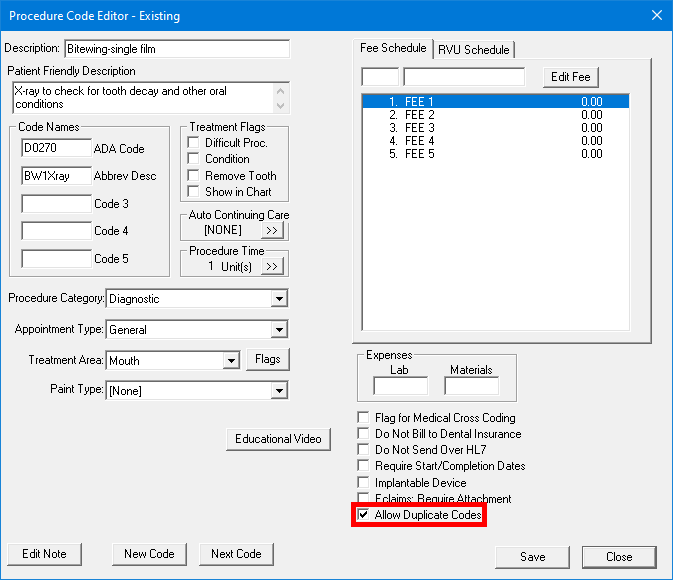
Select the Allow Duplicate Codes checkbox.
Click Save.
On the confirmation message, click Save.
To allow duplicates of a multi-code without a warning message
In Office Manager, on the Maintenance menu, point to Practice Setup, and then click Multi-Code Setup. In the Multi-Code List dialog box, double-click a multi-code.
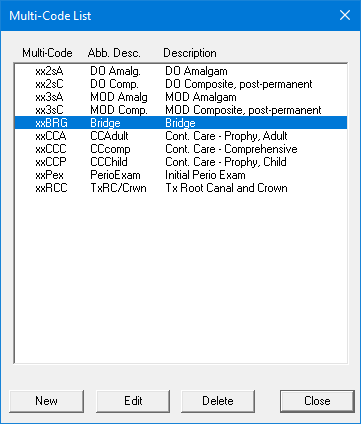
The Multi-Code List dialog box appears.
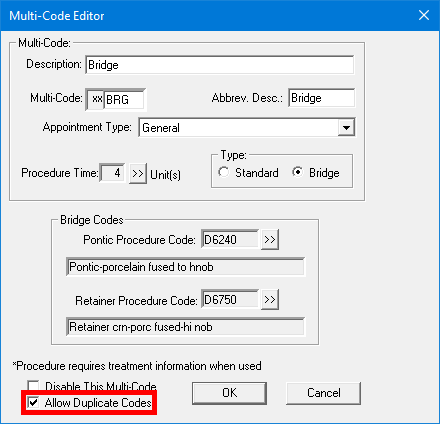
Select the Allow Duplicate Codes checkbox.
Click OK.
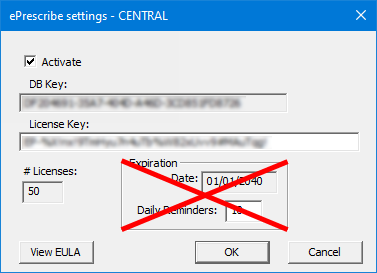
The expiration date for an ePrescribe subscription has been removed from the following areas of Dentrix Enterprise:
The Subscriptions tab of the Clinic Information dialog box for the Central (organization-level) clinic. Also, daily reminders to renew your subscription prior to an approaching expiration date no longer appear.
The ePrescribe Subscription section in the global settings.
To access the ePrescribe settings for the Central clinic
While logged in to the Central clinic in Office Manager, on the Maintenance menu, point to Practice Setup, and then click Clinical Resource Setup.
In the Clinic Resource Setup dialog box, under Clinic Information, click Edit.
In the Clinic Information dialog box, select the Subscriptions tab.
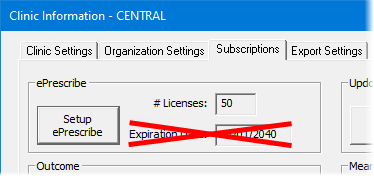
Click Setup ePrescribe.
The ePrescribe Settings - Central dialog box appears.
Install Manager is a new standalone program for managing Dentrix Enterprise installations. There is a new Windows service and a new registry key associated with Install Manager:
New Windows service - Install Manager requires the new Dentrix Enterprise Update Service.
New Windows Registry key - Install Manager stores values in the following new registry key: HKEY_LOCAL_MACHINE\SOFTWARE\Wow6432Node\Dentrix Dental Systems, Inc.\DENTRIX\InstallManager.
Note: For complete instructions on installing and upgrading Dentrix Enterprise, refer to the Dentrix Enterprise Installation Guide.
To install the Dentrix Enterprise server features
Extract the contents of the server installation package.
If you want to install the client program files on the server, extract the contents of the workstation installation package, and then copy the client application setup (Setup_DE_Client.exe) from the extracted workstation installation package to the extracted server installation package.
In the extracted server installation package, launch Setup.exe to install Install Manager.
When Install Manager opens, run the SQL Update Scripts to update the database.
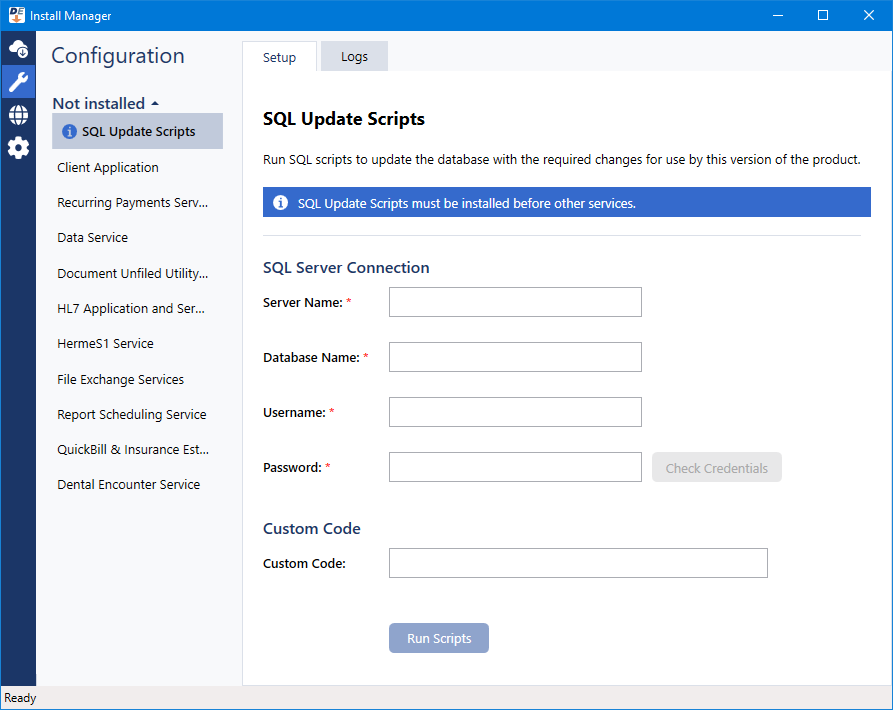
If applicable, install the Client Application.
Install services as needed: Recurring Payments Service, Data Service, Document Unfiled Utility Service, HL7 Application and Services, HermeS1 Service, File Exchange Services, Report Scheduling Service, QuickBill & Insurance Estimator Services, and/or Dental Encounter Service.
Close Install Manager.
To upgrade the Dentrix Enterprise server features
If you are upgrading from version 11.0.20:
(Optional) If the Dentrix Enterprise client program files are installed, and you want to continue to access Dentrix Enterprise on the server, you may want to uninstall the 11.0.20 client program files on the server. You can install the 11.0.48 client program files later.
Extract the contents of the server installation package.
If you want to install or upgrade the client program files on the server, extract the contents of the workstation installation package, and then copy the client application setup (Setup_DE_Client.exe) from the extracted workstation installation package to the extracted server installation package.
In the extracted server installation package, launch Setup.exe to install Install Manager.
When Install Manager opens, run the SQL Update Scripts to update the database.
If applicable, install the Client Application.
Install/reinstall services as needed: Recurring Payments Service, Data Service, Document Unfiled Utility Service, HL7 Application and Services, HermeS1 Service, File Exchange Services, Report Scheduling Service, QuickBill & Insurance Estimator Services, and/or Dental Encounter Service.
Close Install Manager.
If you are upgrading from version 11.0.40/.43/.44/.45/.46:
Extract the contents of the server install package.
If you want to install or upgrade the client program files on the server, extract the contents of the workstation installation package, and then copy the client application setup (Setup_DE_Client.exe) from the extracted workstation installation package to the extracted server installation package.
In the extracted server installation package, launch Setup.exe to install Install Manager.
When Install Manager opens, run the SQL Update Scripts to update the database.
If applicable, install the Client Application.
Install services under Not Installed as needed: Recurring Payments Service, Data Service, Document Unfiled Utility Service, HL7 Application and Services, HermeS1 Service, File Exchange Services, Report Scheduling Service, QuickBill & Insurance Estimator Services, and/or Dental Encounter Service.
Close Install Manager.
If the Dentrix Enterprise client program files are installed, and you want to continue to access Dentrix Enterprise on the server, to upgrade the client application from a previous version, launch the client application setup (Setup_DE_Client.exe).
To upgrade services from a previous version, in the extracted server installation package, launch service setups as needed: Recurring Payments Service (Dtx.RecurringPaymentsService.Installer.exe), Data Service (Dtx.DataService.Installer.exe), Document Unfiled Utility Service (Dtx.DocUUService.Installer.exe), HL7 Application and Services (HL7Installer.exe), HermeS1 Service (HermesSetup.exe), File Exchange Services (FileExchangeServicesInstaller.exe), Report Scheduling Service (ReportBuilderServiceInstaller.exe), QuickBill & Insurance Estimator Services (QuickBillBE.exe), and/or Dental Encounter Service (DentalEncounterService.exe).
To install the Dentrix Enterprise workstation features
Extract the contents of the workstation installation package.
In the extracted workstation installation package, open the file Install.package to specify the correct value for UpdateServerName.
In the extracted workstation installation package, launch Setup.exe to install Install Manager.
When Install Manager opens, install the Client Application.

Install services as needed: Report Scheduling Service and/or Document Unfiled Utility Service.
Close Install Manager.
To upgrade the Dentrix Enterprise workstation features
Upgrading from version 11.0.20:
(Optional) If the Dentrix Enterprise client program files are installed, and you want to continue to access Dentrix Enterprise on the workstation, you may want to uninstall the 11.0.20 client program files on the computer. You can install the 11.0.48 client program files later.
Extract the contents of the workstation installation package.
In the extracted workstation installation package, open the file Install.package to specify a value for UpdateServerName.
In the extracted workstation installation package, launch Setup.exe to install Install Manager.
When Install Manager opens, install the Client Application.
Install/reinstall services as needed: Report Scheduling Service and/or Document Unfiled Utility Service.
Close Install Manager.
Upgrading from version 11.0.40/.43/.44/.45/.46:
Extract the contents of the workstation installation package.
In the extracted workstation installation package, open the file Install.package to specify a value for UpdateServerName.
In the extracted workstation installation package, launch Setup.exe to install Install Manager.
When Install Manager opens, install services under Not Installed as needed: Report Scheduling Service and/or Document Unfiled Utility Service.
Close Install Manager.
In the extracted workstation installation package, launch the client application setup (Setup_DE_Client.exe) to upgrade the client application.
To upgrade services from a previous version, in the extracted workstation installation package, launch service setups as needed: Recurring Payments Service (Dtx.RecurringPaymentsService.Installer.exe) and/or Document Unfiled Utility Service (Dtx.DocUUService.Installer.exe).
The following enhancements have been made to medical health history assessments (which you can access from Chart by clicking the Patient Health History Wizard button  on the toolbar):
There are new security rights to restrict who can open, sign, export, and save assessments. There is also a new security right to control whether a patient signature is required or not. These new rights are located under the "Practice/Clinic Setup" category and are named "Health History Form, Export," "Health History Form, Open," "Health History Form, Require Patient Signature," "Health History Form, Save," and "Health History Form, Sign."

The asterisks (*) for required fields have been enhanced to be more noticeable.

Dentrix Enterprise now helps you easily identify missing required information when you attempt to navigate to another section without answering all required fields in the current section.
If you click Next or Back.
![]()
If you click another section and then click No on the message (or X to close the message) that appears.
![]()
You stay on the current section, the fields are outlined in red, and red text "Required" appears to help you easily identify missing required information.
![]()
Note: If the first unanswered required field is not visible, the form scrolls automatically to that field.
When select Yes as an answer to a question, an Add More button appears so you can add multiple responses.
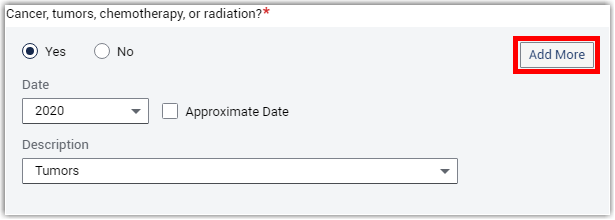
Click Add More to insert fields for an additional response.
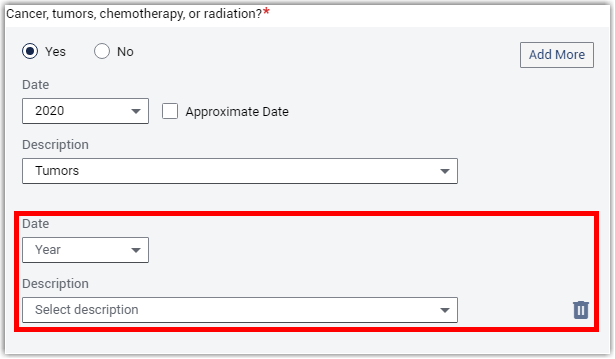
Notes:
You can add up to four additional responses.
To remove a set of additional responses, click the corresponding Delete button (trash can icon).
In the Reproductive System section, the following changes have been made:
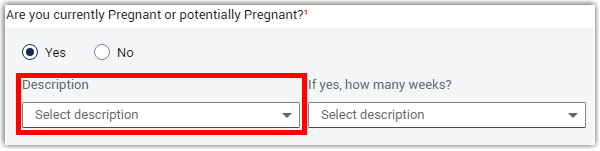
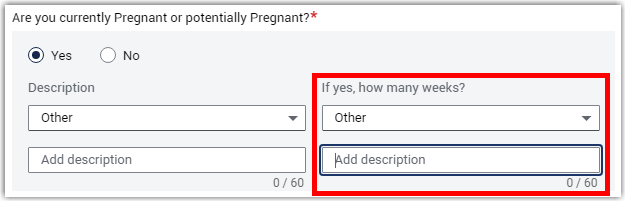
Are you currently? was changed to Are you currently Pregnant or potentially Pregnant?, and there are now Yes and No options for that question. This question is required.
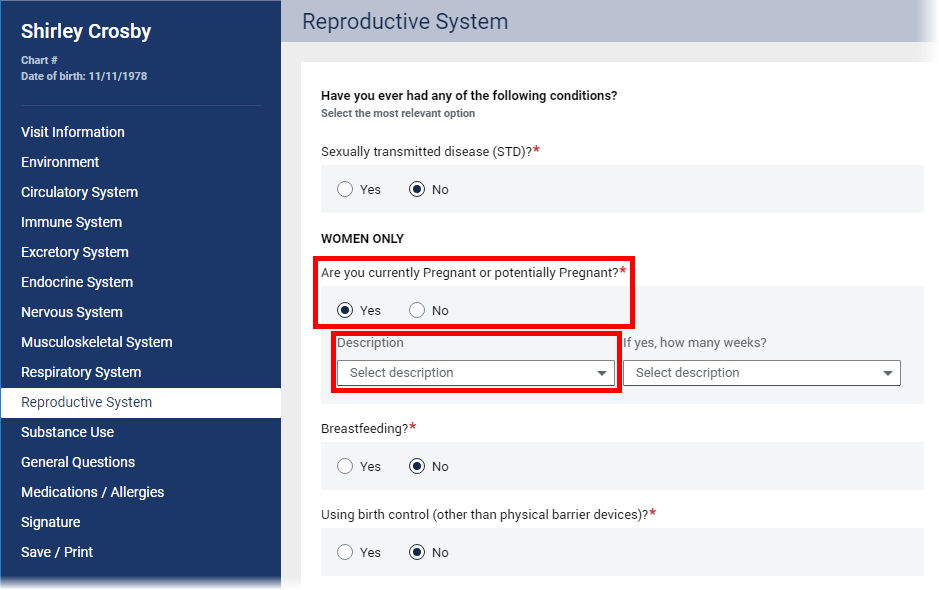
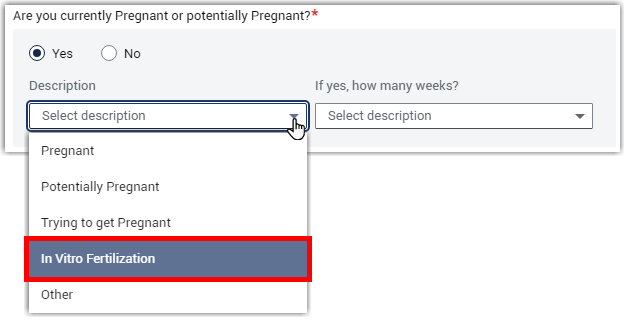
The Pregnant or potentially pregnant? list has been replaced with the Description list. This option is not required.
An In Vitro Fertilization option now appears on the Description list.
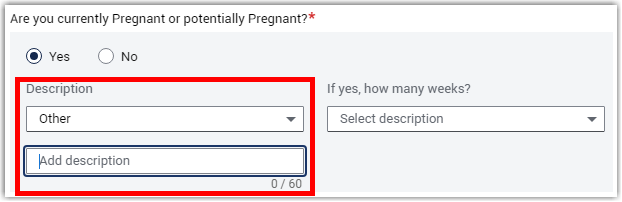
If Other is selected from the Description list, a box for entering text appears.
If Other is selected from the If yes, how many weeks? list, a box for entering text appears.
The DPMH (Division of Pediatrics and Maternal Health) Report incorporates the aforementioned changes.
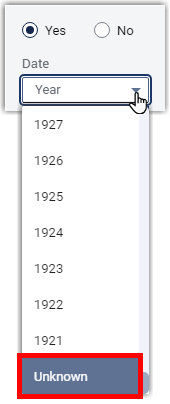
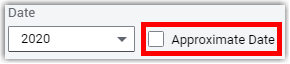
An Unknown option has been added to every Year list that appears when you select Yes for a question in any section. Also, if a year is selected in a Year list, an Approximate Date checkbox now appears.
In the Signature section, the following changes have been made:
The statement area has been enhanced with a new layout, and the Do and Do Not options now appear below the statement. This new layout also affects printed forms.
The Change Provider search button has been replaced with a Change button and a box that displays the logged-in user's ID by default. The box updates if you select a different user.
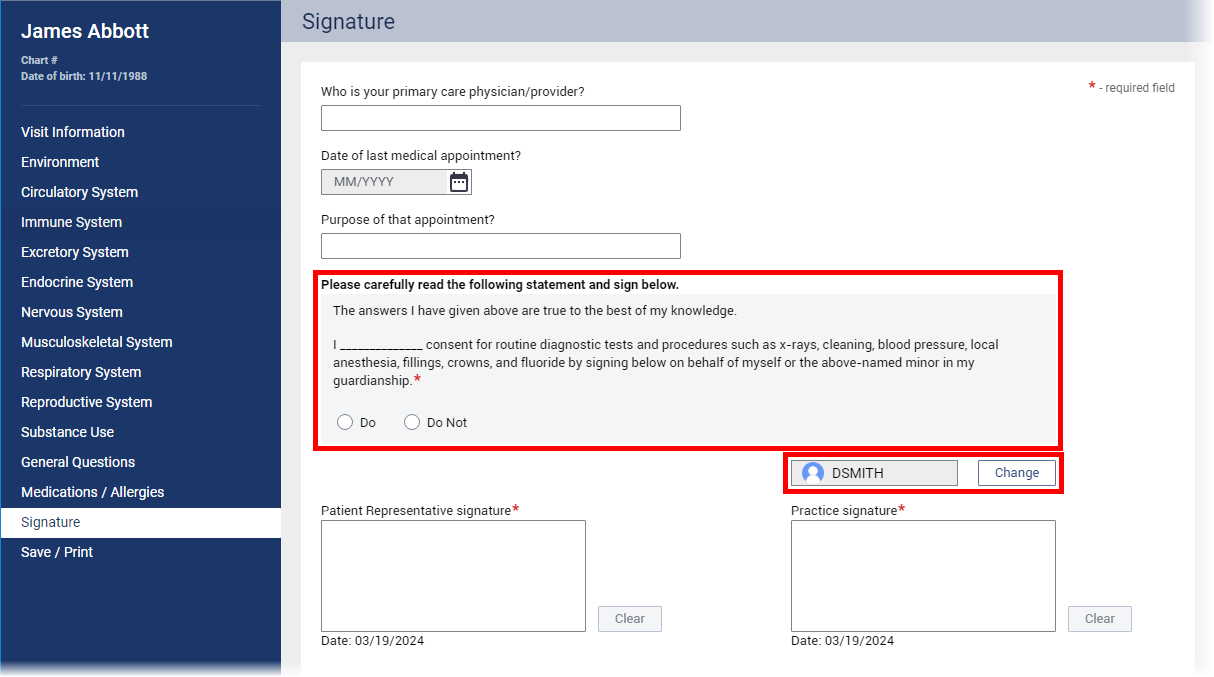
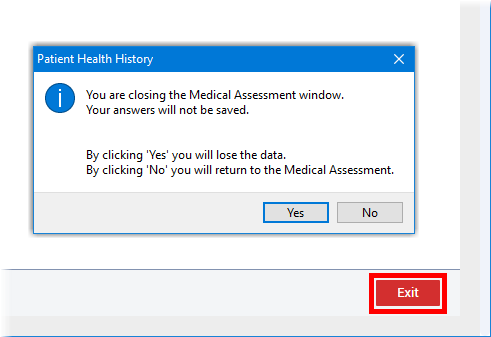
The Close button has been renamed Exit. If you attempt to close an assessment with unsaved changes, a confirmation message appears and allows you to either exit without saving or return to the assessment.
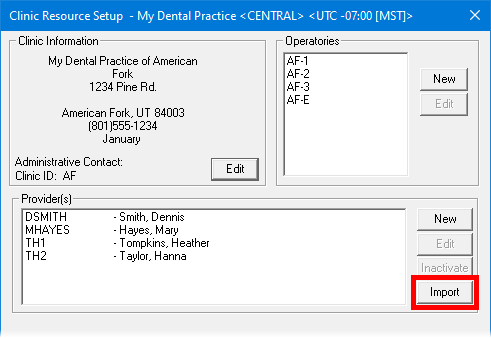
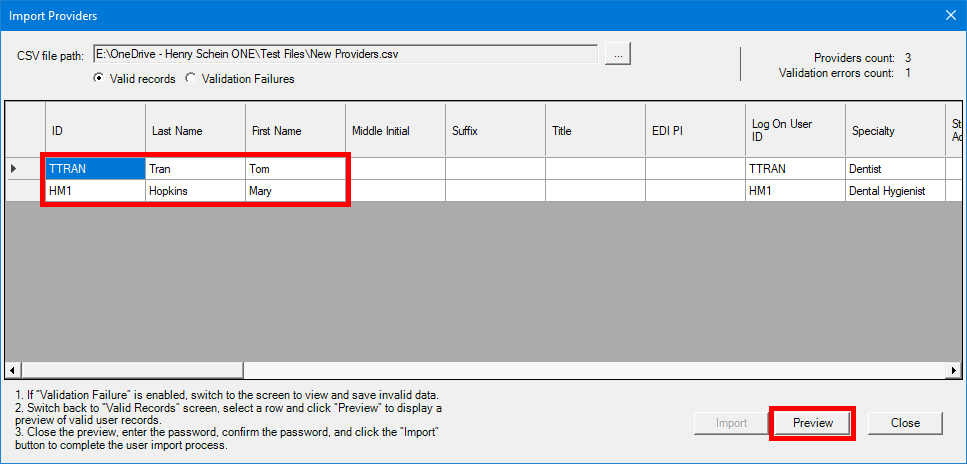
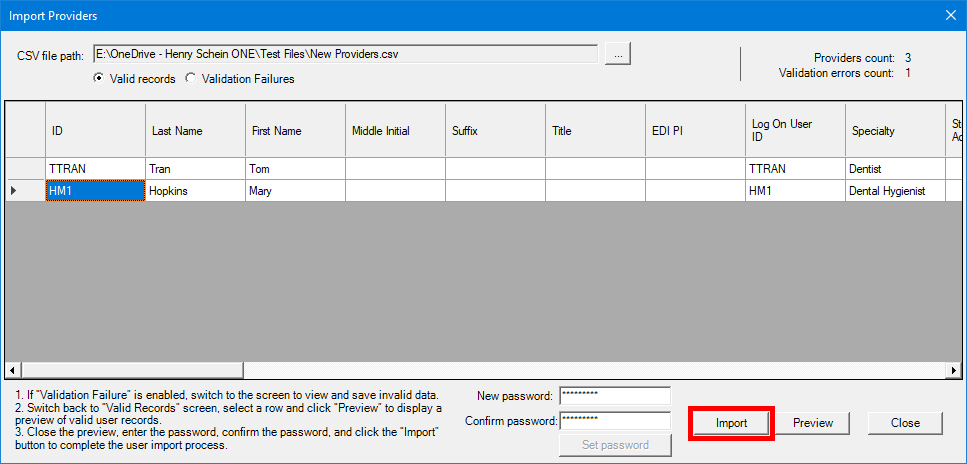
You can now import a batch of providers or staff from a .csv file.
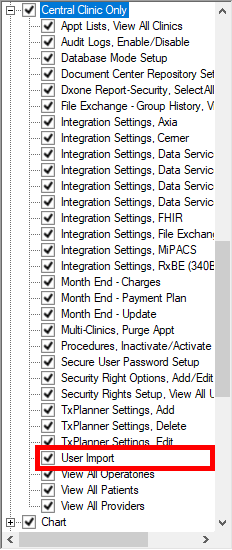
There is a new security right that allows a user to import a batch of users. The "User Import" security right is under the "Central Clinic Only" category.
To import providers
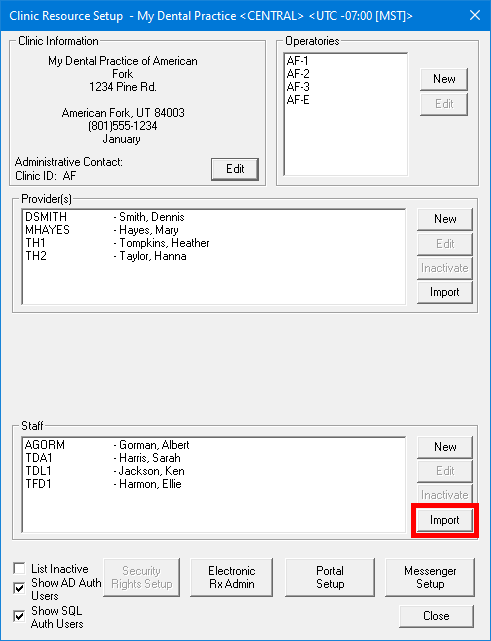
In the Central clinic's Clinic Resource Setup dialog box (in Office Manager, go to Maintenance > Practice Setup > Clinic Resource Setup), next to the Provider(s) list, click Import.
The Import Providers dialog box appears.
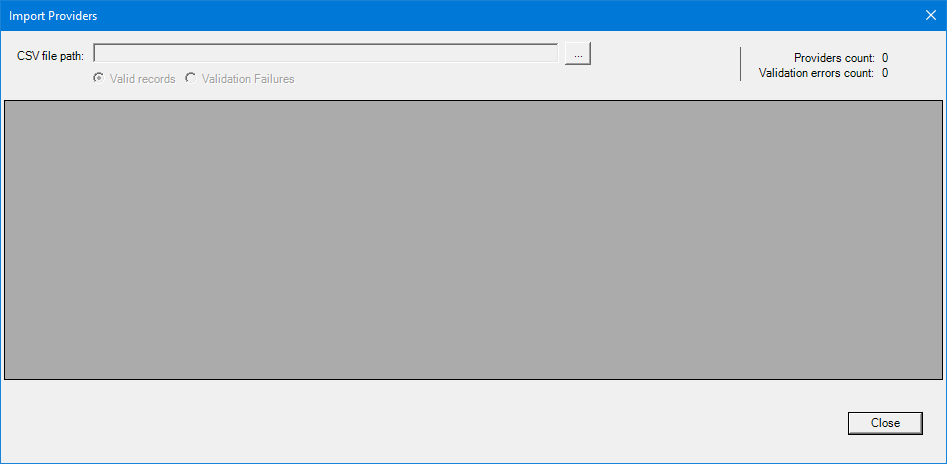
Click the CSV file path search button  to select the correct .csv file.
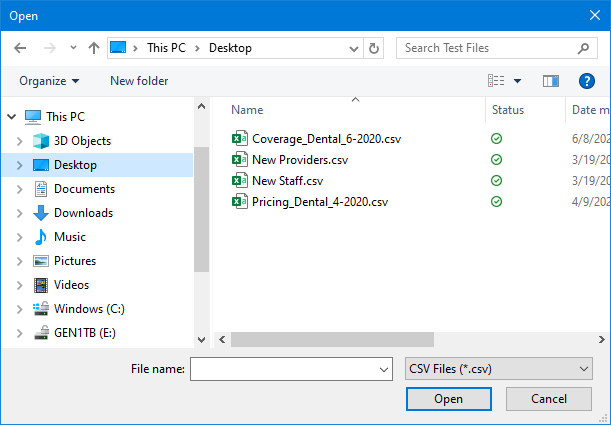
The Valid records are listed by default.
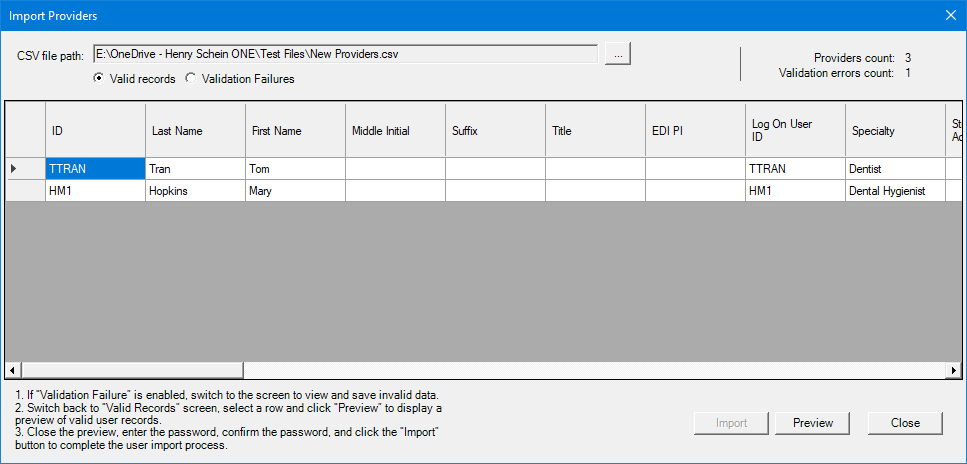
To view invalid records, do the following:
Select the Validation Failures option.
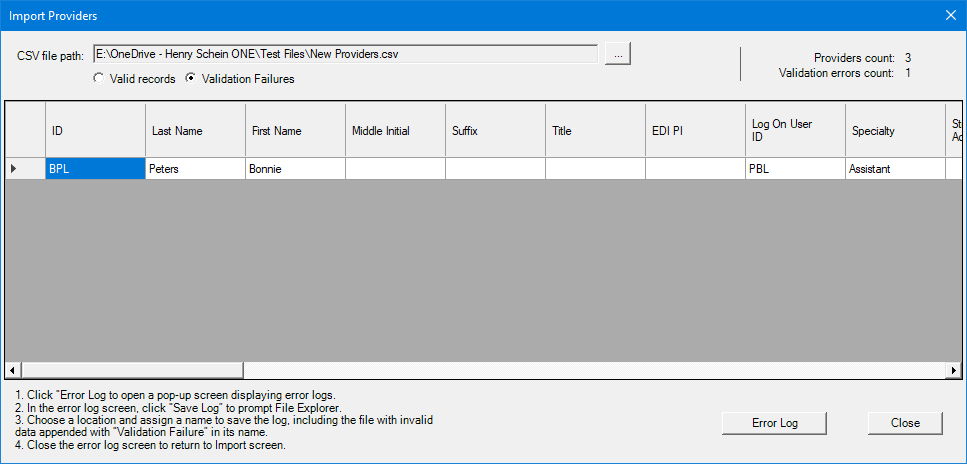
Note: The invalid records listed will not be imported.
To view the error log, which details what the validation errors are, click Error Log.
The Validation Failures dialog box appears.
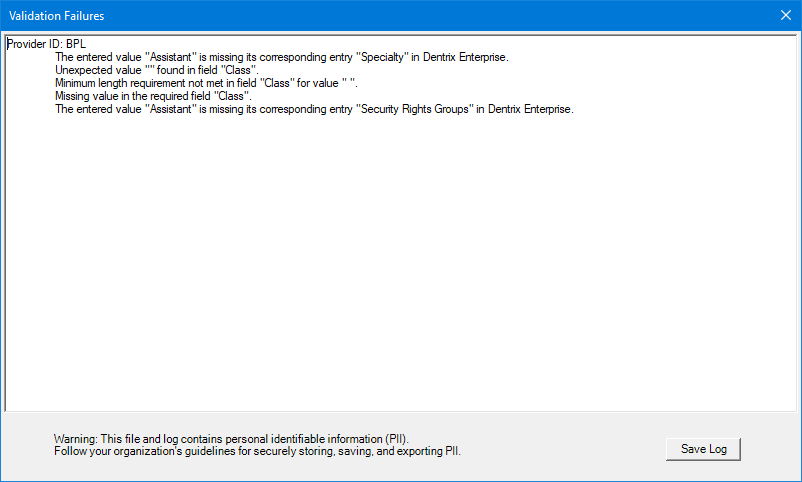
To save a .log file (with the validation errors) and a .csv file (with the invalid records) in a location you specify, click Save Log.
Note: You can correct the errors in the .csv file and then try to import those records again.
For each valid record, do the following:
Either double-click a record; or select a record, and then click Preview.
In the Provider Information dialog box, verify that the user information is correct.
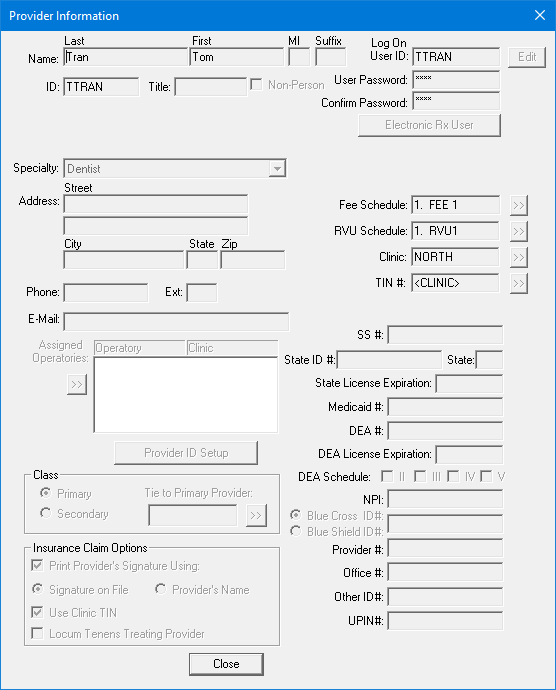
Click Close.
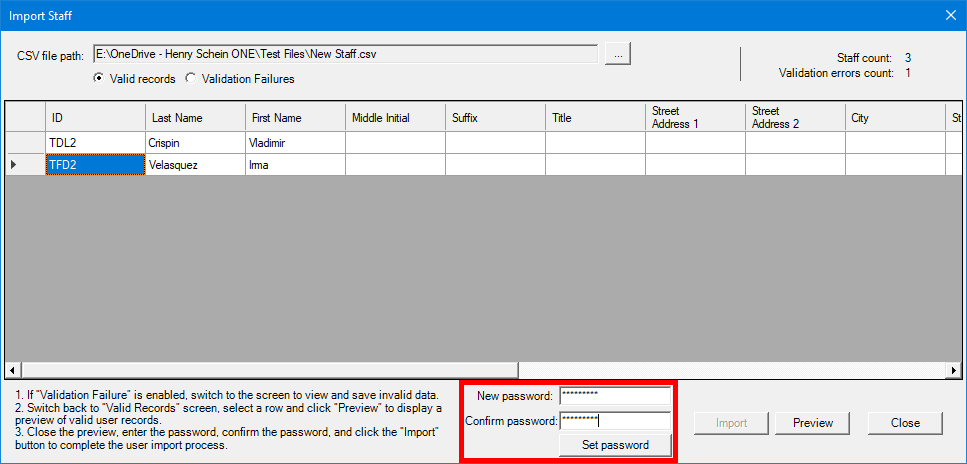
After you have previewed at least one user, set a temporary password for all users being imported:
Enter a password in the New password and Confirm password boxes.
Click Set password.
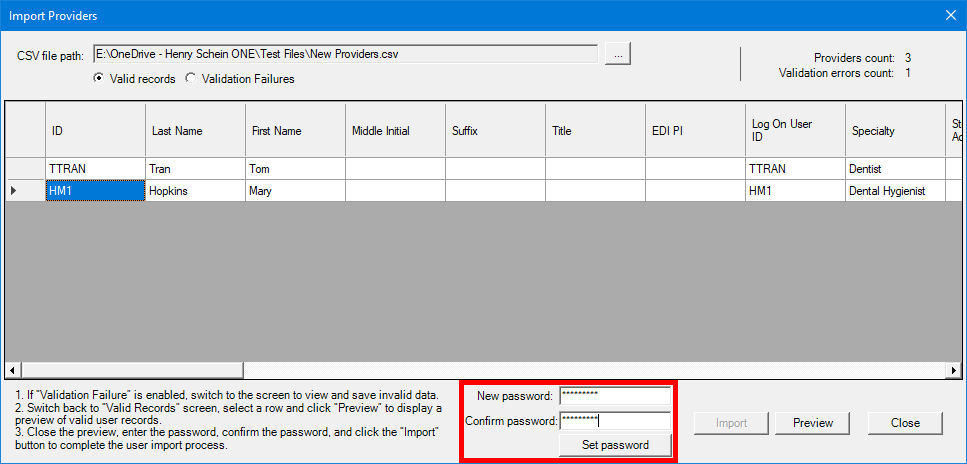
Note: Each imported user will be required to change his or her password the first time he or she attempts to log in to Dentrix Enterprise.
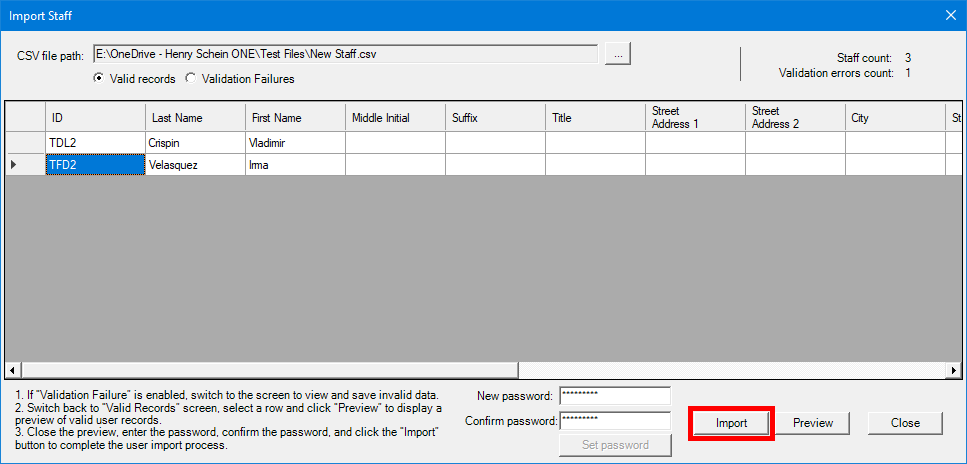
After you have previewed all valid records and set a temporary password, click Import to proceed.
On the success message that appears, click Close.
In the Import Providers dialog box, click Close.
Note: An admin must grant security rights to imported users without a specified user group, so they can log in to Dentrix Enterprise.
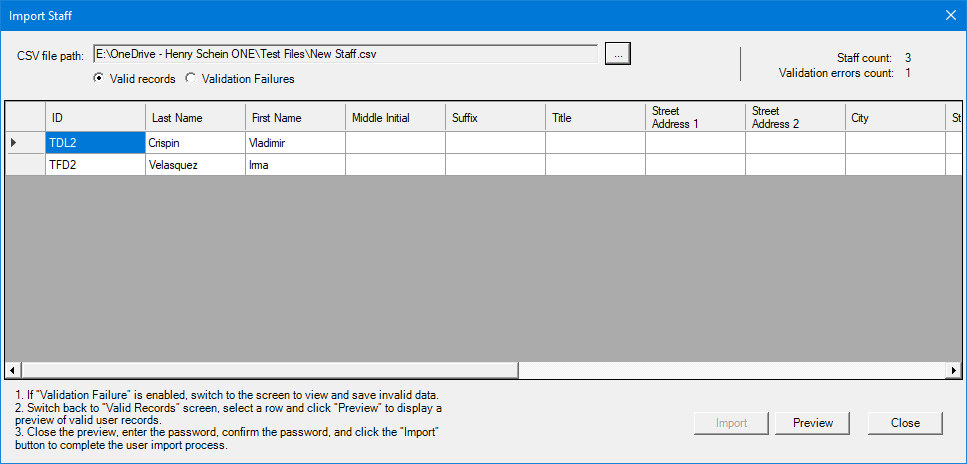
To import staff members
In the Central clinic's Clinic Resource Setup dialog box (in Office Manager, go to Maintenance > Practice Setup > Clinic Resource Setup), next to the Staff list, click Import.
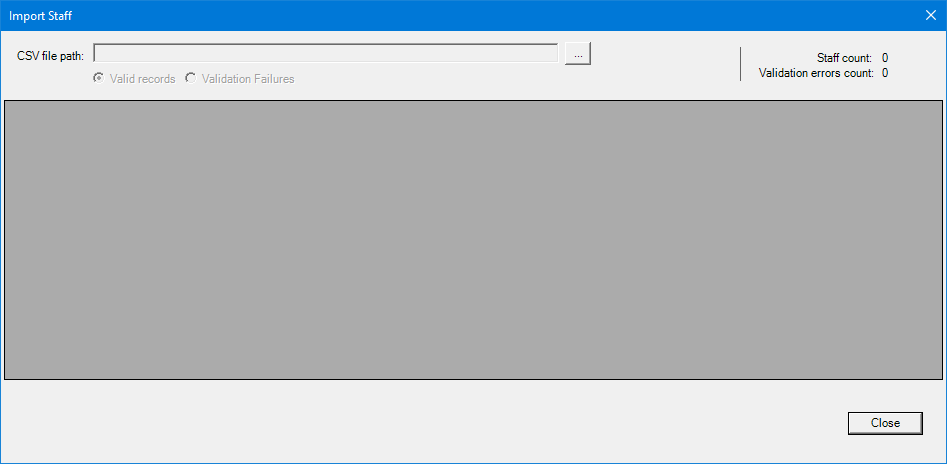
The Import Staff dialog box appears.
Click the CSV file path search button to select the correct .csv file.
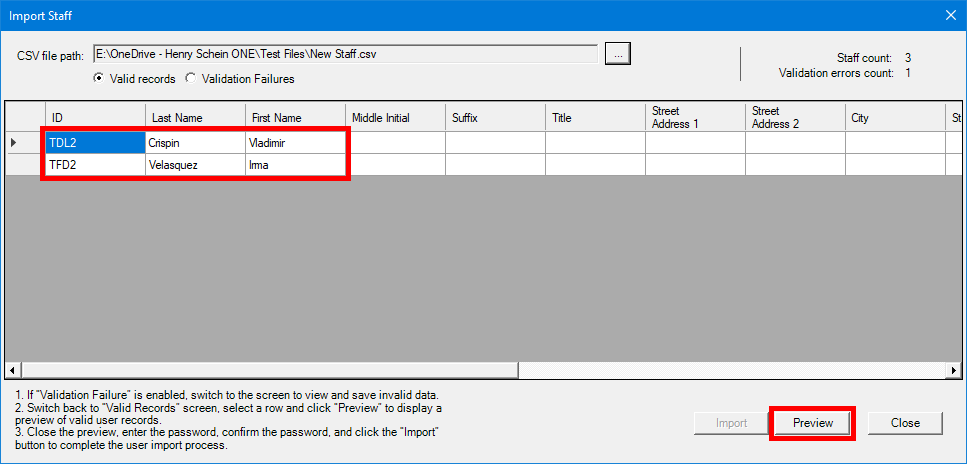
The Valid records are listed by default.
To view invalid records, do the following:
Select the Validation Failures option.
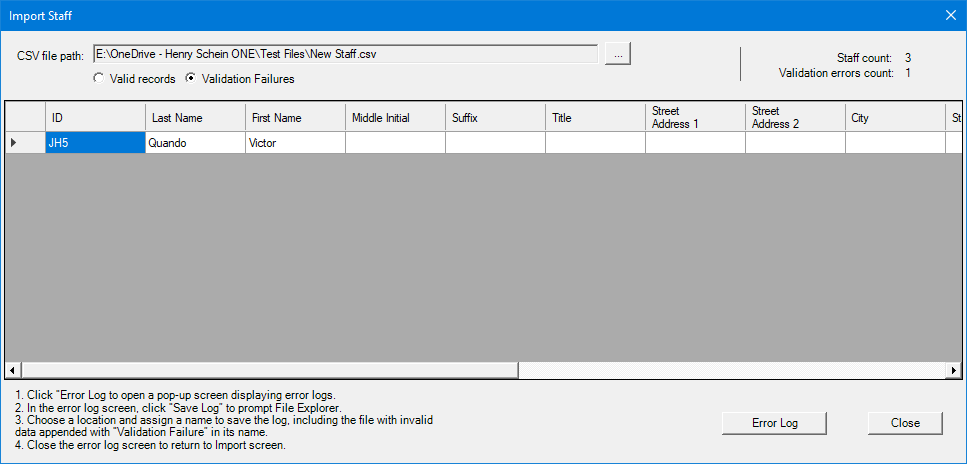
Note: The invalid records listed will not be imported.
To view the error log, which details what the validation errors are, click Error Log.
The Validation Failures dialog box appears.
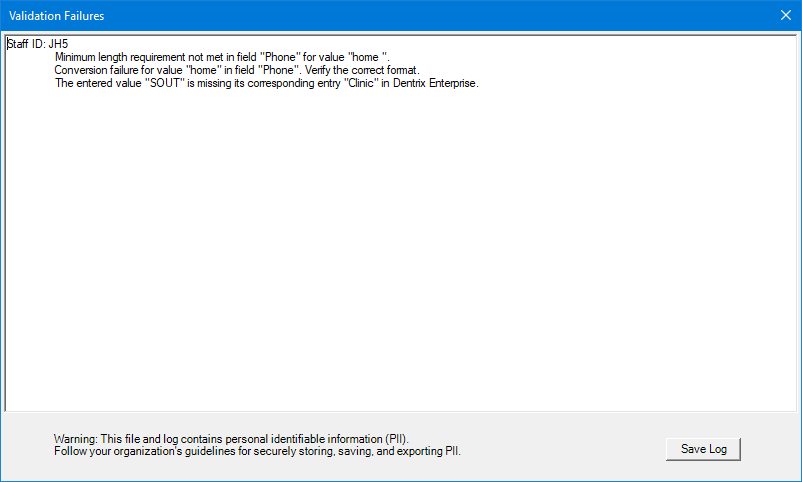
To save a .log file (with the validation errors) and a .csv file (with the invalid records) in a location you specify, click Save Log.
Note: You can correct the errors in the .csv file and then try to import those records again.
For each valid record, do the following:
Either double-click a record; or select a record, and then click Preview.
In the Staff Information dialog box, verify that the user information is correct.
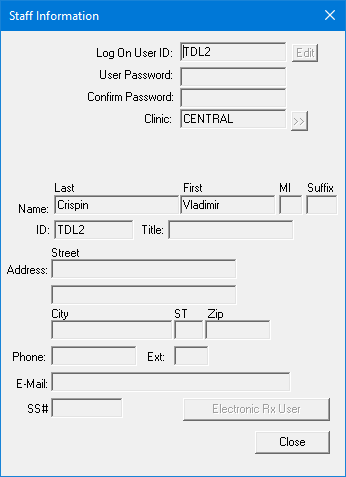
Click Close.
After you have previewed at least one user, set a temporary password for all users being imported:
Enter a password in the New password and Confirm password boxes.
Click Set password.
Note: Each imported user will be required to change his or her password the first time he or she attempts to log in to Dentrix Enterprise.
After you have previewed all valid records and set a temporary password, click Import to proceed.
On the success message that appears, click Close.
In the Import Staff dialog box, click Close.
Note: An admin must grant security rights to imported users without a specified user group so they can log in to Dentrix Enterprise.
There is a new security right "Secure Messenger, Open" that allows a user to open Messenger.
There is a new security right "Consent Forms, Template Setup" that allows a use to access the consent form (enhanced) template setup in Treatment Planner.
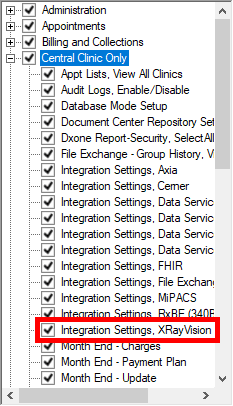
There is a new security right "Integration Settings, XRayVision" that allows a user to edit the XRayVision settings.
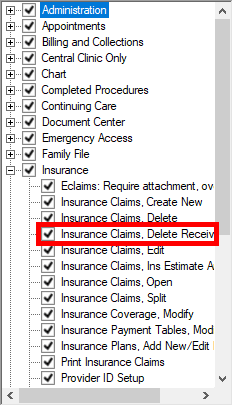
There is a new security right "Insurance Claims, Delete Received/Closed" that allows a user to delete claims with attached payments or adjustments.
Notes:
The "Insurance Claims, Delete Received/Closed" right requires the "Insurance Claims, Delete" right.
If a user without the "Insurance Claims, Delete Received/Closed" right attempts to delete a received/closed claim, Dentrix Enterprise prompts for the credentials of a user with that right so the restriction can be overridden this one time.
If your eTrans account is locked by another user when you attempt to submit electronic claims, the message that appears now provides options to clear the lock and retry the submission. In previous versions, the only option that the message provided was an OK button to dismiss the message.
The new message provides the following options:
A here button within the new text "If you feel that the reported use of this eTrans UserId is inaccurate, you attempt to clear this lock by clicking here."
A Retry button to attempt to submit the claims again.
A Cancel button to dismiss the message and cancel the submission.
![]()
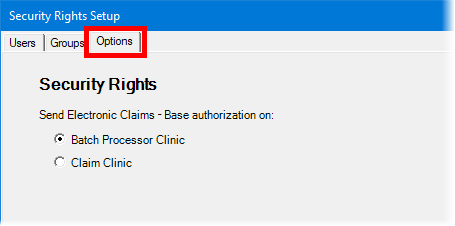
There is a new global setting that controls the e-claims security override setting on the Options tab of the Security Rights Setup dialog box. The global setting controls the following functionality:
With the global setting set to On, the Options tab is available. You can select whether authorization to send electronic claims is based on the claim clinic or the Batch Processor clinic (the clinic a user is logged in to when attempting to send e-claims from Office Manager).
With the global setting set to Off, the Options tab is not available. Authorization to send electronic claims is based on the claim clinic. By default, the global setting is set to Off.
Note: Contact a Dentrix Enterprise Customer Support technician for assistance with changing the global setting.
You can access the Options tab in Office Manager by going to Maintenance > Practice Setup > Security Setup > Security Rights Setup.
When you send e-claims from the Batch Processor, if any claims are skipped, messages appear as applicable to inform you that claims were skipped and the reasons why:
A message may appear and state that you do not have permission to send claims from certain clinics. The number of claims that will not be sent appears. Click OK to continue.

A message may appear and state that certain claims are from a clinic that is not associated with a Data Service account. The number of claims that will not be sent appears. Click OK to continue.
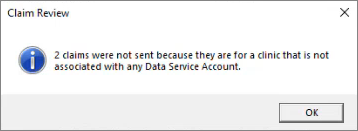
Note: For each skipped claim, "Unsent" will appear in the Status column of the Batch Processor.
If a set of e-claims are being sent using multiple Data Service (eTrans) accounts, a message appears and states that the claims will be validated and sent in batches according to the Data Service account. Click OK to continue.
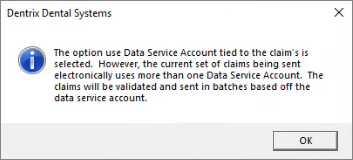
Note: If this message appears, it will do so after any of the skipped claims messages.
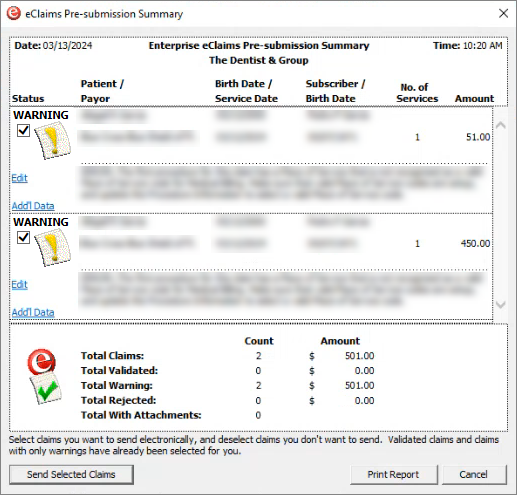
If this message does appear, after you click OK, you must complete the following steps for each account; otherwise, you will complete them only once:
When the eClaims Pre-submission Summary window appears, click Send Selected Claims.
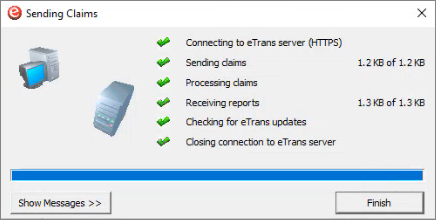
The Sending Claims dialog box appears and displays the progress of the submission.

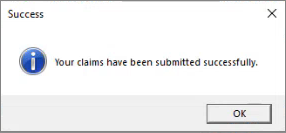
Click OK on the message that appears when the submission is successful.
Click Finish in the Sending Claims dialog box.
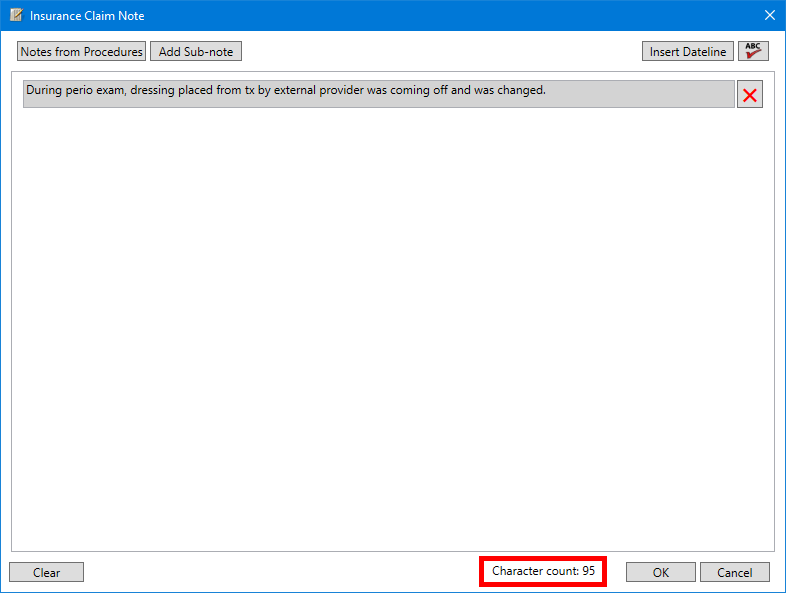
While you are modifying an insurance claim note, the total number of characters appears for your reference. Also, if you are inserting procedure notes into the claim note, if any procedure has associated tooth and/or treatment areas, those appear for your reference.
Note: Only the first 125 characters of an insurance claim note can be transmitted with an electronic claim.
To modify an insurance claim note
In the insurance claim window, do one of the following:
Double-click the Insurance Claim Notes block.
On the menu bar, click Note.

The Insurance Claim Note dialog box appears. The Character count appears at the bottom of the dialog box.
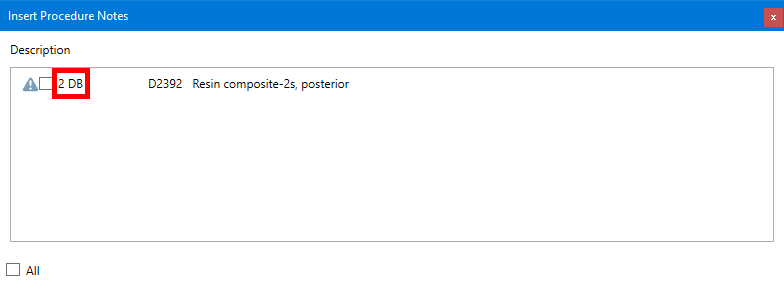
If an entry corresponds to a note that was added from a procedure with associated teeth and/or surfaces, those appear for your reference.

To include a procedure note as a claim entry, click Notes from Procedures.
The Insert Procedure Notes dialog box appears. The Character count appears in the lower-right corner of the dialog box.
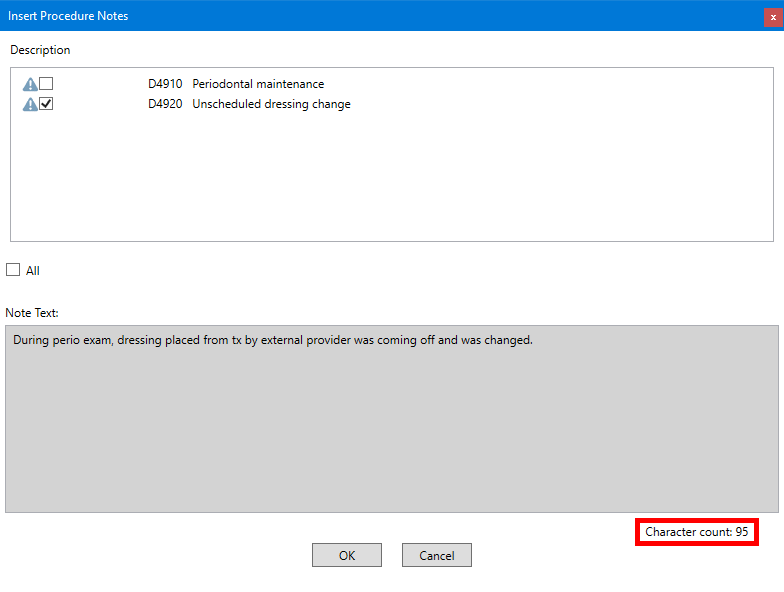
If a procedure in the top list has associated teeth and/or surfaces, those appear for your reference.
The ADA maintains the standardized claim form used for insurance billing. The ADA updates the codes annually, and the claim format occasionally. The updates (which include four new fields) for 2024 printed claim forms are now available in Dentrix Enterprise. The following four new fields have been added to the paper form:
Box 3a. Payer ID - This field should contain the payer ID associated with the insurance carrier for the plan listed in field 3.
Box 11a. Other Payer ID - This field should contain the payer ID associated with the insurance carrier for the plan listed in field 11.
Box 39a. Date Last SRP - If the patient has ever had a Scaling and Root Planing (SRP) procedure performed prior to the date of service of the claim, this field should contain the date of the most recent procedure.
Box 53a. Locum Tenens Treating Dentist? - If the treating provider is designated as a Locum Tenens provider, the box for this field should be marked.
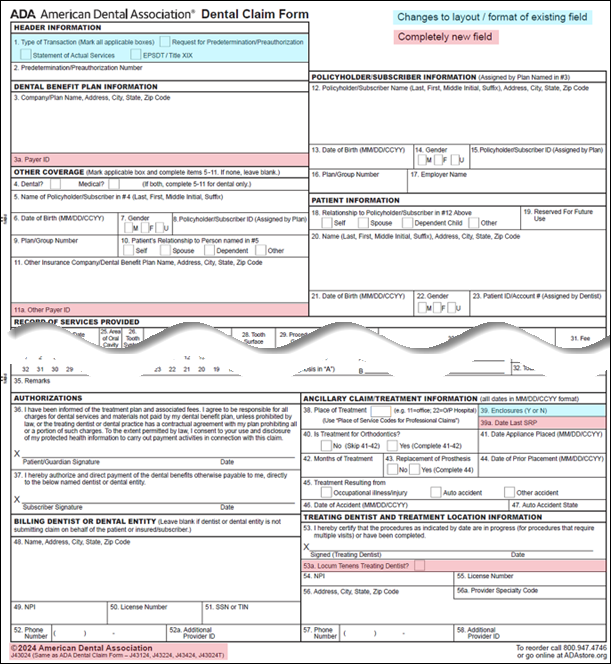
To use the 2024 claim format for a printed claim, the selected claim format for the patient's insurance plan must be "DX2024" (which you can add to the practice definitions to make it available for selection).
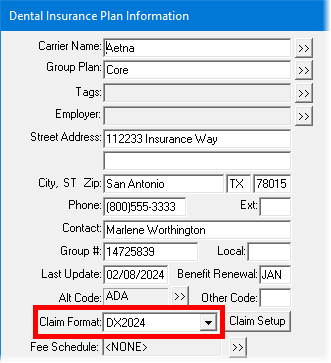
Note: The Locum Tenens provider and last SRP date fields do not apply to electronic claims. The ADA encourages you to continue submitting electronic claims and to submit paper claims only when documentation for Locum Tenens or Last SRP is needed.
To help you maintain a consistent claim acceptance rate with payers, Dentrix Enterprise now allows you to designate providers as Locum Tenens treating providers. This designation appears in a new field on printed ADA 2024 claim forms if applicable.
To designate a locum tenens provider
In Office Manager, on the Maintenance menu, point to Practice Setup, and then click Clinic Resource Setup. In the Clinic Resource Setup dialog box, double-click a provider in the Provider(s) list.
The Provider Information dialog box appears.
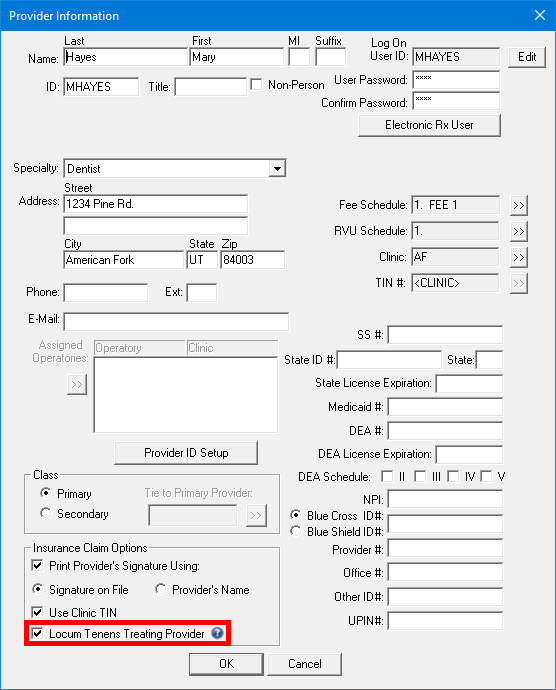
Under Insurance Claim Options, select the Locum Tenens Treating Provider checkbox.
Click OK.