The Dentrix Enterprise API is a web service organized around REST. The API has predictable resource-oriented URLs, accepts form-encoded request bodies, returns JSON-encoded responses, and uses standard HTTP response codes, authentication, and verbs. The authentication server (Apigee) for the Dentrix Enterprise API uses OAuth 2.0 protocol for simple, but effective, authentication and authorization.
Currently, you can use the Dentrix Enterprise API to integrate the following third-party Web applications with Dentrix Enterprise:
Online patient forms
Clinical Quality Measures (CQM) reporting
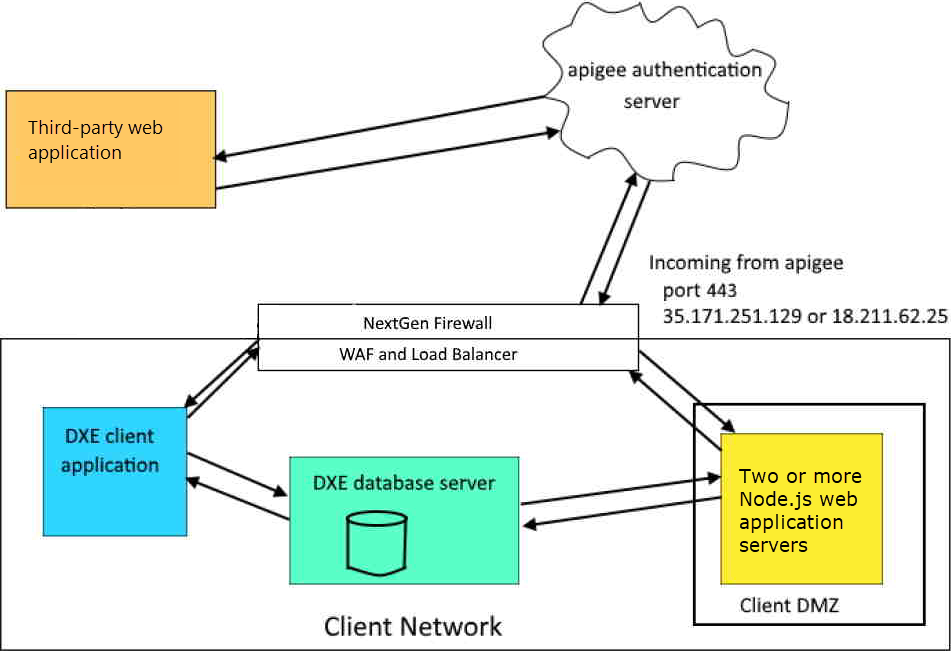
Third-party Web applications interact with Dentrix Enterprise through an authentication server (Apigee). A new server environment (two Node.js servers) is required to take advantage of the integration. You will also need to configure your network to incorporate these new servers and their functionality.
|
Figure 1: A diagram of the infrastructure that is needed to implement this integration. |
To set up your network for the API
Make Sure All Computers Are Ready for Dentrix Enterprise 11.0.2.
Before installing or upgrading to Dentrix Enterprise 11.0.2, the database server must be running Microsoft SQL Server 2016 or later. For a complete list of system requirements, refer to the Dentrix Enterprise 11.0.2 System Requirements.
Install or Upgrade to Dentrix Enterprise 11.0.2.
A Dentrix Enterprise support technician assists you with the installation or upgrade.
Implement a Next-gen Firewall.
For network security, it is recommended that you implement a Next-gen firewall. A Next-gen firewall can help you segment your network and whitelist IP addresses.
Note: A popular, free Next-gen firewall is OPNsense (https://opnsense.org/).
Open Port and Whitelist IP Addresses.
In accordance with common industry recommendations regarding enhancing network security, you may want to close all ports on your firewall that are not essential to running your business and Dentrix Enterprise. You may also want to whitelist IP addresses to allow communication with only the necessary public sites.
It is recommended that you segment your network so that the Node.js servers are in a de-militarized zone (DMZ). The Next-gen firewall or load balancer should have whitelisted IP addresses, so the only traffic that is allowed to access the Node.js servers is from the Apigee authentication server. Refer to Figure 1.
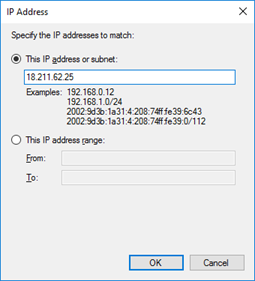
Open port 443 for incoming traffic from the Apigee authentication server, and whitelist the authentication server's IP addresses: 35.171.251.129 and 18.211.62.25.
Important: A qualified network engineer should be engaged by you to perform any network enhancements. You (not Henry Schein One) are liable for any security vulnerabilities you may incur.
To whitelist IP addresses:
Nginx - Nginx works well as a load balancer, but it can also be used to whitelist inbound network IP access. The Nginx website provides a description of whitelisting (and blacklisting) IP addresses:
http://nginx.org/en/docs/http/ngx_http_access_module.html
Limiting IP access in Nginx is done through the ngx_http_access_module. The following example illustrates how this is done:
location / {
deny 192.168.1.1;
allow 192.168.1.0/24;
allow 10.1.1.0/16;
allow 2001:0db8::/32;
deny all;
}
Palo Alto Firewall - The Palo Alto firewall knowledgebase provides a description of how to whitelist IP addresses:
https://knowledgebase.paloaltonetworks.com/KCSArticleDetail?id=kA10g000000ClovCAC
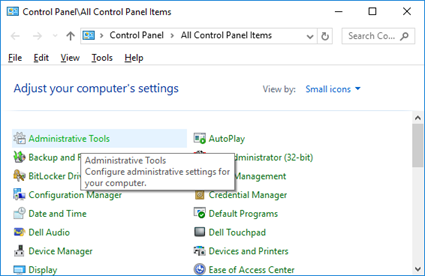
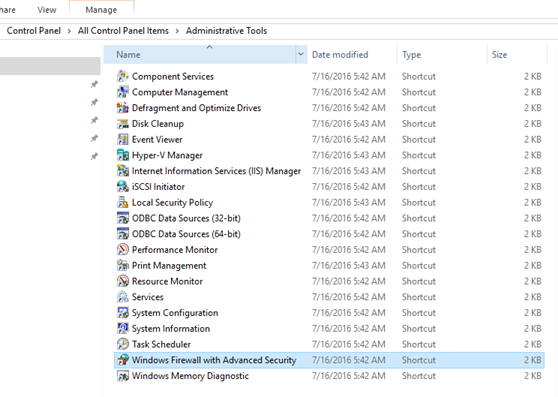
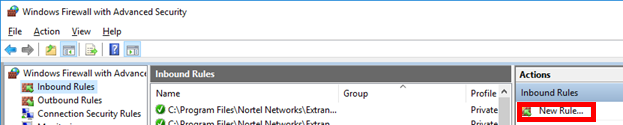
Windows Firewall - To add new IP addresses to the Microsoft Windows firewall whitelist, complete the following steps:
Open the Control Panel, and click Administrative Tools.
Double-click Windows Firewall with Advanced Security.
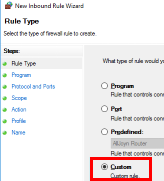
Select Inbound Rules, and then on the right, click New Rule.
In the New Inbound Rule Wizard dialog box, select Custom.
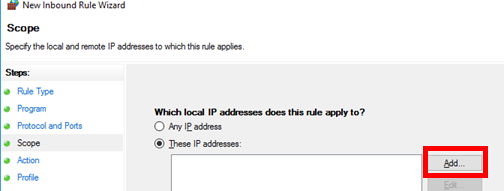
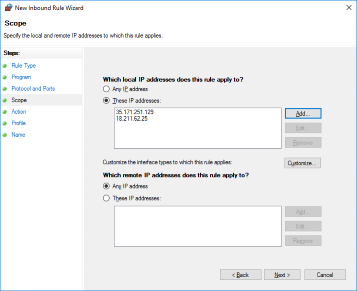
On the left, select Scope, and then add the following IP addresses:
35.171.251.191
18.211.62.25
You must add them one at a time. Do the following:
Click Add.
In the IP Address dialog box, enter an IP address, and then click OK.
Repeat steps i-ii to add another IP address.
To complete the New Inbound Rule Wizard, continue clicking Next and selecting the appropriate options as needed.
Install a Load Balancer.
For performance and reliability, a load balancer that meets the following specifications is needed:
Public facing
Static IP address
Round robin load balancing architecture (performing constant "health checks" on the Node.js servers)
Note: A popular, free load balancer is Nginx (https://nginx.org/).
Implement a Web Application Firewall (WAF).
Note: A popular, free WAF is ModSecurity (https://www.modsecurity.org/).
Set Up Two (2) New Node.js Servers.
For scalability, redundancy, and performance, a new server environment for the API software is required. The environment must consist of two physical computers or two virtual machines (running on separate physical computers). The servers can be implemented behind your firewall; however, it is recommended that your network be segmented so that the Node.js servers are in an Internet-facing DMZ that is separate from your existing network.
Important: Do not use the Dentrix Enterprise database server as a Node.js server.
The Node.js servers must meet the following specifications:
Any Microsoft-supported version of the Windows or Windows Server operating system
64-bit architecture
4 or more CPUs/cores
16 GB of Memory/RAM
80 GB of disk space
Note: To verify the system requirements of the latest version of Node.js, refer to the Node.js documentation.
Sign Up for the API Program.
To sign up for the API program (and the Patient Forms or CQM Reporting feature), contact your Customer Success Manager.
Get an Account for API Access.
Contact a Dentrix Enterprise support technician and provide him or her with the following information:
The static IP address of the load balancer.
An organization name of your choosing.
The support technician uses that information to submit a request for API access.
The support technician is notified when the API registration process is complete.
Deploy Node.js on the Servers.
On the Node.js servers, the support technician does the following:
Installs Node.js.
Updates the DB Config portion of the JSON configuration file to connect to the Microsoft SQL Server instance on the Dentrix Enterprise database server.
Installs a Windows service.
Notes:
After the API environment setup has been completed, the Patient Forms feature, which is available for Dentrix Enterprise as a separate purchase, can be activated for all clinics. While logged in to the Central clinic, the support technician activates the feature in the Integration Settings dialog box of Dentrix Enterprise.
CQM reporting is available only if you have a subscription for the Meaningful Use features, which are available for Dentrix Enterprise as a separate purchase. The support technician activates these features in the global settings.