During the installation of Dentrix Enterprise, you can choose to install a service for handling automated insurance eligibility verifications for patients' upcoming appointments. Then, you can set up that service to use any existing eTrans (eClaims) accounts that you may have or to use Data Services accounts, and you can link each account to specific clinics. You can also configure other options to control the service.
Notes:
Contact your Customer Success Manager for pricing to use this service, to sign up for eClaims or Data Services accounts, and to enroll in eligibility verification.
Editing the Data Services settings requires the "Integration Settings, Data Services" security right.
Adding a Data Services account requires the "Integration Settings, Data Services, Add Accnt" security right. Editing a Data Services account requires the "Integration Settings, Data Services, Edit Accnt" security right. Deleting a Data Services account requires the "Integration Settings, Data Services, Delete Accnt" security right.
To set up automated insurance eligibility verification
While logged in to the Central clinic, in Office Manager, expand the Maintenance menu, point to Practice Setup, and then click Integration Settings.
Note: You can edit Data Services settings only if you are logged in to the Central clinic; otherwise, you can only view them.
The Integration Settings dialog box appears.

Select the Data Services tab.
If applicable, do one of the following:
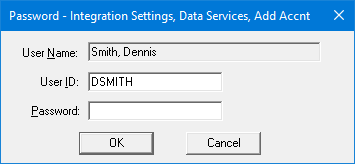
If the Password - Integration Settings, Data Services dialog box appears, user verification has been assigned to the "Integration Settings, Data Services" task. Do one of the following:
If your user account has been granted the "Integration Settings, Data Services" security right, enter your credentials in the User ID and Password boxes, and then click OK.
If your user account has not been granted the "Integration Settings, Data Services" security right, have a user with permission temporarily override this restriction so you can access the Data Services settings this one time. The overriding user enters his or her credentials in the User ID and Password boxes and then clicks OK.

If a message appears, informing you that you do not have rights to this operation, your user account has not been granted the "Integration Settings, Data Services" security right. To have a user with permission temporarily override this restriction so you can access the Data Services settings this one time, do the following:
On the message, click Yes.

In the Password - Integration Settings, Data Services dialog box, the overriding user enters his or her credentials in the User ID and Password boxes and then clicks OK.
The Data Services settings appear on the right. The General tab is selected by default.

You must link your eTrans (eClaims) or Data Services accounts to the service and assign specific clinics to each account. To manage Data Services accounts, do any of the following:
To add an account, do the following:
Click Add.
If applicable, do one of the following:
If the Password - Integration Settings, Data Services, Add Accnt dialog box appears, user verification has been assigned to the "Integration Settings, Data Services, Add Accnt" task. Do one of the following:
If your user account has been granted the "Integration Settings, Data Services, Add Accnt" security right, enter your credentials in the User ID and Password boxes, and then click OK.
If your user account has not been granted the "Integration Settings, Data Services, Add Accnt" security right, have a user with permission temporarily override this restriction so you can add a Data Services account this one time. The overriding user enters his or her credentials in the User ID and Password boxes and then clicks OK.
If a message appears, informing you that you do not have rights to this operation, your user account has not been granted the "Integration Settings, Data Services, Add Accnt" security right. To have a user with permission temporarily override this restriction so you can add a Data Services account this one time, do the following:
On the message, click Yes.
In the Password - Integration Settings, Data Services, Add Accnt dialog box, the overriding user enters his or her credentials in the User ID and Password boxes and then clicks OK.
The Add Data Service Account dialog box appears.
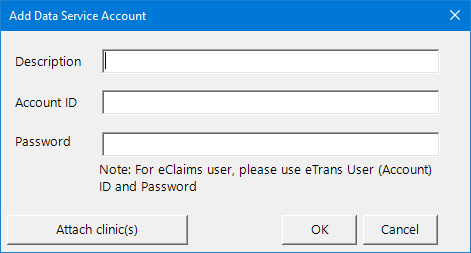
Enter the following account information:
Description - A unique description to identify the account.
Account ID - The eTrans (eClaims) or Data Services account's ID.
Password - The eTrans (eClaims) or Data Services account's password.
To select the clinics that are associated with this account, do the following:
Click Attach clinic(s)
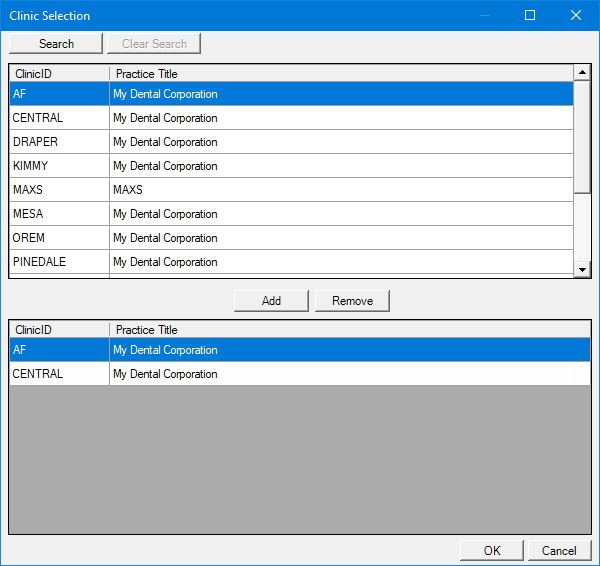
The Clinic Selection dialog box appears.
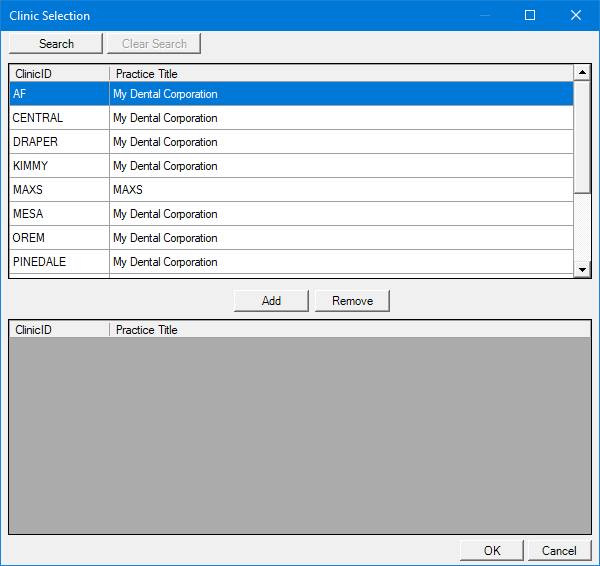
Note: If your user account has been granted the "View All Patients" security right for the Central clinic, all clinics appear in the upper list; otherwise, the clinics for which your user account has been granted the "My Clinics, View" security right (in the "Practice/Clinic Setup" category) appear in the upper list; however, if your user account has not been granted that right to any clinic, only the clinic that you are currently logged in to appears in the upper list.
If the list is long, to search for a clinic by ID and/or title, do the following:
Click Search.
The options for searching appear in the upper list.
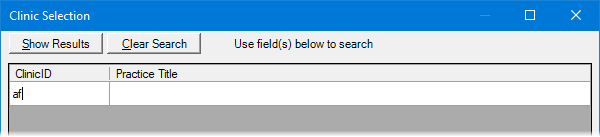
Enter the first character or more of a clinic's ID and/or title in the ID and Practice Title boxes, respectively.
Click Show Results to view a list of matching clinics.
Note: To return to viewing the list of all the clinics, click Search, click Clear Search to clear the search criteria that you entered, and then click Show Results.
In the upper list, select one or more clinics.
Note: To select multiple clinics, click a clinic, and then, while pressing the Ctrl key, click the other desired clinics. To select a range of adjacent clinics, click the first clinic of the desired range of clinics, and then, while pressing the Shift key, click the last clinic of the desired range of clinics.
Click Add.
Repeat steps ii-iv as needed to add other clinics.
Note: To not include a clinic that you added, select that clinic in the lower list, and then click Remove.
Click OK.
You are returned to the Integration Settings dialog box.
To edit an account, do the following:
Select an account.
Click Edit.
If applicable, do one of the following:
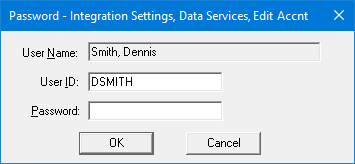
If the Password - Integration Settings, Data Services, Edit Accnt dialog box appears, user verification has been assigned to the "Integration Settings, Data Services, Edit Accnt" task. Do one of the following:
If your user account has been granted the "Integration Settings, Data Services, Edit Accnt" security right, enter your credentials in the User ID and Password boxes, and then click OK.
If your user account has not been granted the "Integration Settings, Data Services, Edit,Accnt" security right, have a user with permission temporarily override this restriction so you can edit a Data Services account this one time. The overriding user enters his or her credentials in the User ID and Password boxes and then clicks OK.
If a message appears, informing you that you do not have rights to this operation, your user account has not been granted the "Integration Settings, Data Services, Edit Accnt" security right. To have a user with permission temporarily override this restriction so you can edit a Data Services account this one time, do the following:
On the message, click Yes.
In the Password - Integration Settings, Data Services, Edit Accnt dialog box, the overriding user enters his or her credentials in the User ID and Password boxes and then clicks OK.
The Edit Data Service Account dialog box appears.

Change any of the following account information:
Description - A unique description to identify the account.
Account ID - The eTrans (eClaims) or Data Services account's ID.
Password - The eTrans (eClaims) or Data Services account's password.
To add or remove clinics for this account, do the following:
Click Attach clinic(s)
The Clinic Selection dialog box appears.
Note: Only the clinics for which your user account has been granted the "My Clinics, View" security right (in the "Practice/Clinic Setup" category) are available; otherwise, if your user account has not been granted that right to any clinic, only the clinic that you are currently logged in to is available.
To add clinics, do the following:
If the upper list is long, to search for clinics by ID and/or title to add them, do the following:
Click Search.
The options for searching appear in the upper list.
Enter the first character or more of a clinic's ID and/or title in the ID and Practice Title boxes, respectively.
Click Show Results to view a list of matching clinics.
Note: To return to viewing the list of all the clinics, click Search, click Clear Search to clear the search criteria that you entered, and then click Show Results.
In the upper list, select one or more clinics.
Note: To select multiple clinics, click a clinic, and then, while pressing the Ctrl key, click the other desired clinics. To select a range of adjacent clinics, click the first clinic of the desired range of clinics, and then, while pressing the Shift key, click the last clinic of the desired range of clinics.
Click Add.
To remove clinics, do the following:
In the lower list, select one or more clinics.
Note: To select multiple clinics, click a clinic, and then, while pressing the Ctrl key, click the other desired clinics. To select a range of adjacent clinics, click the first clinic of the desired range of clinics, and then, while pressing the Shift key, click the last clinic of the desired range of clinics.
Click Remove.
Click OK.
You are returned to the Integration Settings dialog box.
To delete an account, do the following:
Select an account.
Click Delete.
If applicable, do one of the following:
If the Password - Integration Settings, Data Services, Delete Accnt dialog box appears, user verification has been assigned to the "Integration Settings, Data Services, Delete Accnt" task. Do one of the following:
If your user account has been granted the "Integration Settings, Data Services, Delete Accnt" security right, enter your credentials in the User ID and Password boxes, and then click OK.
If your user account has not been granted the "Integration Settings, Data Services, Delete Accnt" security right, have a user with permission temporarily override this restriction so you can delete a Data Services account this one time. The overriding user enters his or her credentials in the User ID and Password boxes and then clicks OK.

If a message appears, informing you that you do not have rights to this operation, your user account has not been granted the "Integration Settings, Data Services, Delete Accnt" security right. To have a user with permission temporarily override this restriction so you can delete a Data Services account this one time, do the following:
On the message, click Yes.
In the Password - Integration Settings, Data Services, Delete Accnt dialog box, the overriding user enters his or her credentials in the User ID and Password boxes and then clicks OK.
A confirmation message appears.
Click Yes.
Under Data Service Connection Settings, set up the following options:
Server - Enter the URL to the API server.
Port - (Optional) Enter the port number to use to allow communication through your firewalls.
With the connection settings entered, to verify that you can connect to the specified server, click Test Connection.
To set up the options for checking eligibilities, select the Eligibilities tab.
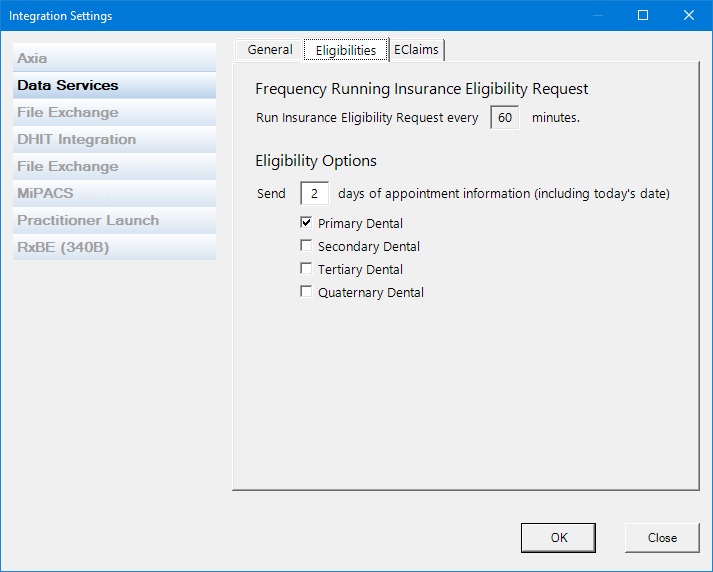
Note: The service checks eligibilities every 60 minutes. You cannot change this.
Under Eligibility Options, do the following:
In the Send [X] days of appointment information (including today's date) box, enter a number between 1 and 99 to specify how many business days worth of future appointments, starting from today's date, that you want the service to check eligibilities for.
Select the checkboxes that correspond to the types of coverage that you want the service to verify eligibilities for: Primary Dental, Secondary Dental, Tertiary Dental, and/or Quaternary Dental. At least one checkbox must be selected.
Click OK.
Notes:
The practice default setting Eligibility Check Date valid for indicates how long a verification of insurance eligibility is valid. In that box, enter how long an eligibility check should be valid for. The eligibility service will not re-check a patient's eligibility for any appointments before the specified time has elapsed.
You can still manually specify a patient's eligibility by editing his or her insurance information in Family File. However, with the automated insurance eligibility verification feature, a patient's eligibility information is updated automatically.