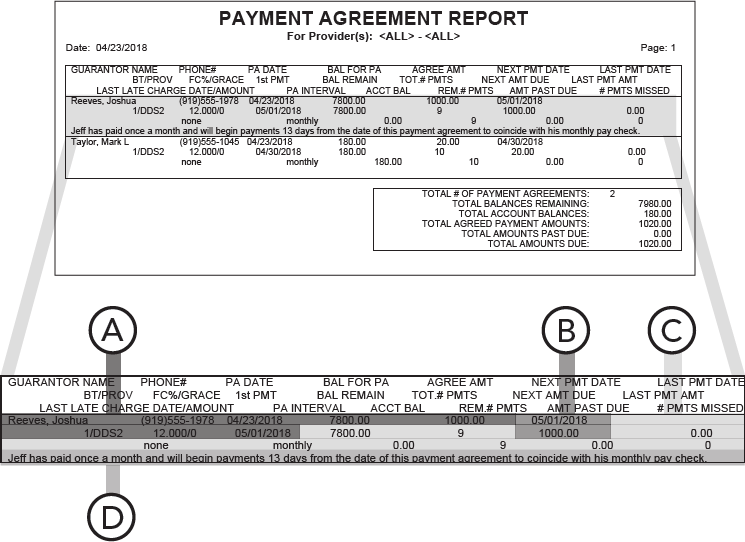
The Payment Agreement Report displays analysis and management information for monitoring legacy payment agreements that have not been completed. The report includes information on the agreement terms, the remaining balance for the payment agreement, and missed payments, and the last payment date and amount.
|
Why: |
To ensure that the practice follows up with guarantors that fail to make payments, to identify and assist guarantors that are prone to default on the agreement, and to reduce the amount of bad debt that the practice writes off |
When: |
As frequently as your patients are required to make payments |
Note: Generating a report in Office Manager requires the "Reports" security right. Viewing or printing a report in the Batch Processor requires the "Batch Processor, Print/Display Reports" security right.
To generate the Payment Agreement Report
In Office Manager, on the Reports menu, point to Ledger, and then click Payment Agreement Report.
Notes:
Whether the ledger reports appear on the menu or not is determined by a setting.
Also, this option is available only if your user account has been granted the "Reports" security right.
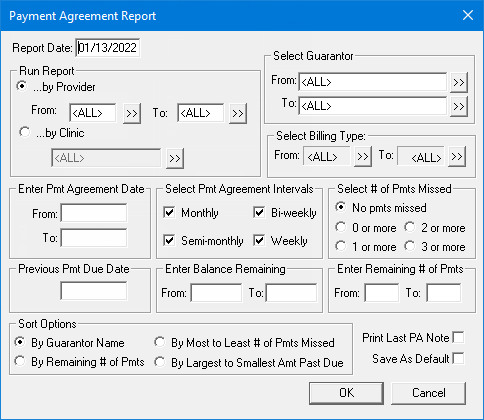
The Payment Agreement Report dialog box appears.

Set up the following options:
Report Date - By default, today's date appears in the box, but you can enter a different date. The specified date appears at the top of the report.
Run Report - How you want to generate the report. Select one of the following options:
By Provider - To generate the report by provider. With this option selected, to specify the preferred providers (Prov1 in Family File) of patients with payment agreements to include on the report. To specify providers, do one of the following:
To include all providers, type <ALL> for both From and To.
To include a specific range of providers, enter or select the starting provider (numerically by ID) of the range for From and the ending provider of the range for To.
To include a specific provider, enter or select the same provider for From and To.
To include an open-ended range of providers, enter or select a provider for either From or To, and type <ALL> for the other option.
To select a provider for From or To, do the following:
Click
the corresponding search button ![]() .
.
The Select Provider dialog box appears.

Either leave the ID and Last Name boxes empty to get a list of all providers, or enter all or part of a provider's ID or last name in the ID or Last Name box, respectively, to search for a provider.
Under Search By, select one of the following options: This Clinic, to search for the provider in the clinic that you are currently logged in to; All Clinics, to search for the provider in all clinics; or My Clinics, to search for the provider in the clinics to which you have been granted the "My Clinics, Select Provider " security right.
Notes:
The All Clinics option is available only if your user account has been granted the "View All Providers" security right for the Central clinic and if your user account has not been granted the "My Clinics, Select Provider" security right for the clinic that you are currently logged in to.
The My Clinics option is available only if your user account has been granted the "My Clinics, Select Provider" security right for at least one clinic and if your user account has not been granted the "View All Providers" security right for the Central clinic.
Either select the All Providers option to include providers who are associated with clinics (and who have a Log On User ID), or select the In ApptBook option to include providers who have been set up in Appointment Book.
Click
the search button ![]() .
.
The matching primary and secondary providers appear in the list.
Select the correct provider.
Click OK.
By Clinic - To generate the report by clinic. With this option selected, to specify the clinics of patients with payment agreements to include on the report. To specify clinics, do one of the following:
To include patients in any clinic, select the All checkbox.
To include patients in a specific clinic, do the following:
Click
the search button ![]() .
.
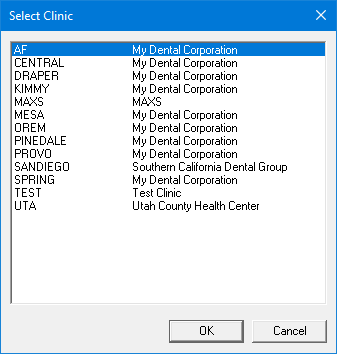
The Select Clinic dialog box appears.

Note: If your user account has been granted the "View All Patients" security right for the Central clinic, the ID and name of all clinics appear in the list; otherwise, the ID and name of each clinic for which your user account has been granted the "My Clinics, View" security right (in the "Practice/Clinic Setup" category) appear in the list; however, if your user account has not been granted that right to any clinic, only the ID and name of the clinic that you are currently logged in to appear in the list.
In the list, select the correct clinic.
Click OK.
Select Guarantor - The guarantors of patients with payment agreements to include on the report. To specify the guarantors, do one of the following:
To include all guarantors, type <ALL> for both From and To.
To include a specific range of guarantors, enter or select the starting guarantor (alphabetically by last name) of the range for From and the ending guarantor of the range for To.
To include a specific guarantor, enter or select the same guarantor for From and To.
To include an open-ended range of guarantors, enter or select a guarantor for either From or To, and type <ALL> for the other option.
To select a guarantor for From or To, do the following:
Click the corresponding search button
![]() .
.
The Select Patient dialog box appears.

In the Enter Last Name box, enter the last name of a guarantor.
Note: For information about all the search options that are available in the Select Patient dialog box, refer to the topic about selecting a patient.
Do one of the following:
Double-click the correct guarantor in the list of results.
Select the correct guarantor in the list of results, and then click OK.
Select Billing Type - The billing types of patients with payment agreements to include on the report. To specify billing types, do one of the following:
To include all billing types, select <ALL> for both From and To.
To include a specific range of billing types, select the starting billing type (numerically by ID) of the range for From and the ending billing type of the range for To.
To include a specific billing type, select the same billing type for From and To.
To include an open-ended range of billing types, select a billing type for either From or To, and select <ALL> for the other option.
To select a billing type for From or To, do the following:
Click the corresponding search button
![]() .
.
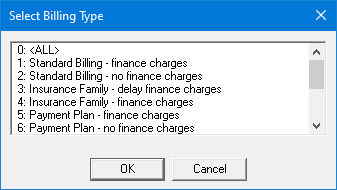
The Select Billing Type dialog box appears.

In the list, select the correct billing type.
Click OK.
Enter Pmt Agreement Date - Only payment agreements that were created during the specified date range may be included on the report. To specify the date range, do one of the following:
To include all dates, make sure that both the From and To boxes are blank.
To include a specific date range, enter the starting date of the range for From and the ending date of the range for To.
To include a specific date, enter the same date for both From and To.
To include an open-ended range of dates, enter a date for either From or To, and make sure that the other box is blank.
Select Pmt Agreement Interval - Only payment agreements with the specified intervals may be included on the report. To specify the payment agreement intervals, do one of the following:
To include all intervals, clear all four checkboxes: Monthly, Semi-monthly, Bi-weekly, and Weekly.
To include specific intervals, select any of the following checkboxes: Monthly, Semi-monthly, Bi-weekly, and/or Weekly. Clear the check boxes of the intervals that you do not want to include.
Select # of Pmts Missed - Only payment agreements for patients who have missed the specified number of payments may be included on the report. To specify the number of missed payments, select one of the following options:
No pmts missed - No payments have been missed.
0 or more - Whether or not payments have been missed.
1 or more - One or more payments have been missed.
2 or more - Two or more payments have been missed.
3 or more - Three or more payments have been missed.
Previous Pmt Due Date - Only payment agreements with payments that were due within the specified Previous Pmt Due Date and Report Date may be included on the report. Do one of the following:
To include all dates, make sure that the Previous Pmt Due Date box is blank, and make sure that today's date is entered in the Report Date box.
To include a specific date range, enter the starting date of the range in the Previous Pmt Due Date box, and make sure that correct ending date of the range is entered in the Report Date box.
Enter Balance Remaining - Only payment agreements with remaining balances that are within the specified range may be included on the report. To specify the range, do one of the following:
To include all amounts, make sure that both the From and To boxes are blank.
To include a specific range of amounts, enter the starting amount of the range for From and the ending amount of the range for To.
To include a specific amount, enter the same amount for both From and To.
To include an open-ended range of amounts, enter an amount for either From or To, and make sure that the other box is blank.
Remaining # of Pmts - Only payment agreements with at least the specified number of payments remaining may be included on the report. To specify the number of remaining payments, do one of the following:
To include any number of remaining payments, make sure that both the From and To boxes are blank.
To include a specific range of the number of remaining payments, enter the starting number of the range for From and the ending number of the range for To.
To include a specific number of remaining payments, enter the same number for both From and To.
To include an open-ended range of the number of remaining payments, enter a number for either From or To, and make sure that the other box is blank.
Sort Options - Select one of the following sorting options:
By Guarantor Name - To organize the list alphabetically.
By Remaining # of Pmts - To sort patients by the number of payments they have remaining on their payment agreements.
By Most to Least # of Pmts Missed - To put those patients with the most payments missed first on the list.
By Largest to Smallest Amt Past Due - To put patients who have the largest dollar amount past due first on the list.
Print Last PA Note - With this check box selected, last payment agreement notes appear on the report. With this checkbox clear, the notes do not appear.
To save the current settings for the next time that you want to run the report, select the Save As Default check box.
Click OK to send the report to the Batch Processor.
Preview and then print the report, or print the report without previewing it.

Important information this report provides
Original Agreement Details - In addition to the name and phone number of the guarantor, the following information is included:
PA Date - The date of the payment agreement.
Bal For PA - The original balance of the payment agreement.
Agree Amt - The monthly payment amount.
Future Transactions:
Next Pmt Date - The next payment due date.
Next Amt Due - The next payment amount.
Current Status:
Last Pmt Date - The guarantor’s last payment date.
Last Pmt Amt - The amount of the guarantor’s last payment.
Rem # Pmts - The number of payments remaining.
Bal Remain - The remaining balance of the payment agreement.
Acct Bal - The guarantor’s current account balance.
PA Notes - If you select Print Last PA Note when setting options for the report, the last payment agreement note appears on the report.