The Oral Health Status (OHS) Report displays OHS survey data within a specified date range and can include patient details.
Note: The Oral Health Status Report is available only if the global setting for the Oral Health Status features is enabled.
To generate the report
In DXOne Reporting, select Custom, and then double-click Oral Health Status Report.
The Oral Health Status Report dialog box appears.

Set up the following options:
Date Range - To filter the report by date, do one of the following:
To include patients with completed OHS surveys that have dates within a range that you specify, select the Specific Range option. With this option selected, do one of the following:
Enter a date range (in a m/d/yyyy format) in the From and To boxes.
To select a date, do the following for From and To:
Click the corresponding calendar icon to view a month calendar.

Navigate to the correct month, using the left and right arrows.
Note: To quickly change the year and month, click the month-year at the top of the calendar, navigate to the correct year, using the left and right arrows, and then click the correct month.
Click the correct day.
To include patients with completed OHS surveys that have dates within a range that is relative to the report date, select the Relative Date Range option. With this option selected, select one of the following relative date ranges from the list:
|
Current Day Current MTD Current Fiscal YTD Current Calendar YTD |
Previous Day Previous Week Previous Month Previous 3 Months Previous 6 Months Previous Fiscal Year Previous Calendar Year |
Next Day Next Week Next Month Next 3 Months Next 6 Months Next Fiscal Year Next Calendar Year |
Statuses:
OHS Status - To filter the report by status, do one of the following:
To not include patients with completed OHS surveys that have the specified statuses, clear the OHS Status checkbox.
To include patients with completed OHS surveys that have the specified statuses, select the OHS Status checkbox. With this checkbox selected, the options to select statuses are available. Do one of the following:
To include OHS surveys with any status, select the All checkbox.
To include OHS surveys with specific statuses, do the following:
Click the search button ![]() .
.
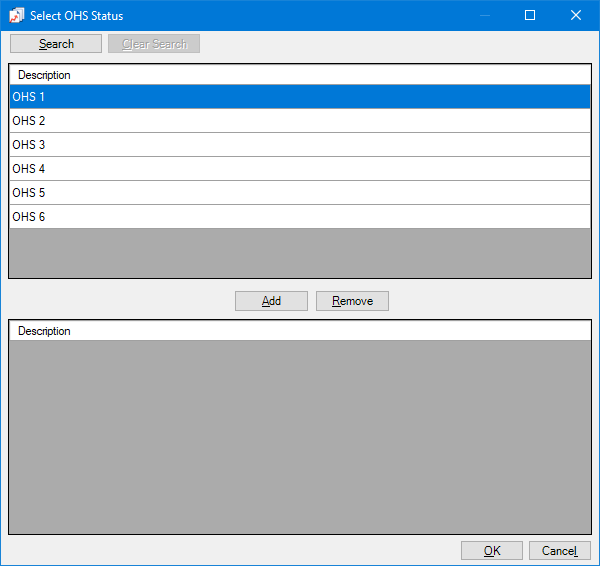
The Select OHS Status dialog box appears.
Notes:
To search for a status, click Search, enter the first character or more of a status description in the Description box, and then click Show Results to view a list of matching statuses.
After viewing search results, to return to viewing the list of all the statuses, click Search, click Clear Search to clear the search criteria that you entered, and then click Show Results.
In the upper list, select one or more statuses.
Note: To select multiple statuses, click a status, and then, while pressing the Ctrl key, click the other desired statuses. To select a range of adjacent statuses, click the first status of the desired range of statuses, and then, while pressing the Shift key, click the last status of the desired range of statuses.
Click Add.
Note: To not include a status that you added, select that status in the lower list, and then click Remove.
Click OK.
Note: OHS class 5 and 6 are calculated based on the date that you generate the report.
Caries Risk - To filter the report by caries risk levels, do one of the following:
To not include patients with completed OHS surveys that have the specified caries risk levels, clear the Caries Risk checkbox.
To include patients with completed OHS surveys that have the specified caries risk levels, select the Caries Risk checkbox. With this checkbox selected, the options to select statuses are available. Do one of the following:
To include OHS surveys with any caries risk level, select the All checkbox.
To include OHS surveys with specific caries risk levels, do the following:
Click the search button ![]() .
.
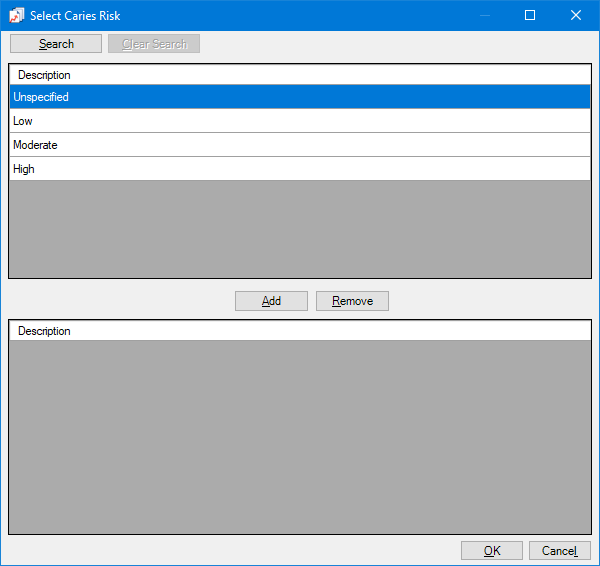
The Select Caries Risk dialog box appears.
Notes:
To search for a caries risk level, click Search, enter the first character or more of a caries risk level description in the Description box, and then click Show Results to view a list of matching caries risk levels.
After viewing search results, to return to viewing the list of all the caries risk levels, click Search, click Clear Search to clear the search criteria that you entered, and then click Show Results.
In the upper list, select one or more caries risk levels.
Note: To select multiple caries risk levels, click a caries risk level, and then, while pressing the Ctrl key, click the other desired caries risk levels. To select a range of adjacent caries risk levels, click the first caries risk level of the desired range of caries risk levels, and then, while pressing the Shift key, click the last caries risk level of the desired range of caries risk levels.
Click Add.
Note: To not include a caries risk level that you added, select that caries risk level in the lower list, and then click Remove.
Click OK.
Tobacco Use - To filter the report by tobacco uses, do one of the following:
To not include patients with completed OHS surveys that have the specified tobacco uses, clear the Tobacco Use checkbox.
To include patients with completed OHS surveys that have the specified tobacco uses, select the Tobacco Use checkbox. With this checkbox selected, the options to select tobacco uses are available. Do one of the following:
To include OHS surveys with any tobacco use, select the All checkbox.
To include OHS surveys with specific tobacco uses, do the following:
Click the search button ![]() .
.
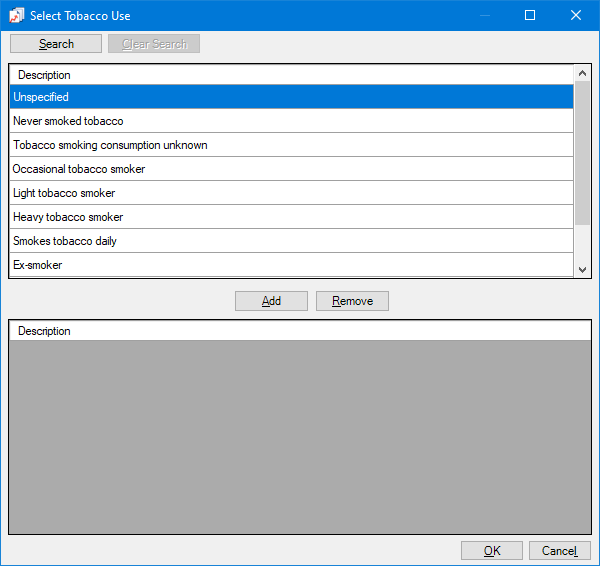
The Select Tobacco Use dialog box appears.
Notes:
To search for a tobacco use, click Search, enter the first character or more of a tobacco use description in the Description box, and then click Show Results to view a list of matching tobacco uses.
After viewing search results, to return to viewing the list of all the tobacco uses, click Search, click Clear Search to clear the search criteria that you entered, and then click Show Results.
In the upper list, select one or more tobacco uses.
Note: To select multiple tobacco uses, click a tobacco use, and then, while pressing the Ctrl key, click the other desired tobacco uses. To select a range of adjacent tobacco uses, click the first tobacco use of the desired range of tobacco uses, and then, while pressing the Shift key, click the last tobacco use of the desired range of tobacco uses.
Click Add.
Note: To not include a tobacco use that you added, select that tobacco use in the lower list, and then click Remove.
Click OK.
Diabetes - To filter the report by types of diabetes, do one of the following:
To not include patients with completed OHS surveys that have the specified diabetes types, clear the Diabetes checkbox.
To include patients with completed OHS surveys that have the specified diabetes types, select the Diabetes checkbox. With this checkbox selected, the options to select diabetes types are available. Do one of the following:
To include OHS surveys with any diabetes type, select the All checkbox.
To include OHS surveys with specific diabetes types, do the following:
Click the search button ![]() .
.
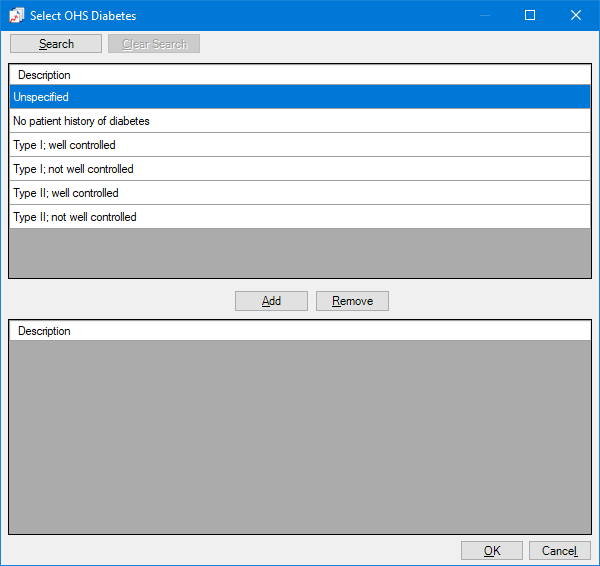
The Select OHS Diabetes dialog box appears.
Notes:
To search for a diabetes type, click Search, enter the first character or more of a diabetes type description in the Description box, and then click Show Results to view a list of matching diabetes types.
After viewing search results, to return to viewing the list of all the diabetes types, click Search, click Clear Search to clear the search criteria that you entered, and then click Show Results.
In the upper list, select one or more diabetes types.
Note: To select multiple diabetes types, click a diabetes type, and then, while pressing the Ctrl key, click the other desired diabetes types. To select a range of adjacent diabetes types, click the first diabetes type of the desired range of diabetes types, and then, while pressing the Shift key, click the last diabetes type of the desired range of diabetes types.
Click Add.
Note: To not include a diabetes type that you added, select that diabetes type in the lower list, and then click Remove.
Click OK.
Dry Mouth - To filter the report by dry mouth descriptions, do one of the following:
To not include patients with completed OHS surveys that have the specified dry mouth descriptions, clear the Dry Mouth checkbox.
To include patients with completed OHS surveys that have the specified dry mouth descriptions, select the Dry Mouth checkbox. With this checkbox selected, the options to select dry mouth descriptions are available. Do one of the following:
To include OHS surveys with any dry mouth description, select the All checkbox.
To include OHS surveys with specific dry mouth descriptions, do the following:
Click the search button ![]() .
.
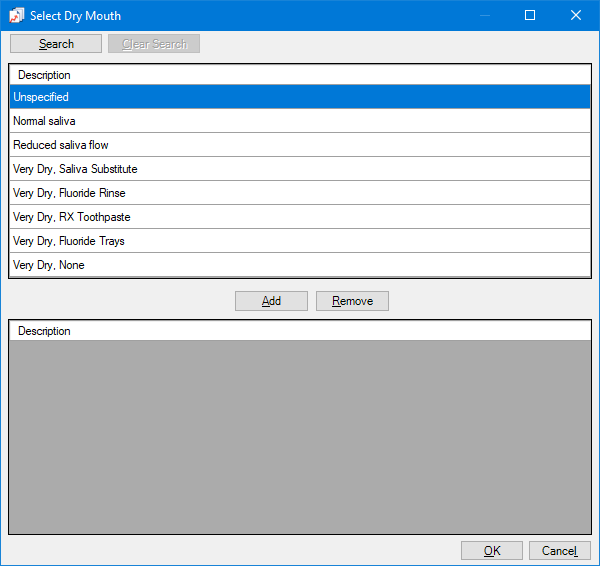
The Select Dry Mouth dialog box appears.
Notes:
To search for a dry mouth description, click Search, enter the first character or more of a dry mouth description in the Description box, and then click Show Results to view a list of matching dry mouth description.
After viewing search results, to return to viewing the list of all the dry mouth descriptions, click Search, click Clear Search to clear the search criteria that you entered, and then click Show Results.
In the upper list, select one or more dry mouth descriptions.
Note: To select multiple dry mouth descriptions, click a dry mouth description, and then, while pressing the Ctrl key, click the other desired dry mouth descriptions. To select a range of adjacent dry mouth descriptions, click the first dry mouth description of the desired range of dry mouth descriptions, and then, while pressing the Shift key, click the last dry mouth description of the desired range of dry mouth descriptions.
Click Add.
Note: To not include a dry mouth description that you added, select that dry mouth description in the lower list, and then click Remove.
Click OK.
Notes:
If all these checkboxes are clear, the report will include patients with a completed OHS survey within the selected date range (in the OHS 1-6 columns) and patients who do not have a completed OHS survey (in the NO OHS column).
If at least one of these checkboxes is selected, the report will include patients with a completed OHS survey within the selected date range and who meet the specified filter criteria. The report will not include patients who do not have a completed OHS survey (the NO OHS column will not appear on the report).
Clinic - To filter the report by the clinics that users were logged in to when OHS surveys were completed, do one of the following:
To include all clinics that you are allowed to generate the report for, select the All checkbox.
To include specific clinics, do the following:
Click the search button  .
.
The Select Clinics dialog box appears.

Note: Only the clinics that you are allowed to generate the report for are available.
If the list is long, to search for a clinic by ID and/or title, do the following:
Click Search.
The options for searching appear in the upper list.

Enter the first character or more of a clinic's ID and/or title in the ID and Practice Title boxes, respectively.
Click Show Results to view a list of matching clinics.
Note: To return to viewing the list of all the clinics, click Search, click Clear Search to clear the search criteria that you entered, and then click Show Results.
In the upper list, select one or more clinics.
Note: To select multiple clinics, click a clinic, and then, while pressing the Ctrl key, click the other desired clinics. To select a range of adjacent clinics, click the first clinic of the desired range of clinics, and then, while pressing the Shift key, click the last clinic of the desired range of clinics.
Click Add.
Repeat steps b-d as needed to add other clinics.
Note: To not include a clinic that you added, select that clinic in the lower list, and then click Remove.
Click OK.
Provider - To filter the report by the providers who signed the associated clinical notes that are associated with completed OHS surveys, which may differ from the logged-in users who completed OHS surveys, do one of the following:
To include all providers that you are allowed to generate the report for, select the All checkbox.
To include specific providers, do the following:
Click the search button .
The Select Providers/Staff dialog box appears.

Note: Only the providers and staff that you are allowed to generate the report for are available.
If the list is long, to search for a provider by ID, first name, last name, and/or title, do the following:
Click Search.
The options for searching appear in the upper list.

Enter the first character or more of a provider's ID, first name, last name, and/or title in the ID, First Name, Last Name, and Title boxes, respectively.
Click Show Results to view a list of matching providers and staff members.
Note: To return to viewing the list of all the providers and staff members, click Search, click Clear Search to clear the search criteria that you entered, and then click Show Results.
In the upper list, select one or more providers.
Note: To select multiple providers, click a provider, and then, while pressing the Ctrl key, click the other desired providers. To select a range of adjacent providers, click the first provider of the desired range of providers, and then, while pressing the Shift key, click the last provider of the desired range of providers.
Click Add.
Repeat steps b-d as needed to add other providers.
Note: To not include a provider that you added, select that provider in the lower list, and then click Remove.
Click OK.
Age - To filter the report by the ages of patients who have OHS surveys entered in their records, do one of the following:
To include patients of any age, select the All checkbox.
To include patients of specific ages, do the following:
Click the search button .
The Select Ages dialog box appears.
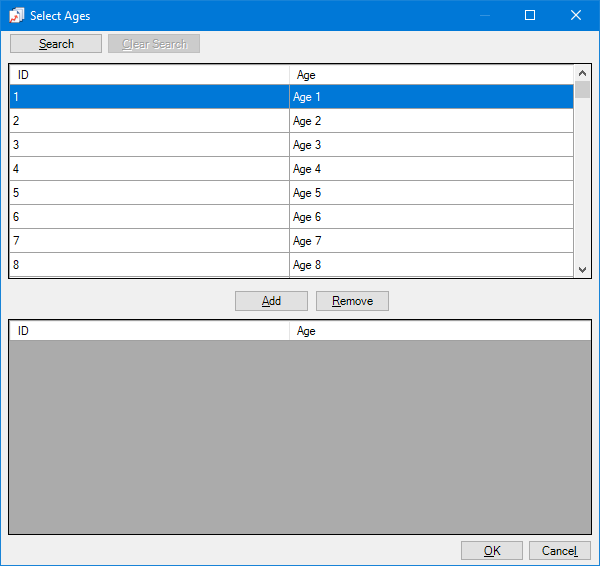
Note: Ages 1 through 120 are available.
To search for an age by number or description, do the following:
Click Search.
The options for searching appear in the upper list.

Either enter a number in the ID box, or type Age followed by a space and then a number in the Age box.
Click Show Results to view a list of matching ages.
Note: To return to viewing the list of all the ages, click Search, click Clear Search to clear the search criteria that you entered, and then click Show Results.
In the upper list, select one or more ages.
Note: To select multiple ages, click an age, and then, while pressing the Ctrl key, click the other desired ages. To select a range of adjacent ages, click the first age of the desired range of ages, and then, while pressing the Shift key, click the last age of the desired range of ages.
Click Add.
Repeat steps b-d as needed to add other ages.
Note: To not include an age that you added, select that age in the lower list, and then click Remove.
Click OK.
Under Age, select or clear the following checkboxes:
Include Values before Lower Bound - With this checkbox selected, the report includes each gender statistic for the ages below the lowest selected age combined. With this checkbox clear, the report includes each gender statistic for the ages down to the lowest selected age combined.
Include Values after Upper Bound - With this checkbox selected, the report includes each gender statistic for the ages above the highest selected age combined. With this checkbox clear, the report includes each gender statistic for the ages up to the highest selected age combined.
Note: These options apply only if you are running the report for specific ages (the All checkbox is clear).
Patient Tag - Do one of the following:
To not filter the report by a patient tag, clear the Run By Patient Tag checkbox.
To filter the report by the tags that are assigned to patients who have OHS surveys entered in their records, select the Run By Patient Tag checkbox. With this checkbox selected, the options to filter the report by tag are available. Do one of the following:
To include patients with any patient tag, select the All checkbox.
To include patients with specific tags, do the following:
Click the search button ![]() .
.
The Patient Tag Selection dialog box appears.

If the list is long, to search for a patient tag, do the following:
Click Search.
The options for searching appear in the upper list.

Enter the first character or more of a patient tag name in the Tag Name box.
Click Show Results to view a list of matching patient tags.
Note: To return to viewing the list of all the patient tags, click Search, click Clear Search to clear the search criteria that you entered, and then click Show Results.
In the upper list, select one or more patient tags.
Note: To select multiple patient tags, click a patient tag, and then, while pressing the Ctrl key, click the other desired patient tags. To select a range of adjacent patient tags, click the first patient tag of the desired range of patient tags, and then, while pressing the Shift key, click the last patient tag of the desired range of patient tags.
Click Add.
Repeat steps b-d as needed to add other patient tags.
Note: To not include a patient tag that you added, select that patient tag in the lower list, and then click Remove.
Click OK.
Group By - Select one of the following options:
No Group By - For no grouping. The summary report will be generated. The overall total number of patients appear on the report.
Clinic - To group the report by clinic.
Do one of the following:
To not group the report by provider within each clinic grouping, clear the Provider checkbox. The report displays totals for each clinic.
To group the report by provider within each clinic grouping, select the Provider checkbox. For each provider, the report displays totals that are related to the outer clinic grouping. The report displays totals for each clinic.
Provider - To group the report by provider.
Do one of the following:
To not group the report by clinic within each provider grouping, clear the Clinic checkbox. The report displays totals for each provider.
To group the report by clinic within each provider grouping, select the Clinic checkbox. For each clinic, the report displays totals that are related to the outer provider grouping. The report displays totals for each provider.
Other Options - Select or clear the following checkboxes:
New Page For Each Clinic - With this checkbox selected, each clinic's data starts on a new page. With this checkbox clear, a clinic's data can start anywhere on a page.
Note: This checkbox is available only if the Clinic option under Group By is selected.
Excel Friendly (Includes All Patient & OHS Data) - With this checkbox selected, the report includes patient details and OHS data but without groupings and totals, which is a format that you can easily export to a spreadsheet program. With this checkbox clear, the report displays data in its standard format.
Note: The report is sorted by last name, and then by first name, and then by OHS visit. A patient may appear more than once on the report.
Age as of June 30th - With this checkbox selected, the report calculates the age of each patient as of June 30 within the specified date range. With this checkbox selected, the report calculates the age of each patient as of the date that you generate the report.
Click Save as Default to save the current settings for the next time you run the report.
Click Clear Defaults to revert the dialog box options to the original defaults.
Click Schedule to schedule a report job.
Click OK to preview the report.
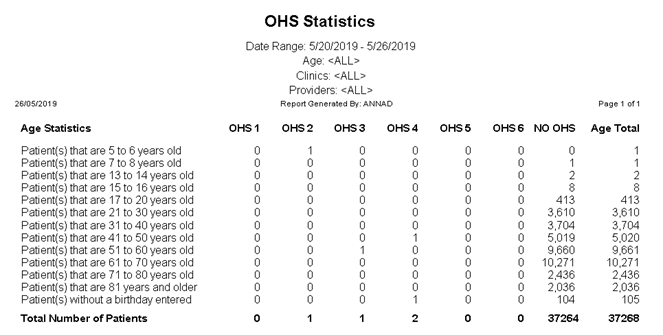
For each age group on the report, the following statistics appear:
The number of patients who have a completed OHS survey, broken down into columns by OHS status.
The number of patients who do not have a completed OHS survey. Depending on how you filter the report, this column may not appear on the report.
The total number of patients.
The report also displays the total number of patients across all age groups for each column of data on the report.
Note: A patient may be counted more than once on the report.