The Insurance Claim Aging Report lists outstanding insurance claims, grouped by insurance carrier, along with the aged balances of each claim.
|
Why: |
To identify unpaid claims so they can be targeted for collections |
When: |
Monthly |
To generate the report
In DXOne Reporting, select Ledger, and then double-click Insurance Claims Aging.
The Insurance Claim Aging dialog box appears.
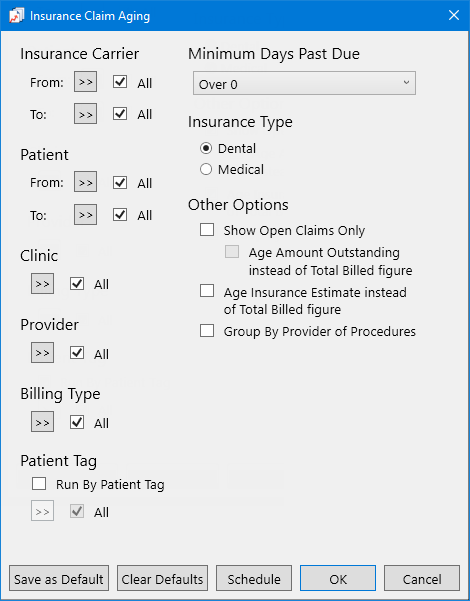
Set up the following options:
Insurance Carrier - To filter the report by the insurance carriers that are associated with claims, do one of the following:
To include all insurance carriers, select the All checkbox for both From and To.
To include a specific range of insurance carriers, select the starting insurance carrier (alphabetically by name) of the range for From and the ending insurance carrier of the range for To.
To include a specific insurance carrier, select the same insurance carrier for both From and To.
To include an open-ended range of insurance carriers, select an insurance carrier for either From or To, and then select the All check box for the other option.
To select a specific insurance carrier for From or To, do the following:
Click the corresponding search button
 .
.
The Select Insurance Carriers dialog box appears.

Do one of the following:
To get a list of all insurance carriers, do not enter any search criteria.
To search for insurance carriers by name, group plan name, group plan number, local number, payor ID, and/or address, enter the first character or more of an insurance carrier name, group plan name, group plan number, local number, payor ID, and/or address in the Carrier Name, Group Plan, Group#, Local#, Payor ID, and Address boxes, respectively.

Note: To clear any text that you have entered, click Clear Search.
Click Show Results to view a list of insurance carriers.

Note: To clear the list so you can search again, click Search.
In the list, select an insurance carrier.
Click OK.
Patient - To filter the report by the patients who are associated with claims, do one of the following:
To include all patients in the clinics that you are allowed to generate the report for, select the All checkbox for both From and To.
To include a specific range of patients, select the starting patient (alphabetically by last name) of the range for From and the ending patient of the range for To.
To include a specific patient, select the same patient for both From and To.
To include an open-ended range of patients, select a patient for either From or To, and then select the All checkbox for the other option.
To select a specific patient for From or To, do the following:
Click the corresponding search button
.
The Selection Patients dialog box appears.

Note: Only the patients in the clinics that you are allowed to generate the report for are available.
Do one of the following:
To get a list of all patients, do not enter any search criteria.
To search for patients by last name, birth date, status, chart number, Social Security Number, ID, and/or home phone number, enter the first character or more of a patient's last name, birth date, status, chart number, Social Security Number, ID, and/or home phone number in the Name, Birthday, Status, Chart#, SS#, OtherId, and Home Phone # boxes, respectively.

Note: To clear any text that you have entered, click Clear Search.
Click Show Results to view a list of patients.

Note: To clear the list so you can search again, click Search.
In the list, select a patient.
Click OK.
Clinic - To filter the report by the rendering clinics that are associated with procedures on claims, do one of the following:
To include all clinics that you are allowed to generate the report for, select the All checkbox.
To include specific clinics, do the following:
Click the search button .
The Select Clinics dialog box appears.

Note: Only the clinics that you are allowed to generate the report for are available.
If the list is long, to search for a clinic by ID and/or title, do the following:
Click Search.
The options for searching appear in the upper list.

Enter the first character or more of a clinic's ID and/or title in the ID and Practice Title boxes, respectively.
Click Show Results to view a list of matching clinics.
Note: To return to viewing the list of all the clinics, click Search, click Clear Search to clear the search criteria that you entered, and then click Show Results.
In the upper list, select one or more clinics.
Note: To select multiple clinics, click a clinic, and then, while pressing the Ctrl key, click the other desired clinics. To select a range of adjacent clinics, click the first clinic of the desired range of clinics, and then, while pressing the Shift key, click the last clinic of the desired range of clinics.
Click Add.
Repeat steps b-d as needed to add other clinics.
Note: To not include a clinic that you added, select that clinic in the lower list, and then click Remove.
Click OK.
Provider - To filter the report by the rendering providers that are associated with procedures on claims, do one of the following:
To include all providers that you are allowed to generate the report for, select the All checkbox.
To include specific providers, do the following:
Click the search button .
The Select Providers/Staff dialog box appears.

Note: Only the providers and staff that you are allowed to generate the report for are available.
If the list is long, to search for a provider by ID, first name, last name, and/or title, do the following:
Click Search.
The options for searching appear in the upper list.

Enter the first character or more of a provider's ID, first name, last name, and/or title in the ID, First Name, Last Name, and Title boxes, respectively.
Click Show Results to view a list of matching providers and staff members.
Note: To return to viewing the list of all the providers and staff members, click Search, click Clear Search to clear the search criteria that you entered, and then click Show Results.
In the upper list, select one or more providers.
Note: To select multiple providers, click a provider, and then, while pressing the Ctrl key, click the other desired providers. To select a range of adjacent providers, click the first provider of the desired range of providers, and then, while pressing the Shift key, click the last provider of the desired range of providers.
Click Add.
Repeat steps b-d as needed to add other providers.
Note: To not include a provider that you added, select that provider in the lower list, and then click Remove.
Click OK.
Billing Type - To filter the report by the billing types that are associated with patients on claims, do one of the following:
To include all billing types, select the All checkbox.
To include specific billing types, do the following:
Click the search button .
The Select Billing Type dialog box appears.

If the list is long, to search for a billing type by ID and/or description, do the following:
Click Search.
The options for searching appear in the upper list.

Enter the first character or more of a billing type's ID and/or description in the ID and Description boxes, respectively.
Click Show Results to view a list of matching billing types.
Note: To return to viewing the list of all the billing types, click Search, click Clear Search to clear the search criteria that you entered, and then click Show Results.
In the upper list, select one or more billing types.
Note: To select multiple billing types, click a billing type, and then, while pressing the Ctrl key, click the other desired billing types. To select a range of adjacent billing types, click the first billing type of the desired range of billing types, and then, while pressing the Shift key, click the last billing type of the desired range of billing types.
Click Add.
Repeat steps b-d as needed to add other billing types.
Note: To not include a billing type that you added, select that billing type in the lower list, and then click Remove.
Click OK.
Patient Tag - Do one of the following:
To not filter the report by a patient tag, clear the Run By Patient Tag checkbox.
To filter the report by the tags that are assigned to patients, select the Run By Patient Tag checkbox. With this checkbox selected, the options to filter the report by tag are available. Do one of the following:
To include claims for patients with any patient tag, select the All checkbox.
To include claims for patients with specific tags, do the following:
Click the search button ![]() .
.
The Patient Tag Selection dialog box appears.

If the list is long, to search for a patient tag, do the following:
Click Search.
The options for searching appear in the upper list.

Enter the first character or more of a patient tag name in the Tag Name box.
Click Show Results to view a list of matching patient tags.
Note: To return to viewing the list of all the patient tags, click Search, click Clear Search to clear the search criteria that you entered, and then click Show Results.
In the upper list, select one or more patient tags.
Note: To select multiple patient tags, click a patient tag, and then, while pressing the Ctrl key, click the other desired patient tags. To select a range of adjacent patient tags, click the first patient tag of the desired range of patient tags, and then, while pressing the Shift key, click the last patient tag of the desired range of patient tags.
Click Add.
Repeat steps b-d as needed to add other patient tags.
Note: To not include a patient tag that you added, select that patient tag in the lower list, and then click Remove.
Click OK.
Minimum Days Past Due - From the list, select the minimum number of days past due that a claim must be for it to be included on the report: Over 0, Over 30, Over 60, Over 90, Over 120, Over 150, or Over 180. Claims that have been sent over 0, 30, 60, 90, 120, 150, or 180 days ago, respectively, will be included on the report.
Note: To include all claims, regardless of when they were sent, select Over 0.
Insurance Type - To filter the report by the type of insurance that carriers provide, select one of the following options:
Dental - To include insurance carriers that are associated with dental insurance plans.
Medical - To include insurance carriers that are associated with medical insurance plans.
Other Options - Select or clear the following checkboxes as needed:
Show Open Claims Only - If your clinics have been set up to allow Dentrix Enterprise to mark claims as being closed automatically or to allow you to do it manually, you can filter the report to include only open claims. Do one of the following:
To include only claims that have not been marked as being closed (either automatically or manually), select the Show Open Claims Only checkbox selected, the report.
Note: If Dentrix Enterprise cannot close a claim automatically, and if you have not closed the claim manually, the claim is considered to be open even if an insurance payment has been posted and there is not an outstanding amount that is expected from insurance for the claim.
To include claims that have not had any insurance payments posted for them (claims that do not have the Received status), clear the Show Open Claims Only checkbox.
Note: Select the Show Open Claims Only check box only if the Claim Must Be Zero to Close checkbox in the Clinic Resource Setup dialog box is selected, thus allowing claims to be marked as being closed. You must be logged in to the Central clinic to change this setting.
If the Show Open Claims Only checkbox is selected, the Age Amount Outstanding instead of Total Billed figure checkbox becomes available. Do one of the following:
To have the amount that is still outstanding from insurance be placed in the applicable age column (1-30, 31-60, 61-90, 91-120, 121-150, 151-180, or 181+) for a claim on the report, select the Age Amount Outstanding instead of Total Billed figure checkbox.
To have the total amount that was billed to insurance be placed in the applicable age column (1-30, 31-60, 61-90, 91-120, 121-150, 151-180, or 181+) for a claim on the report clear the Age Amount Outstanding instead of Total Billed figure checkbox.
Note: Selecting the Show Open Claims Only check box causes the Age Insurance Estimate instead of Total Figure Billed checkbox to become unavailable even if it had been selected previously.
Age Insurance Estimate instead of Total Billed figure - With this checkbox selected, the amount of the estimated insurance portion will be placed in the applicable age column (1-30, 31-60, 61-90, 91-120, 121-150, 151-180, or 181+) for a claim on the report. With this checkbox clear, the total amount that was billed to insurance will be placed in the applicable age column (1-30, 31-60, 61-90, 91-120, 121-150, 151-180, or 181+) for a claim on the report.
Note: This checkbox is available only if the Show Open Claims Only checkbox is clear.
Group By Provider of Procedures - With this checkbox selected, claims on the report are grouped by rendering provider and then by insurance plan. With this checkbox clear, claims on the report are grouped by insurance plan.
Click Save as Default to save the current settings for the next time you run the report.
Click Clear Defaults to revert the dialog box options to the original defaults.
Click Schedule to schedule a report job.
Click OK to preview the report.
Important information this report provides
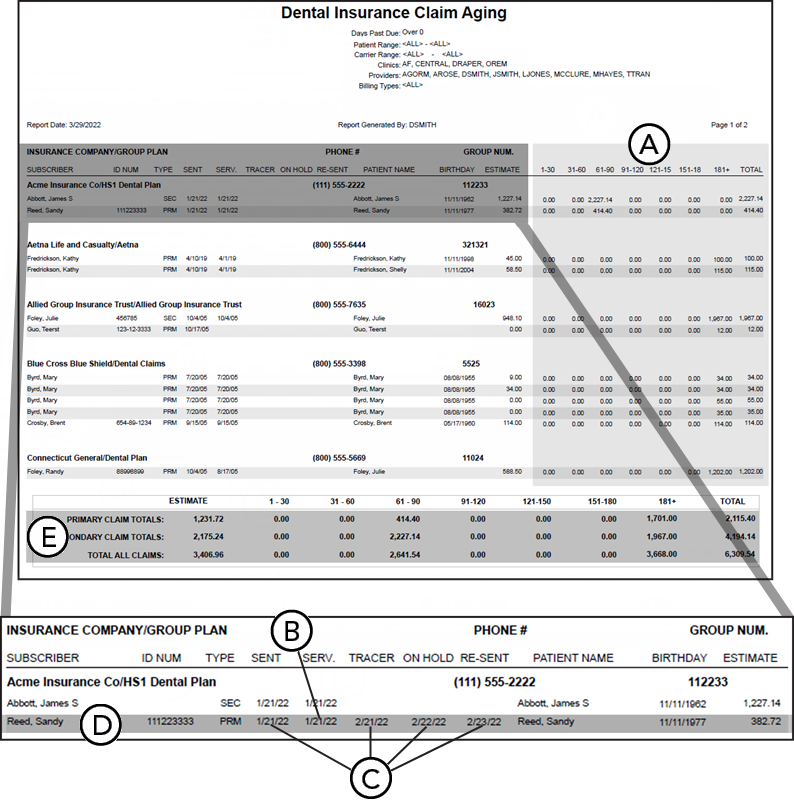
Aged Balances - The claim's aged balances. The amount that was billed to insurance, the amount that is still outstanding from insurance, or the amount of the estimated insurance portion appears in the applicable age column (1-30, 31-60, 61-90, 91-120, 121-150, 151-180, or 181+). Also, the total balance appears.
Service Date - The service date (the date of the procedure) is found in the Primary (or Secondary) Insurance Claim dialog box, which can be accessed by double-clicking a claim in Ledger. The service date is entered automatically when a claim is created.

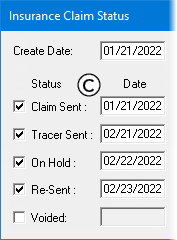
Status Dates - If you have entered dates in the Insurance Claim Status dialog box, the corresponding dates appear on the report.
Sent - The date that the claim was sent. If you send a claim electronically, the Sent date is entered automatically in the Insurance Claim Status dialog box.
Tracer - The date that the tracer was sent (if applicable).
On Hold - The date that the claim was placed on hold (if applicable).
Re-Sent - The date that the claim was re-sent to the insurance carrier (if applicable). If you re-send a claim electronically, the Re-sent date is entered automatically in the Insurance Claim Status dialog box.
Claim Information - The subscriber’s name and ID number, a notation as to whether the claim is a primary or secondary claim, the patient’s name and birth date, and the estimated insurance payment.
Note: The corresponding insurance carrier's name, plan name, contact phone number, and group number appear for your reference if you need to contact the insurance carrier.
Totals - The totals for the insurance carriers on the report that provide primary plans, totals for the insurance carriers on the report that provide secondary plans, and totals for all insurance carriers on the report.
