The Appointment Cycle Time Report helps you analyze changes in appointments' statuses. The report provides statistics regarding how long patients wait to be treated and how long they spend in treatment.
|
Why: |
To generate a report of appointment information, total visit times, and in-clinic wait times to monitor daily activity |
When: |
Daily |
To generate the report
In DXOne Reporting, select Management, and then double-click Appointment Cycle Time.
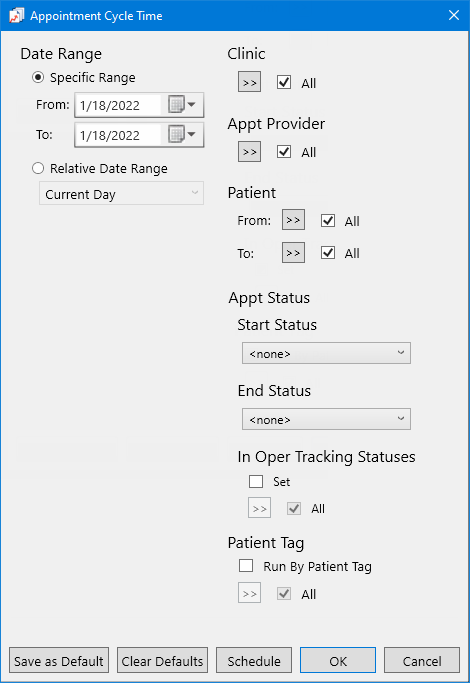
The Appointment Cycle Time dialog box appears.

Set up the following options:
Date Range - To filter the report by date, do one of the following:
To include appointments that have dates within a range that you specify, select the Specific Range option. With this option selected, do one of the following:
Enter a date range (in a m/d/yyyy format) in the From and To boxes.
To select a date, do the following for From and To:
Click the corresponding calendar icon to view a month calendar.

Navigate to the correct month, using the left and right arrows.
Note: To quickly change the year and month, click the month-year at the top of the calendar, navigate to the correct year, using the left and right arrows, and then click the correct month.
Click the correct day.
To include appointments that have dates within a range that is relative to the report date, select the Relative Date Range option. With this option selected, select one of the following relative date ranges from the list:
Current Day Current MTD Current Fiscal YTD Current Calendar YTD |
Previous Day Previous Week Previous Month Previous 3 Months Previous 6 Months Previous Fiscal Year Previous Calendar Year |
Next Day Next Week Next Month Next 3 Months Next 6 Months Next Fiscal Year Next Calendar Year |
Clinic - To filter the report by the clinics that are associated with appointments, do one of the following:
To include all clinics that you are allowed to generate the report for, select the All checkbox.
To include specific clinics, do the following:
Click the search button  .
.
The Select Clinics dialog box appears.

Note: Only the clinics that you are allowed to generate the report for are available.
If the list is long, to search for a clinic by ID and/or title, do the following:
Click Search.
The options for searching appear in the upper list.

Enter the first character or more of a clinic's ID and/or title in the ID and Practice Title boxes, respectively.
Click Show Results to view a list of matching clinics.
Note: To return to viewing the list of all the clinics, click Search, click Clear Search to clear the search criteria that you entered, and then click Show Results.
In the upper list, select one or more clinics.
Note: To select multiple clinics, click a clinic, and then, while pressing the Ctrl key, click the other desired clinics. To select a range of adjacent clinics, click the first clinic of the desired range of clinics, and then, while pressing the Shift key, click the last clinic of the desired range of clinics.
Click Add.
Repeat steps b-d as needed to add other clinics.
Note: To not include a clinic that you added, select that clinic in the lower list, and then click Remove.
Click OK.
Appt Provider - To filter the report by the providers who are associated with appointments, do one of the following:
To include all providers that you are allowed to generate the report for, select the All checkbox.
To include specific providers, do the following:
Click the search button  .
.
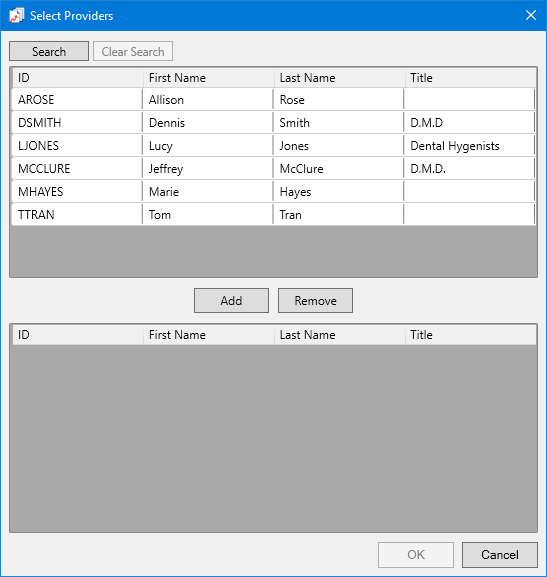
The Select Providers dialog box appears.

Note: Only the providers that you are allowed to generate the report for are available.
If the list is long, to search for a provider by ID, first name, last name, and/or title, do the following:
Click Search.
The options for searching appear in the upper list.

Enter the first character or more of a provider's ID, first name, last name, and/or title in the ID, First Name, Last Name, and Title boxes, respectively.
Click Show Results to view a list of matching providers.
Note: To return to viewing the list of all the providers, click Search, click Clear Search to clear the search criteria that you entered, and then click Show Results.
In the upper list, select one or more providers.
Note: To select multiple providers, click a provider, and then, while pressing the Ctrl key, click the other desired providers. To select a range of adjacent providers, click the first provider of the desired range of providers, and then, while pressing the Shift key, click the last provider of the desired range of providers.
Click Add.
Repeat steps b-d as needed to add other providers.
Note: To not include a provider that you added, select that provider in the lower list, and then click Remove.
Click OK.
Patient - To filter the report by the patients who are associated with appointments, do one of the following:
To include all patients in the clinics that you are allowed to generate the report for, select the All checkbox for both From and To.
To include a specific range of patients, select the starting patient (alphabetically by last name) of the range for From and the ending patient of the range for To.
To include a specific patient, select the same patient for both From and To.
To include an open-ended range of patients, select a patient for either From or To, and then select the All checkbox for the other option.
To select a specific patient for From or To, do the following:
Click the corresponding search button
 .
.
The Selection Patients dialog box appears.

Note: Only the patients in the clinics that you are allowed to generate the report for are available.
Do one of the following:
To get a list of all patients, do not enter any search criteria.
To search for patients by last name, birth date, status, chart number, Social Security Number, ID, and/or home phone number, enter the first character or more of a patient's last name, birth date, status, chart number, Social Security Number, ID, and/or home phone number in the Name, Birthday, Status, Chart#, SS#, OtherId, and Home Phone # boxes, respectively.

Note: To clear any text that you have entered, click Clear Search.
Click Show Results to view a list of patients.

Note: To clear the list so you can search again, click Search.
In the list, select a patient.
Click OK.
Appt Status:
Start Status - From the list, select the appointment status that corresponds to the status that you select when a patient has arrived or has been checked in (for example, HERE or READY).
End Status - From the list, select the appointment status that corresponds to the status that you select when a patient is done with treatment or is ready to check out (for example, COMP or CHKOUT).
Notes:
According to the specified Start Status and In Oper Tracking Statuses, the report displays the In-clinic wait time (ICWT) for an appointment.
According to the specified Start Status and End Status, the report displays the length of time for an appointment.
In Oper Tracking Statuses - Do one of the following:
To not include the appointment statuses that correspond to in-operatory statuses, clear the Set checkbox.
Note: The in-operatory length of time for each appointment on the report will be zero.
To include the appointment statuses that correspond to in-operatory statuses, which are the statuses that you select while a patient is being treated (for example, CHAIR or SEATED), select the Set checkbox. With this checkbox selected, the options to specify appointment statuses are available. Do one of the following:
To include all statuses, select the All check box.
To include specific statuses, do the following:
Click the search button ![]() .
.
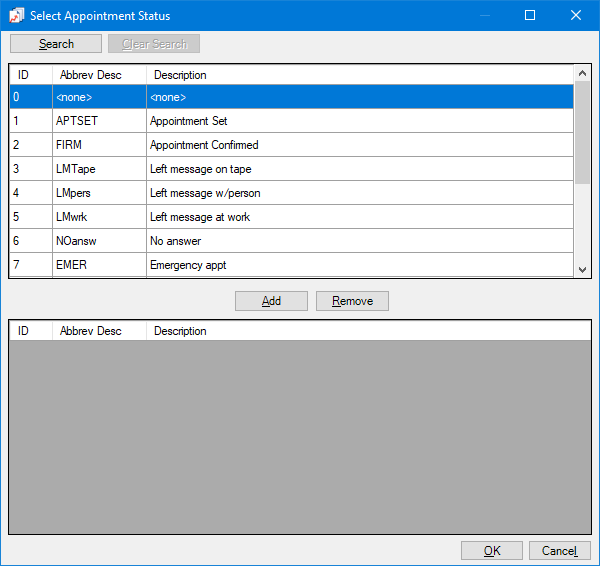
The Select Appointment Status dialog box appears.

If the list is long, to search for a status by ID, abbreviated description and/or description, do the following:
Click Search.
The options for searching appear in the upper list.

Enter the first character or more of a status ID, abbreviated description and/or description in the ID, Abbrev Desc, and Description boxes, respectively.
Click Show Results to view a list of matching statuses.
Note: To return to viewing the list of all the statuses, click Search, click Clear Search to clear the search criteria that you entered, and then click Show Results.
In the upper list, select one or more statuses.
Note: To select multiple statuses, click a status, and then, while pressing the Ctrl key, click the other desired statuses. To select a range of adjacent statuses, click the first status of the desired range of statuses, and then, while pressing the Shift key, click the last status of the desired range of statuses.
Click Add.
Repeat steps b-d as needed to add other statuses.
Note: To not include a status that you added, select that status in the lower list, and then click Remove.
Click OK.
Note: If a patient's appointment is not associated with one of the specified in-operatory statuses for the report, the in-operatory length of time for that appointment will be zero.
Patient Tag - Do one of the following:
To not filter the report by a patient tag, clear the Run By Patient Tag checkbox.
To filter the report by the tags that are assigned to patients, select the Run By Patient Tag checkbox. With this checkbox selected, the options to filter the report by tag are available. Do one of the following:
To include appointments for patients with any patient tag, select the All checkbox.
To include appointments for patients with specific tags, do the following:
Click the search button ![]() .
.
The Patient Tag Selection dialog box appears.

If the list is long, to search for a patient tag, do the following:
Click Search.
The options for searching appear in the upper list.

Enter the first character or more of a patient tag name in the Tag Name box.
Click Show Results to view a list of matching patient tags.
Note: To return to viewing the list of all the patient tags, click Search, click Clear Search to clear the search criteria that you entered, and then click Show Results.
In the upper list, select one or more patient tags.
Note: To select multiple patient tags, click a patient tag, and then, while pressing the Ctrl key, click the other desired patient tags. To select a range of adjacent patient tags, click the first patient tag of the desired range of patient tags, and then, while pressing the Shift key, click the last patient tag of the desired range of patient tags.
Click Add.
Repeat steps b-d as needed to add other patient tags.
Note: To not include a patient tag that you added, select that patient tag in the lower list, and then click Remove.
Click OK.
Click Save as Default to save the current settings for the next time you run the report.
Click Clear Defaults to revert the dialog box options to the original defaults.
Click Schedule to schedule a report job.
Click OK to preview the report.

Important information this report provides
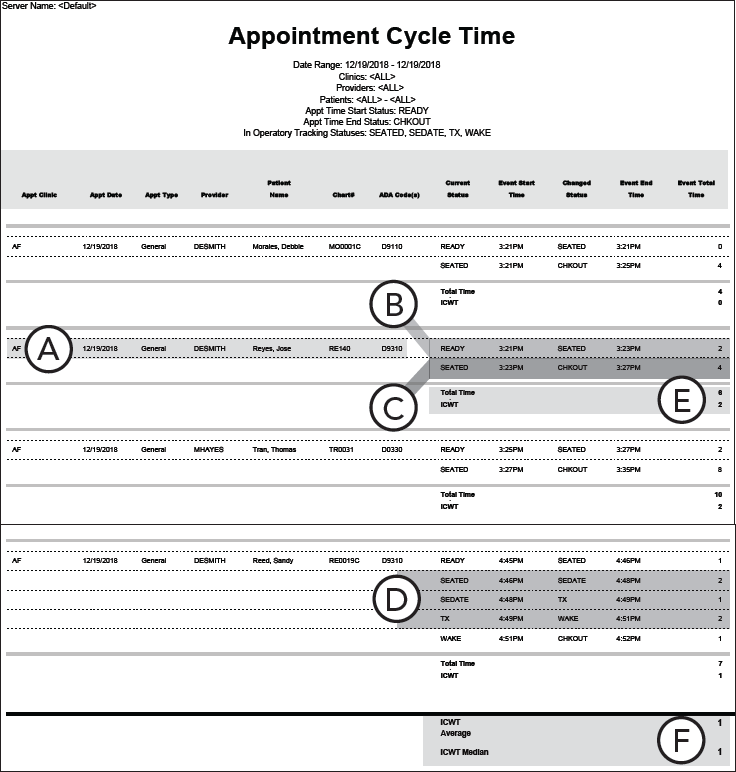
For each appointment listed, the report displays the following information:
Appointment details - The clinic, date, type, provider, patient name, chart number, and ADA code (or "Multiple" if there is more than one ADA code) that is associated with the appointment.
Status change (waited) - When the patient's time in the waiting room started and stopped, and how long the patient waited.
Status change (treated) - When the patient's time in an operatory started and stopped, and how long the patient was being treated.
In-operatory statuses - If In Oper Tracking Statuses were set when setting up options for this report, one or more status changes during treatment (such as imaging, sedation, treatment, and awake) may appear.
Appointment subtotals - The length of the appointment, according to the specified starting status and ending status. Also, the in-clinic wait time (ICWT) for the appointment.
Average and median - The average wait time and median wait time for all the appointments on the report.