This guide provides information about the new software release. This guide includes a brief description of the new features and enhancements available in this release and instructions on how to use the new features and enhancements.
Notes:
For a complete list of features and fixes in this Dentrix Enterprise release, refer to the release notes.
Before installing or upgrading Dentrix Enterprise, make sure your computers comply with the latest system requirements.
This release includes the following new features and enhancements:
New Installers - There are now two installers for Dentrix Enterprise: one for the server, and one for the clients. The new installers provide a better installation/upgrade experience.
Patient Demographics:
The global setting for requiring demographics has been removed. From Office Manager, you can now specify whether certain patient demographics are required for adding or updating a patient record in Family File.
From Office Manager, you can now specify whether the subscriber ID is required for attaching an insurance plan to a patient record in Family File.
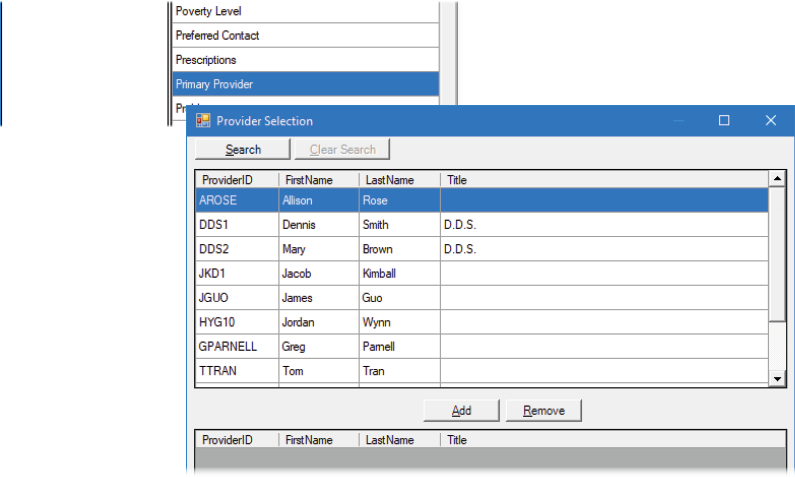
In Family File, the labels for the Home and Mobile boxes under Contact Info in the Head-of-House Information or Patient Information dialog box have been renamed to Primary and Secondary. Also, in the Patient Information block, for Phone, "P" and "S" appear next to the primary and secondary phone numbers, respectively.
Scheduling:
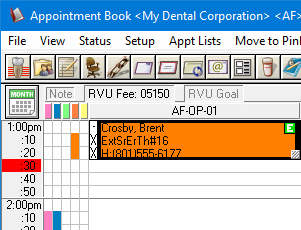
Outline for Selected Appointment - A noticeable, thick, black outline now appears around a selected appointment tile in Appointment Book.
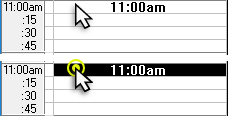
Show Time for Open Time Slot - If you position your pointer over an open time slot in Appointment Book, or if you click an open time slot, the corresponding time appears on the time slot.
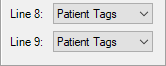
Additional Appointment Information - An appointment tile can now display the following information (according to the view setup): insurance carrier/payor, billing type, financial class, and/or patient tags.
Note: If it is common for patients to have many patient tags assigned to them, you can have the list of patient tags wrap to the next line.
Full Operatory Notification - If you attempt to schedule more than 64 appointments in an operatory on a given day, Dentrix Enterprise now notifies you that the appointment cannot be scheduled because the operatory is full.
Additional Information for New-patient Appointments - You can now enter a prospective patient's mobile number and email address when you are scheduling a new-patient appointment for that person. Additionally, when you create a Family File record from this appointment, one of the following occurs: if you are adding the patient to a new family, the email address entered is transferred to the patient's record; if you are adding the patient to an existing family, the guarantor's email address is used.
Broken Appointments - On the Appointment tab of More Information, the date and time of a broken appointment corresponds to the date and time for which the appointment was scheduled instead of when it was broken.
Reporting:
Reporting Dashboard and New Security Rights:
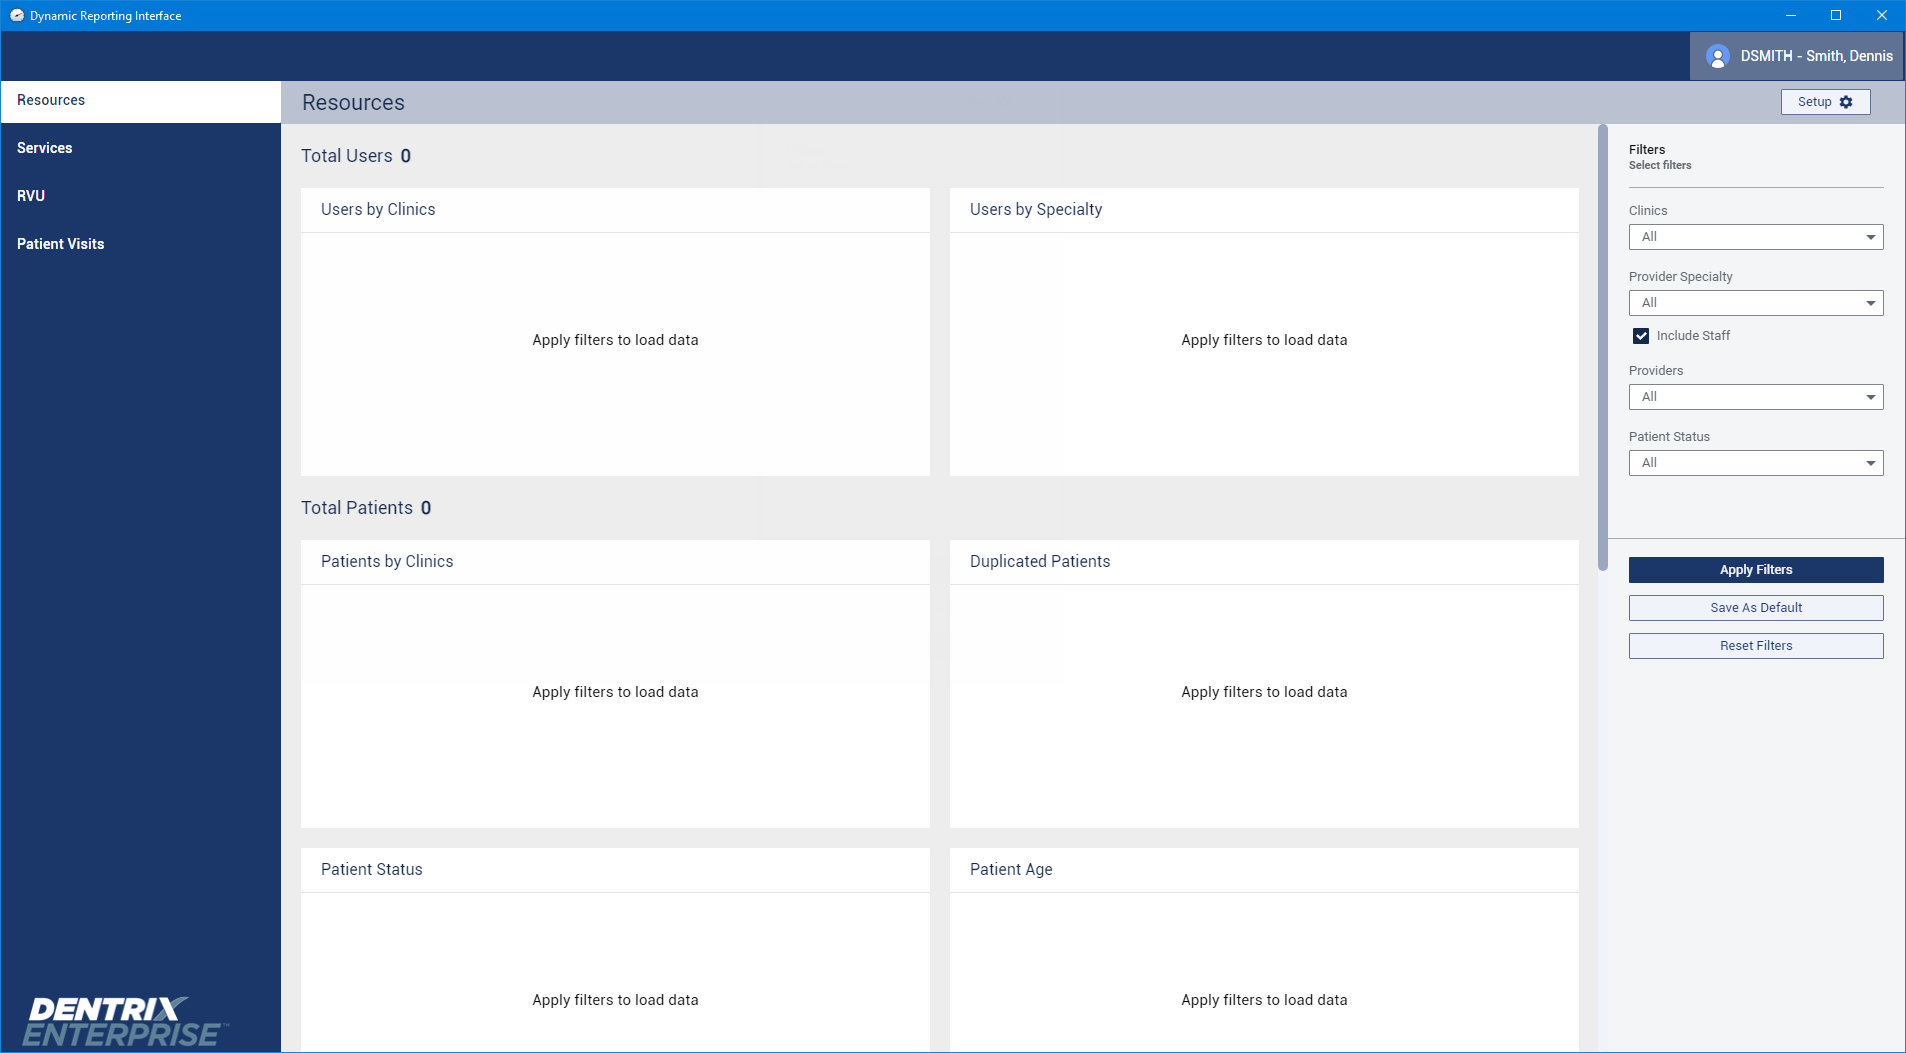
A new, dynamic reporting dashboard is available. To open the dashboard, do one of the following in Office Manager: click the new Dynamic Reporting Interface button on the toolbar; or click the new Dynamic Reporting Interface option on the File menu.
Accessing the reporting dashboard requires the new "Dynamic Reporting Interface, Open" security right (in the "Office Manager" category).
Exporting data from the reporting dashboard requires the new "Dynamic Reporting Interface, Export Report" security right.
Day Sheet - You can now group transactions and totals on the Day Sheet (in DXOne Reporting) by billing type with subtotals by clinic or provider.
Patient List:
More than one user can now generate the same list at the same time.
When filtering the list by Assigned Clinic, you can now select only the clinics that you have access to.
When filtering the list by Primary Provider, you can now select only the providers that you have access to.
When you are filtering the list, an information icon (blue question mark) appears next to Assigned Clinic. When you position your pointer over that icon, a pop-up message appears, explaining how security rights affect the availability of clinics. Also, an information icon (blue question mark) appears next to Primary Provider. When you position your pointer over that icon, a pop-up message appears, explaining how security rights affect the availability of providers.
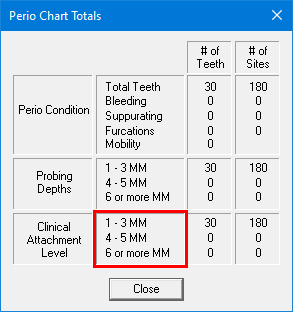
CAL in Perio Diagnostics - In Perio Chart, now the Clinical Attachment Levels are calculated using new criteria.
Independent Modules - The following modules are now independent modules:
Medical Alerts.
Outstanding Claim Manager.
Treatment Request Manager.
Collections Manager.
Family Balance Manager.
Dentrix Enterprise Messenger.
Notes:
An independent module can be opened from another module or independently and remain open independent of other modules.
When an independent module is opened, the number of available licenses and the number of unique connected users are compared.
Toolbars and Menus:
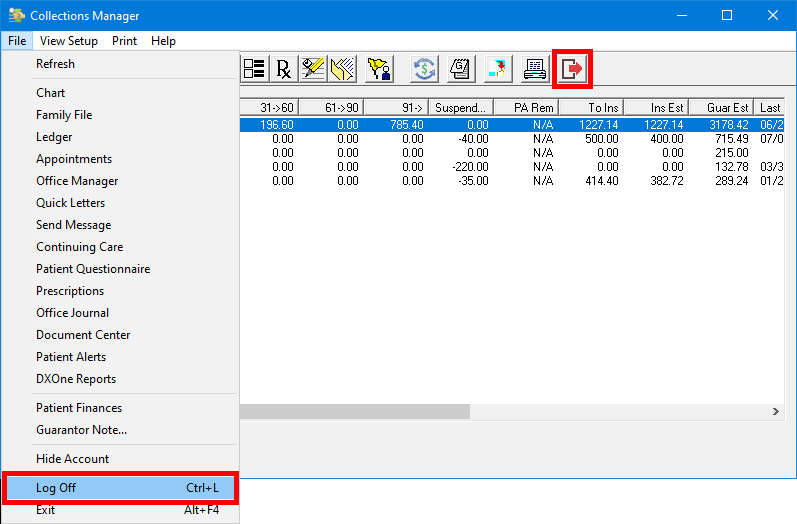
Log Off:
A Log Off button now appears on the toolbar of each independent module (if a toolbar is present).
A Log Off option now appears on the File menu of Collections Manager.
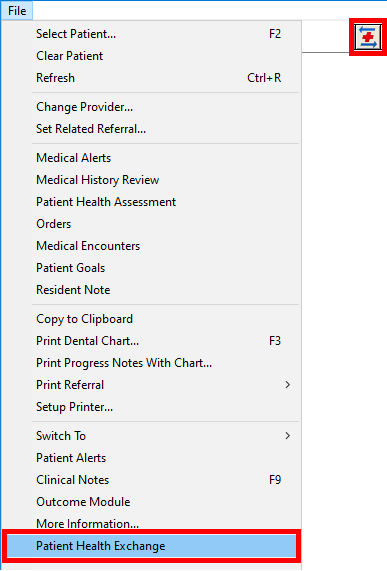
Patient Health Exchange:
A Patient Health Exchange button now appears on the toolbar of Chart and Ledger.
A Patient Health Exchange option now appears on the File menu of Chart and Ledger.
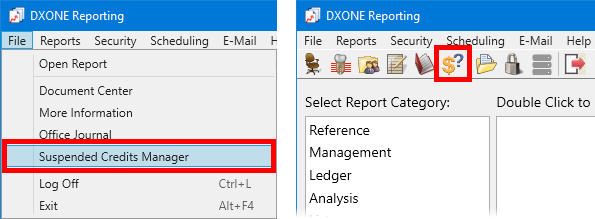
Suspended Credits Manager:
A Suspended Credits Manager button now appears on the toolbar of DXOne Reporting.
A Suspended Credits Manager option now appears on the File menu of DXOne Reporting.
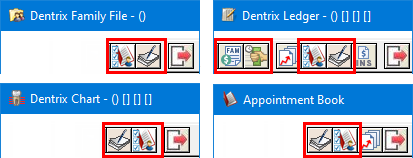
Signature Manager - A Signature Manager button now appears on the toolbar of Family File, Ledger, Chart, and Appointment Book by default.
Scheduling Assistant - A Scheduling Assistant button now appears on the toolbar of Family File, Ledger, Chart, and Appointment Book by default.
Collections Manager - A Collections Manager button now appears on the toolbar of Ledger by default.
Family Balance Manager - A Family Balance Manager button now appears on the toolbar of Ledger by default.
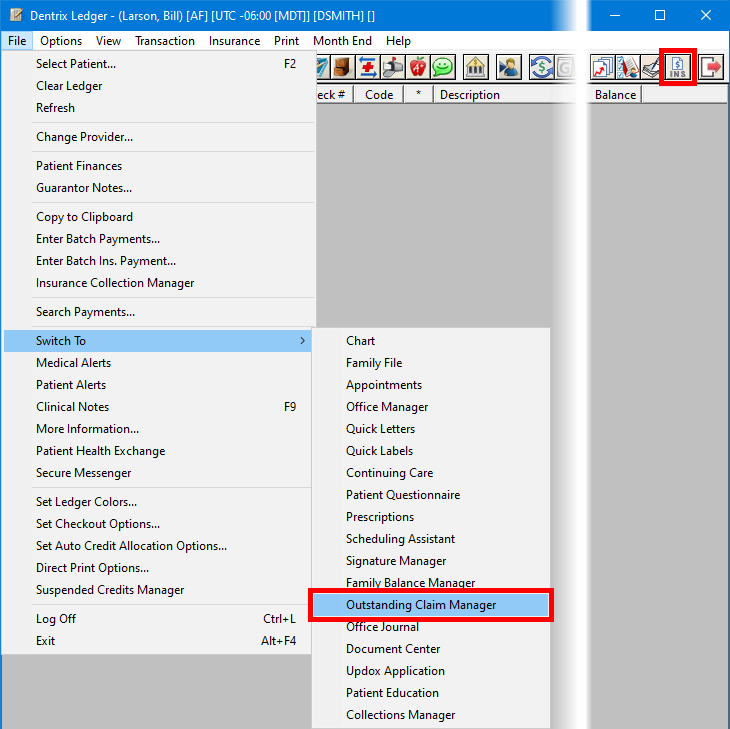
Outstanding Claim Manager:
An Outstanding Claim Manager button now appears on the toolbar of Ledger.
An Outstanding Claim Manager option now appears on the File > Switch To menu of Ledger.
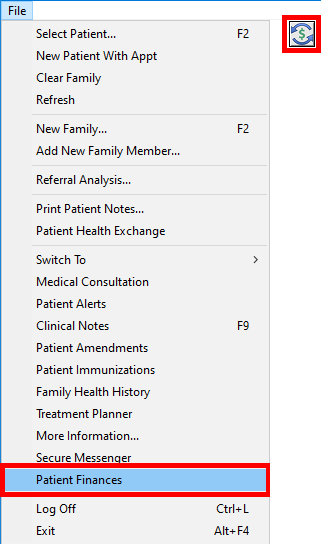
Patient Finances:
A Patient Finances button now appears on the toolbar of Appointment Book, Chart, and Family File.
A Patient Finances option now appears on the File menu of Appointment Book, Chart, and Family File.
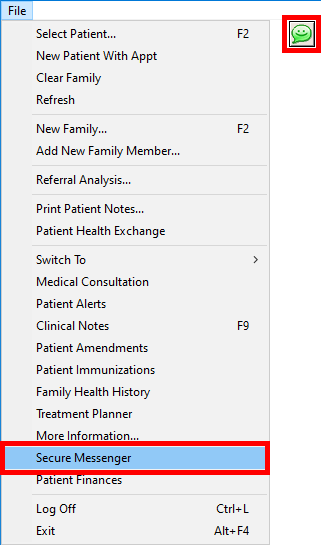
Dentrix Enterprise Messenger:
A Dentrix Enterprise Messenger button now appears on the toolbar of Ledger, Family File, Appointment Book, and Chart.
A Dentrix Enterprise Messenger option now appears on the File menu of Ledger, Family File, Appointment Book, and Chart.
Medical Alerts - Now, if you attempt to open the Medical Alerts for a patient in certain situations, a warning message appears.
Medical History Reviews - New logic and confirmation messages have been implemented for medical history reviews and medical alerts to help prevent information from not being entered or saved.
Dentrix Enterprise Messenger - A warning message no longer appears when you close Dentrix Enterprise Messenger.
Patient Finances - Only one Patient Finance window can now be open at a time.
Reduced Database Connections - With a global setting set to optimize large databases, the number of database connections has been reduced for Patient Health Exchange, Patient Finances, Suspended Credits Manager, Messenger, Signature Manager, and Clinical Notes.
Improved Database Performance - Optimized some SQL queries.
Gathering Software Settings - To help offices get a better quality of support, a new automated process retrieves information about software settings.
HL7:
HL7 RDE Messages - If the HL7 interface cannot process an RDE message due to a database connectivity issue, the system will retry after a certain length of time.
Partial Bidirectional Support of Appointment IDs in SIU Messages:
If the SendApptID+DBID check box is selected for the settings of an HL7 site, in the SCH-1 or SCH-2 segment of an outbound SIU message, the Appointment External ID will be the ApptExtID (ApptID + DB ID Text + ApptDB).
If the SendApptID+DBID check box is clear for the settings of an HL7 site, in the SCH-1 or SCH-2 segment of an outbound SIU message, the Appointment External ID will be the ApptID.
When an inbound SIU message for an appointment is received, if an appointment with the specified ApptExtID exists in DXE, that appointment will be updated.
When an inbound SIU message for an appointment is received, if an appointment with the specified ApptExtID does not exist in DXE, a new appointment will be created.
Note: Any appointment that is created in DXE as a result of processing an inbound HL7 message from an external system is considered a medical appointment. Any updates that are made to a medical appointment in DXE will not result in an outbound message being sent.
Adding Patients from Elite - (For a specific correctional facility only) A new stored procedure automatically reads a file from an Elite database and adds a new patient in Dentrix Enterprise.
Enhanced Consent Forms - For an enhanced consent form in Treatment Planner, Dentrix Enterprise now populates the Name box under Practice signature automatically with the name of the user who is currently logged in. (EN-372)
Note: In prior versions of Dentrix Enterprise, the box would be blank until after a practice signature was added, at which time, the patient's primary provider would be entered by default.
Document Center Extraction Utility - The utility now extracts all documents that are associated with a given patient regardless of which clinic the documents were acquired at. The utility does not extract documents for a patient in a clinic other than the intended one.
Dental Readiness (For military facilities only):
The HL7 interface now sends the date of a patient's most recent panorex (PD_DATE; in a YYYYMMDDHHMMSS format) in the OBX 4 segment of an outbound ADT A08 message. The date is included only if the patient has the procedure D0330 posted in his or her record with a Completed or RC (Referral Completed) status.
The HL7 interface now sends the date of a patient's most recent exam (LAST_EXAM; in a YYYYMMDDHHMMSS format) in the OBX 3 segment of an outbound ADT A08 message. The date is included only if the patient has an applicable procedure posted in his or her record with a Completed or RC (Referral Completed) status.
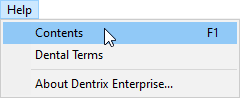
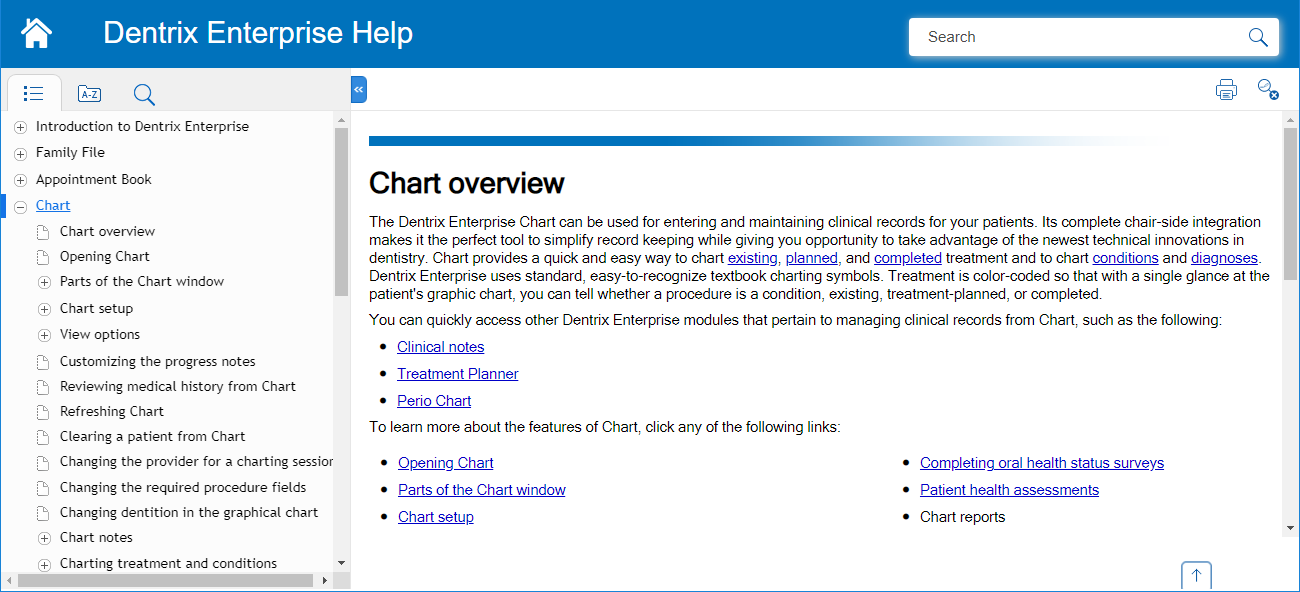
Help - The Help is now available online only. In Dentrix Enterprise, on the Help menu (if present), click Contents to open a browser window and view the Help.
The following sections contain instructions about how to use the new features and enhancements of this release.
There are now two installers for Dentrix Enterprise: one for the server, and one for clients. The new installers provide a better installation/upgrade experience. For instructions on installing or upgrading Dentrix Enterprise, refer to the installation guide.
The global setting for requiring demographics has been removed. From Office Manager, you can now specify whether certain patient demographics are required for adding or updating a patient record in Family File. Also, from Office Manager, you can now specify whether the subscriber ID is required for attaching an insurance plan to a patient record in Family File.
To specify patient demographic requirements
Open Office Manager.
Note: You must be logged in to the Central (organization-level) clinic.
On the Maintenance menu, point to Practice Setup, click Enterprise Setup.
Select the organization-level clinic, and then click Edit.
Select the Organization Settings tab.
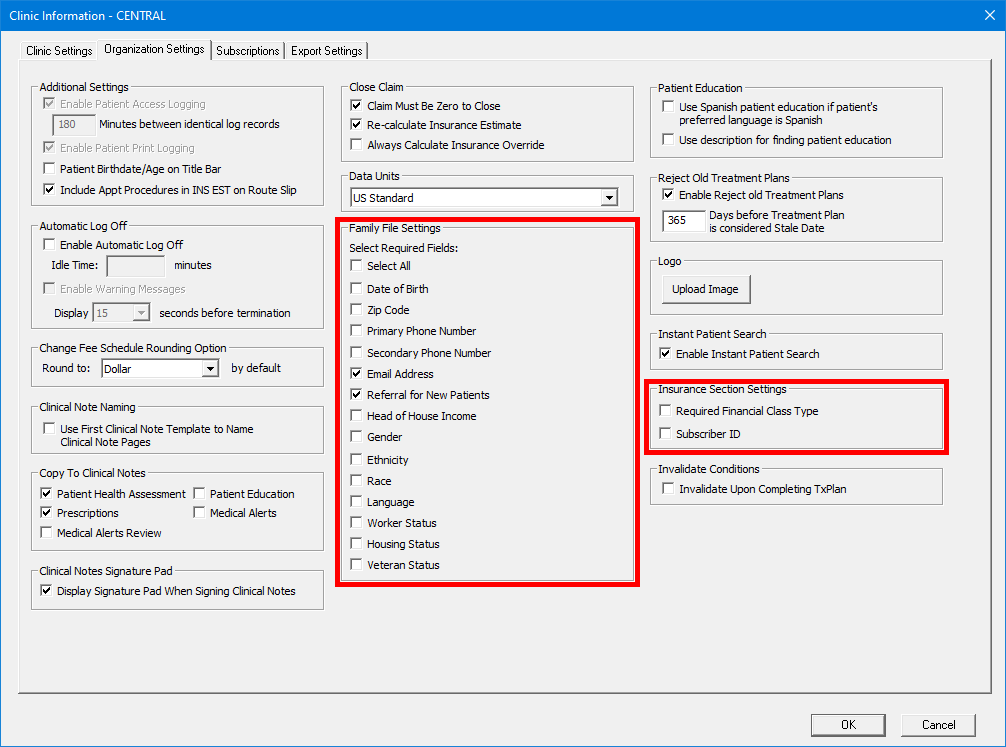
Under Family File Settings, select or clear any of the following check boxes: Date of Birth, Zip Code, Primary Phone Number, Secondary Phone Number, Email Address (previously "Require Patient Email Address"), Referral for New Patients (previously "Require Referral for New Patients"), Head of House Income, Gender, Ethnicity, Race, Language, Worker Status, Housing Status, and Veteran Status.
Under Insurance Section Settings, select or clear any of the following check boxes: Required Financial Class Type (existed previously) and Subscriber ID.
Click OK.
In Family File, the labels for the Home and Mobile boxes under Contact Info in the Head-of-House Information or Patient Information dialog box have been renamed to Primary and Secondary.

Also, in the Patient Information block, for Phone, "P" and "S" appear next to the primary and secondary phone numbers, respectively.

A noticeable, thick, black outline now appears around a selected appointment tile in Appointment Book.
If you position your pointer over an open time slot in Appointment Book, or if you click an open time slot, the corresponding time appears on the time slot.
An appointment tile can now display the following information (according to the view setup): insurance carrier/payor, billing type, financial class, and/or patient tags.
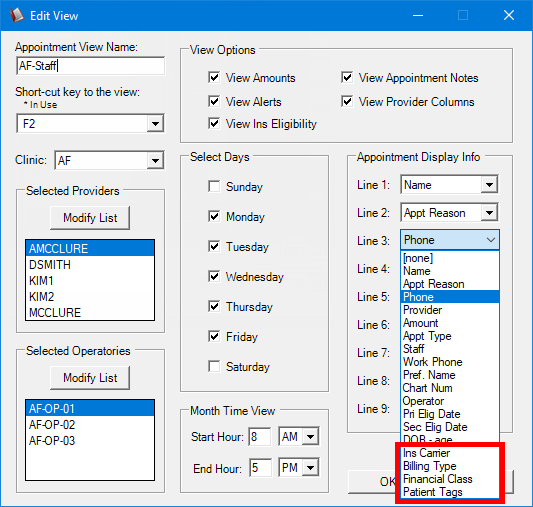
Note: If it is common for patients to have many patient tags assigned to them, you can have the list of patient tags wrap to the next line.
You can now enter a prospective patient's mobile number and email address when you are scheduling a new-patient appointment for that person.
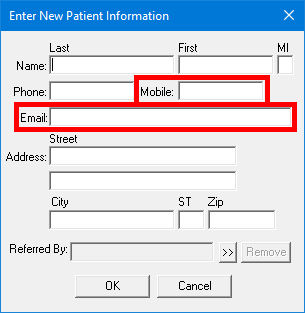
Additionally, when you create a Family File record from this appointment, one of the following occurs: if you are adding the patient to a new family, the email address entered is transferred to the patient's record; if you are adding the patient to an existing family, the guarantor's email address is used.
A new, dynamic reporting dashboard is available.
To learn about Dynamic Reporting, click any of the following links:
Note: Accessing the reporting dashboard requires the new "Dynamic Reporting Interface, Open" security right (in the "Office Manager" category).
Exporting Dynamic Reporting information
Note: Exporting data from the reporting dashboard requires the new "Dynamic Reporting Interface, Export Report" security right.
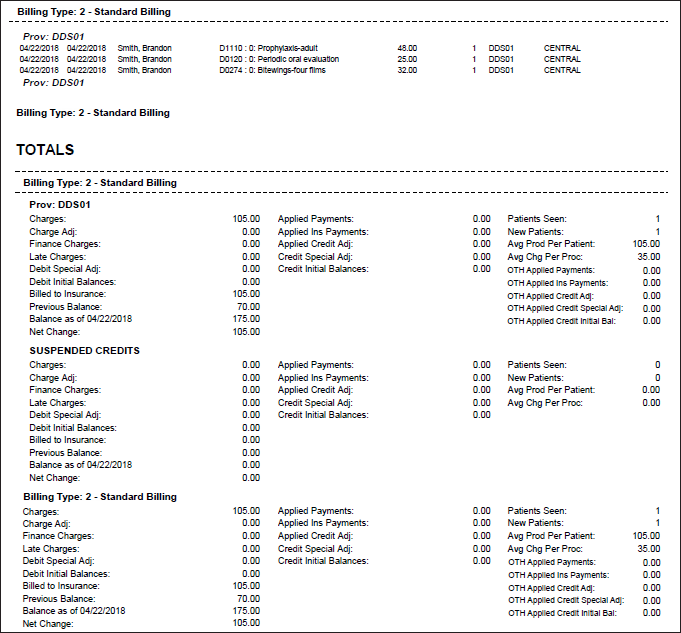
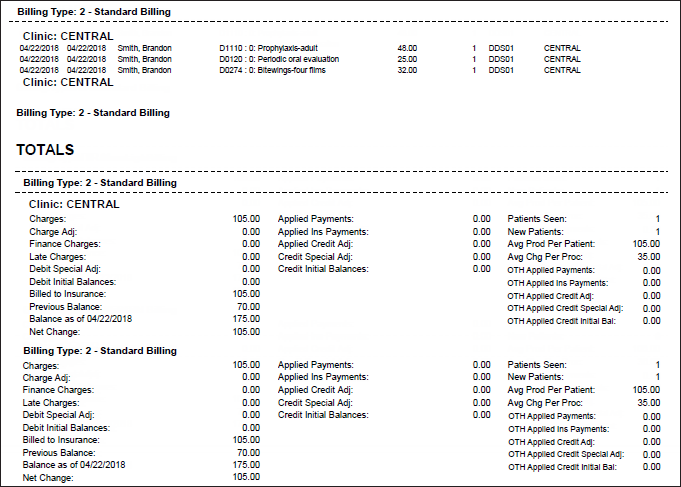
You can now group transactions and totals on the Day Sheet (in DXOne Reporting) by billing type with subtotals by clinic or provider.
To generate the day sheet with a billing type grouping
In DXOne Reporting, select Management, and then double-click Day Sheet.
The Day Sheet dialog box appears.
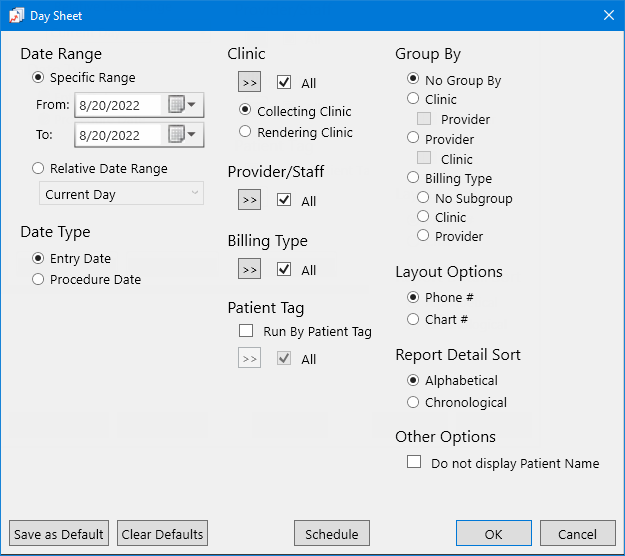
Under Group By, select the Billing Type option to group the report by billing type. Totals are broken down by billing type, and the report displays grand totals.
Also, do one of the following:
To group the report by billing type without a secondary grouping, select the No Subgroup option.
To group the report by clinic within each billing type grouping, select the Clinic option. For each clinic, the report displays totals that are related to the outer billing type grouping. The report displays a charge with its associated rendering clinic. The report displays an applied credit with either the rendering clinic of the charge that it's applied to or its collecting clinic. With this grouping option, the report does not display suspended credits because suspended credits are not associated with a provider.
To group the report by provider within each billing type grouping, select the Provider option. For each provider, the report displays totals that are related to the outer billing type grouping. The report displays a charge with its associated rendering provider. The report displays an applied credit with the rendering provider of the charge that it's applied to.
If all providers are selected for Provider/Staff, the report displays a suspended credit under a "SUSPENDED CREDITS" grouping. If specific providers (instead of all providers) are selected for Provider/Staff, the report does not include a "SUSPENDED CREDITS" grouping.
If specific providers (instead of all providers) are selected for Provider/Staff, the totals and grand totals do not include suspended credits, other applied credits, or other applied credit initial balances.
Set up the other options as needed.
Click OK to preview the report.
Billing type grouping options on the report
Billing Type Totals - The transactions are shown for the billing type. Each billing type's transactions are subtotaled.
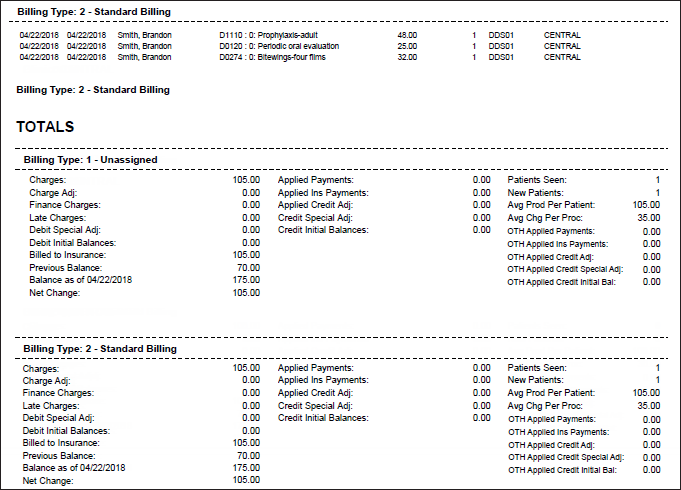
Billing Type Totals (Grouped by Provider) - The transactions are shown for the billing type with a breakdown of the procedures performed by each provider within that billing type grouping. Each provider's transactions within that billing type grouping are subtotaled. If applicable, the suspended credits within that billing type grouping are subtotaled. The transaction totals for the billing type appear below the provider and any suspended credit subtotals.
Billing Type Totals (Grouped by Clinic) - The transactions are shown for the billing type with a breakdown of the procedures performed in each clinic within that billing type grouping. Each clinic's transactions within that billing type grouping are subtotaled. The transaction totals for the billing type appear below the clinic subtotals.
When you are filtering the list, you can select only the clinics and providers that you have access to:
For Assigned Clinic:
All the clinics are available if your user group has been granted the "View All Patients" security right (in the "Central Clinic Only" category).
Only the clinics for which your user group has been granted the "My Clinics, Select Patients" (in the "Practice/Clinic Setup" category) security right are available.
For Primary Provider:
All the providers are available if your user group has been granted the "View All Providers" security right (in the "Central Clinic Only" category).
Only the providers for which your user group has been granted the "My Clinics, Select Provider" security right (in the "Practice/Clinic Setup" category) are available.
Also, an information icon (blue question mark) appears next to Assigned Clinic and next to Primary Provider. When you position your pointer over the icon, a pop-up message appears, explaining how security rights affect the availability of clinics or providers.
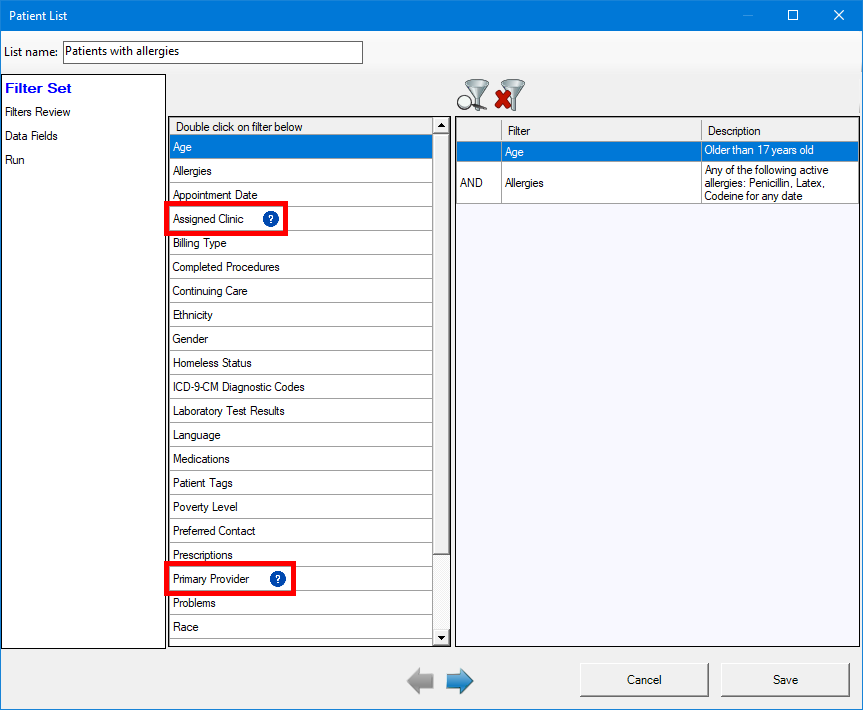
To filter the Patient List
In Office Manager, on the Analysis menu, click Patient List. Then, click either Add to add a template or Edit with a template selected to modify its options.
The Filter Set options become available.
Set up any of the following filters:
Assigned Clinic - Double-click to select the correct clinics.
Primary Provider - Double-click to select the correct providers.
In Perio Chart, now the Clinical Attachment Levels are calculated using the following criteria:
1 = 1-2mm.
2 = 3-4mm.
3 = 5mm or greater.
To view the Perio Chart Totals dialog box, in Perio Chart, click the Summary menu.
|
Old |
New |
|
|
|
A new Log Off button
 , which allows you to log off all modules, is available on the
toolbars of each independent module (if a toolbar is present), such as
Office Manager, Ledger, Appointment Book, Chart, Family File, Document
Center, More Information, and DXOne Reporting.
, which allows you to log off all modules, is available on the
toolbars of each independent module (if a toolbar is present), such as
Office Manager, Ledger, Appointment Book, Chart, Family File, Document
Center, More Information, and DXOne Reporting.
In Collections Manager, a new Log Off button is available on the toolbar, and a new Log Off option is available on the File menu.
In Chart and Ledger, a new Patient Health Exchange button now appears on the toolbar, and a Patient Health Exchange option now appears on the File menu.
In DXOne Reporting, a Suspended Credits Manager button now appears on the toolbar, and a Suspended Credits Manager option now appears on the File menu.
Signature Manager and Scheduling Assistant buttons now appear on the toolbar of Family File, Ledger, Chart, and Appointment Book by default. Collections Manager and Family Balance Manager buttons now appear on the toolbar of Ledger by default.
In Ledger, an Outstanding Claim Manager button now appears on the toolbar, and an Outstanding Claim Manager option now appears on the File > Switch To menu.
In Appointment Book, Chart, and Family File, a Patient Finances button now appears on the toolbar, and a Patient Finances option now appears on the File menu.
In Ledger, Family File, Appointment Book, and Chart, a Dentrix Enterprise Messenger button now appears on the toolbar, and a Dentrix Enterprise Messenger option now appears on the File menu.
Now, if you attempt to open Medical Alerts for a patient in the following situations, a warning message appears:
While there are unsaved changes for a problem/medication/allergy/device for another patient in the Medical Alerts window.
While a review is in process for another patient in the Medical Alerts window.
While the smoking status is being updated for another patient in the Medical Alerts window.
While Patient Prescription is open for another patient (if it was opened from the Medical Alerts window).
New logic and confirmation messages have been implemented for medical history reviews and medical alerts to help prevent information from not being entered or saved.
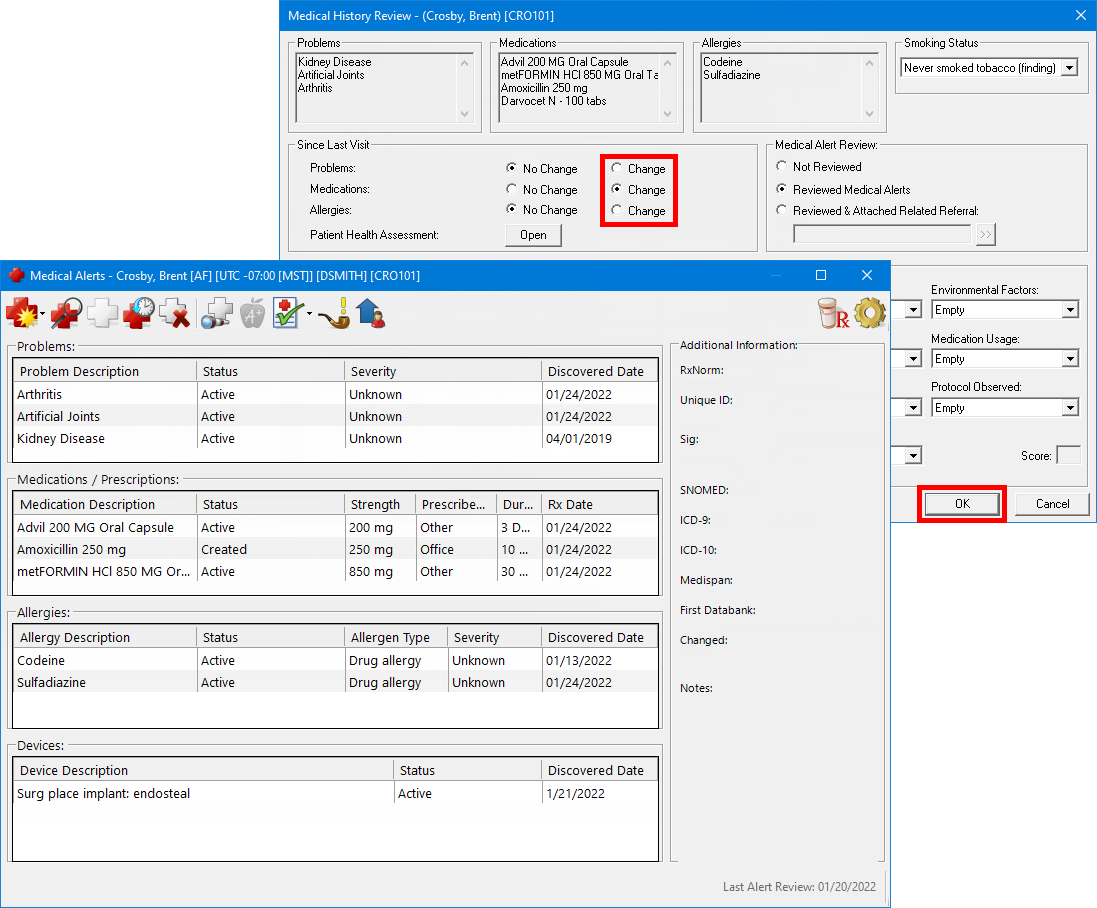
If you return to the medical history review after Medical Alerts opens automatically, Dentrix Enterprise can help prevent information from not being entered or saved:
If you close Medical Alerts without making or saving any changes, a confirmation message appears.
Clicking OK closes the medical history review without changes.
Clicking Cancel returns you to the medical history review.
If you leave Medical Alerts open without making or saving any changes:
With at least one of the Change options selected for problems, allergies, and medications, if you cancel the review without making any changes, a confirmation message appears.
Clicking OK closes the medical history review without changes. You can close Medical Alerts or access a different patient's medical alerts as needed.
Clicking Cancel returns you to the medical history review.
With at least one of the Change options selected for problems, allergies, and medications, if you re-save the review, you are returned to Medical Alerts to update the patient's problems, allergies, and/or medications.
With all the No Change options selected for problems, allergies, and medications, if you cancel the review after making the change, a confirmation message appears.
Clicking OK closes the medical history review without changes. You can close Medical Alerts or access a different patient's medical alerts as needed.
Clicking Cancel returns you to the medical history review.
With all the No Change options selected for problems, allergies, and medications, if you re-save the review after making the change, the medical history review closes. You can close Medical Alerts or access a different patient's medical alerts as needed.
For an enhanced consent form in Treatment Planner, Dentrix Enterprise now populates the Name box under Practice signature automatically with the name of the user who is currently logged in.
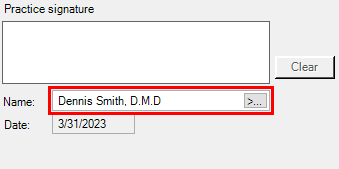
Note: In prior versions of Dentrix Enterprise, the box would be blank until after a practice signature was added, at which time, the patient's primary provider would be entered by default.
The Help is now available online only. In Dentrix Enterprise, on the Help menu (if present), click Contents to open a browser window and view the Help.