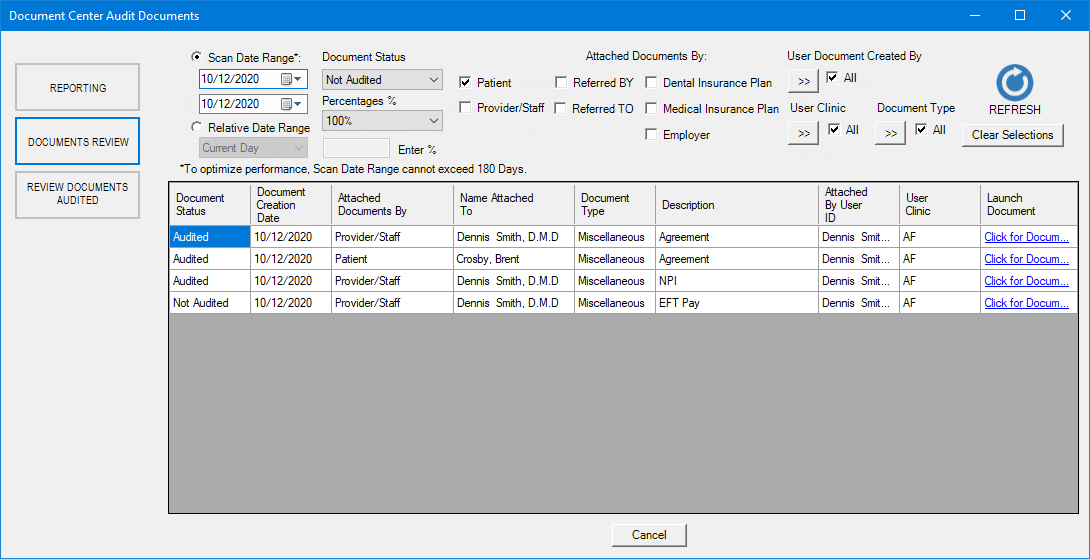
In the Document Center Audit Documents utility, you can view the audit status of and some details regarding each document. Also, for each document there is a link that you can click to review or edit the document information and audit the document as needed.
Note: Opening the Document Information dialog box for a document from the Document Center Audit Documents utility requires the "Document Center, Open" security right (to open Document Center) and the "Document Center, Edit Document Info" security right (to view and edit document information).
To review documents in the Document Center Audit Documents utility
Open the Document Center Audit Documents window, and select the Documents Review tab.

For each document, the data grid displays the following information:
Document Status - The document's audit status: Audited or Not Audited.
Document Creation Date - The document's acquisition date.
Attached Documents By - The type of entity that the document is associated with: Patient, Provider/Staff, Referred BY, Referred TO, Dental Insurance Plan, Medical Insurance Plan, or Employer.
Name Attached To - The name of the entity that the document is associated with.
Document Type - The document's type (the folder name in the document tree).
Description - The document's description (the file name in the document tree).
Attached By User ID - The name of the user who acquired the document.
User Clinic - The clinic that the user who acquired the document was logged in to when he or she acquired the document.
Launch Document - Click the link to open the Document Information dialog box for the document. Then, you can review or edit the document information and audit the document as needed.
Notes:
The corresponding entity's Document Center is open behind the Document Information dialog box, and the corresponding document is selected.
Opening the Document Center requires the "Document Center, Open" security right. And, opening the Document Information dialog box requires the "Document Center, Edit Document Info" security right.
Note: A document may appear more than once in the data grid, depending on the number of attachments and the specified filters.
Change any of the following filters as needed:
Scan creation date - Select one of the following options:
Scan Date Range - Documents that were acquired on a specific date or within a specific date range will be included. By default this option is selected, and the current date is entered. To specify a different date range, do one of the following:
To include a specific creation date (other than today), enter or select the same date as both the starting and ending date of the range.
To include a range of creation dates, enter or select the starting date and ending date of the range.
To change the starting or ending date, do any of the following:
To enter a date, do any of the following:
To change the month, click the month portion of the date and then enter a month as a 1-digit or 2-digit number.
To change the day, click the day portion of the date and then enter a day as a 1-digit or 2-digit number.
To change the year, click the year portion of the date and then enter a year as a 2-digit or 4-digit number.
To select a date, do the following:
Click the corresponding calendar icon to view a month calendar.
![]()
Navigate to the correct month using the left and right arrows.
Note: To quickly change the year and month, click the month-year at the top of the calendar, navigate to the correct year using the left and right arrows, and then click the correct month.
Click the correct day.
Note: The date range cannot exceed 180 days.
Relative Date Range - Documents that were acquired relative to the current date will be included. To specify a relative date or date range, select one of the following options: Current Day, Current Week, Current MTD, Previous Day, Previous Week, or Previous Month.
Document Status - Select one of the following options:
All - To include all documents (audited and unaudited).
Audited - To include audited documents only.
Not Audited - To include unaudited documents only. This option is selected by default.
Percentages % - Do one of the following:
To show all documents that meet the filter criteria, leave 100% selected.
To show a specific percentage of documents (selected randomly) that meet the filter criteria, select 25%, 50%, or Custom %. If Custom % is selected, enter the desired percentage (as a whole number) in the Enter % box.
Attached Documents By - Documents that are associated with the specified types of entities will be included. Select the checkboxes of the entities that you want to include. Clear the checkboxes of the entities that you do not want to include. The following checkboxes are available: Patient, Provider/Staff, Referred BY, Referred TO, Dental Insurance Plan, Medical Insurance Plan, and Employer.
User Document Created By - Documents that were acquired by any or specific users will be included. To specify users, do one of the following:
To include all users, leave the All check box selected.
To include specific users, do the following:
Click the search button  .
.
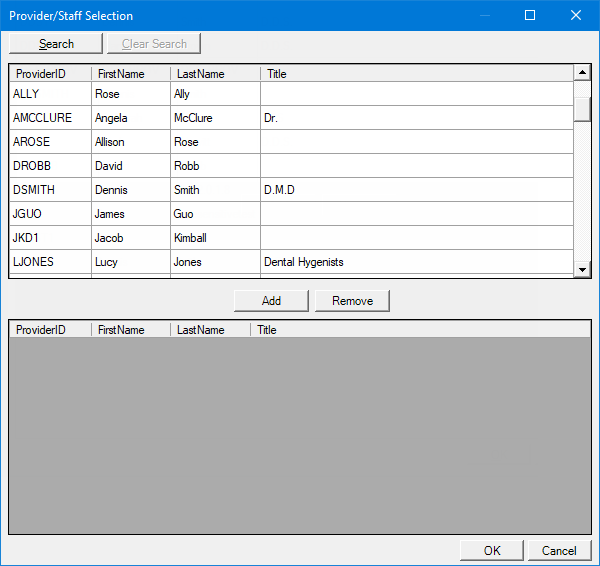
The Provider/Staff Selection dialog box appears.

If the list is long, to search for a provider or staff member by ID, first name, last name, and/or title, do the following:
Click Search.
The options for searching appear in the upper list.

Enter the first character or more of a provider's or staff member's ID, first name, last name, and/or title in the ID, First Name, Last Name, and Title boxes, respectively.
Click Show Results to view a list of matching providers and staff members.
Note: To return to viewing the list of all the providers and staff members, click Search, click Clear Search to clear the search criteria that you entered, and then click Show Results.
In the upper list, select one or more providers and staff members.
Note: To select multiple providers and staff members, click a provider or staff member, and then, while pressing the Ctrl key, click the other providers and staff members. To select a range of adjacent providers and staff members, click the first provider or staff member of the desired range of providers and staff members, and then, while pressing the Shift key, click the last provider or staff member of the desired range of providers and staff members.
Click Add.
Repeat steps b-d as needed to add other providers and staff members.
Note: To remove a provider or staff member that you added, select that provider or staff member in the lower list, and then click Remove.
Click OK.
User Clinic - Documents that were acquired in any or specific clinics will be included. To specify clinics, do one of the following:
To include all clinics, leave the All check box selected.
To include specific clinics, do the following:
Click the search button  .
.
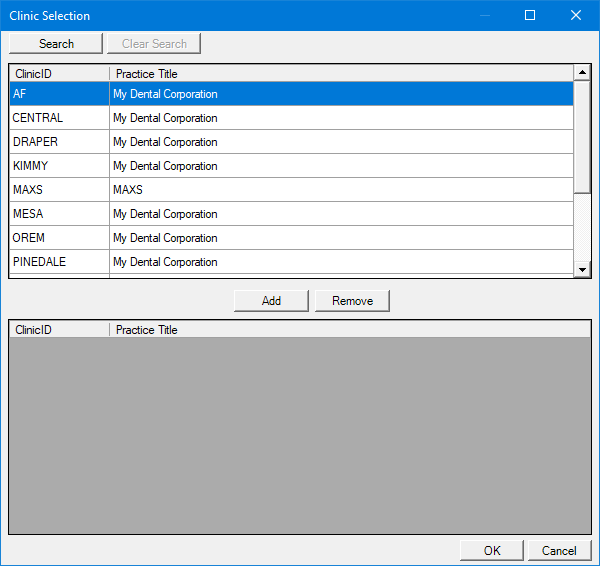
The Clinic Selection dialog box appears.

Note: If your user account has been granted the "View All Patients" security right for the Central clinic, all clinics appear in the upper list; otherwise, the clinics for which your user account has been granted the "My Clinics, View" security right (in the "Practice/Clinic Setup" category) appear in the upper list; however, if your user account has not been granted that right to any clinic, only the clinic that you are currently logged in to appears in the upper list.
To search for a clinic by ID and/or practice name, do the following:
Click Search.
Enter the first character or more of a clinic ID and/or practice title in the ClinicID and/or Practice Title boxes, respectively.

Click Show Results to view a list of matching clinics in the upper list.
Note: To return to viewing the list of all the clinics, click Search, click Clear Search to clear the search criteria that you entered, and then click Show Results.
In the upper list, select one or more clinics.
Note: To select multiple clinics, click a clinic, and then, while pressing the Ctrl key, click the other desired clinics. To select a range of adjacent clinics, click the first clinic of the desired range of clinics, and then, while pressing the Shift key, click the last clinic of the desired range of clinics.
Click Add.
Repeat steps b-d as needed to add other clinics.
Note: To remove a clinic that you added, select that clinic in the lower list, and then click Remove.
Click OK.
Document Type - Documents of any or specific document types will be included. To specify document types, do one of the following:
To include all document types, leave the All checkbox selected.
To include specific document types, do the following:
Click the search button  .
.
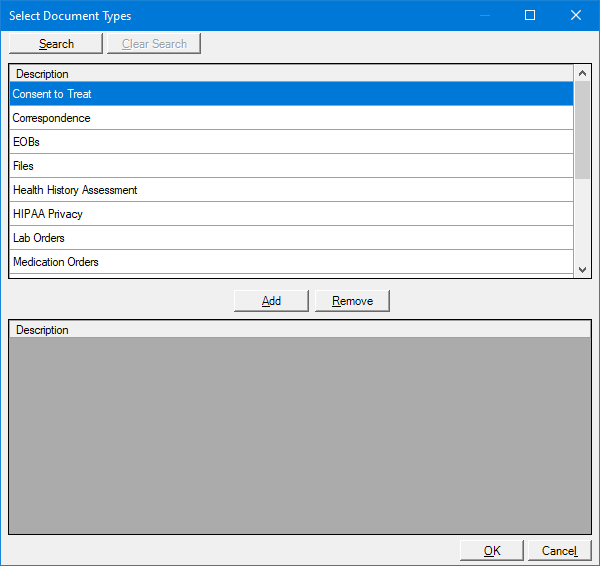
The Select Document Types dialog box appears.

If the list is long, to search for a document type by description, do the following:
Click Search.
The options for searching appear in the upper list.

Enter the first character or more of a document type description in the Description box.
Click Show Results to view a list of matching document types.
Note: To return to viewing the list of all the document types, click Search, click Clear Search to clear the search criteria that you entered, and then click Show Results.
In the upper list, select one or more document types.
Note: To select multiple document types, click a document type, and then, while pressing the Ctrl key, click the other document types. To select a range of adjacent document types, click the first document type of the desired range of document types, and then, while pressing the Shift key, click the last document type of the desired range of document types.
Click Add.
Repeat steps b-d as needed to add other document types.
Note: To remove a document type that you added, select that document type in the lower list, and then click Remove.
Click OK.
If
you have changed any filters, or to make sure that you are viewing the
most recent data, click the Refresh
button ![]() .
.
The data grid is updated according to the specified criteria.
Note: To return the filters to their default states and clear the data grid, click Clear Selections.