You can edit a finance charge or late charge that was posted in Ledger and has not been moved to history (when a month is closed).
Note: Editing finance and late charges requires the "LC/FC, Edit" security right.
To edit a finance or late charge
With a patient selected in Ledger, double-click a finance charge or a late charge.
If applicable, do one of the following:
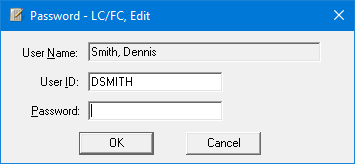
If the Password - LC/FC, Edit dialog box appears, user verification has been assigned to the "LC/FC, Edit" task. Do one of the following:
If your user account has been granted the "LC/FC, Edit" security right, enter your credentials in the User ID and Password boxes, and then click OK.
If your user account has not been granted the "LC/FC, Edit" security right, have a user with permission temporarily override this restriction so you can edit a finance or late charge this one time. The overriding user enters his or her credentials in the User ID and Password boxes and then clicks OK.

If a message appears, informing you that you do not have rights to this operation, your user account has not been granted the "LC/FC, Edit" security right. To have a user with permission temporarily override this restriction so you can edit a finance or late charge this one time, do the following:
On the message, click Yes.

In the Password - LC/FC, Edit dialog box, the overriding user enters his or her credentials in the User ID and Password boxes and then clicks OK.

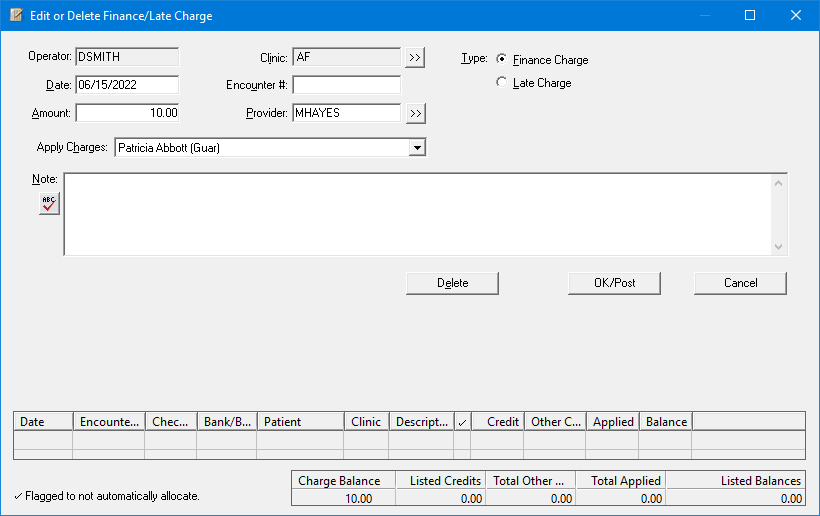
The Edit or Delete Finance/Late Charge dialog box appears.

Change any of the following options as needed:
Date - The date (in a mm/dd/yyyy format) of the finance or late charge.
Notes:
Dentrix Enterprise automatically adds slashes to dates when you enter six or eight numbers (mmddyy or mmddyyyy) and then press the Tab key.
Backdating a finance or late charge to a date in a month that has been closed requires the "Ledger, Backdate to Closed Month" security right.
Amount - The dollar amount of the finance or late charge.
Note: For a whole dollar amount, you can enter a number without adding the decimal point and two zeros. For example, if you type 36 and then press Tab, Dentrix Enterprise will change the amount to 36.00.
Clinic - The clinic that is associated with the finance or late charge. To change the clinic, do the following:
Click the search button ![]() .
.
If applicable, do one of the following:
If the Password - Clinic ID Change dialog box appears, user verification has been assigned to the "Clinic ID Change" task. Do one of the following:
If your user account has been granted the "Clinic ID Change" security right, enter your credentials in the User ID and Password boxes, and then click OK.
If your user account has not been granted the "Clinic ID Change" security right, have a user with permission temporarily override this restriction so you can select a clinic this one time. The overriding user enters his or her credentials in the User ID and Password boxes and then clicks OK.

If a message appears, informing you that you do not have rights to this operation, your user account has not been granted the "Clinic ID Change" security right. To have a user with permission temporarily override this restriction so you can select a clinic this one time, do the following:
On the message, click Yes.

In the Password - Clinic ID Change dialog box, the overriding user enters his or her credentials in the User ID and Password boxes and then clicks OK.

The Select Clinic dialog box appears.

Note: If your user account has been granted the "View All Patients" security right for the Central clinic, the ID and name of all clinics appear in the list; otherwise, the ID and name of each clinic for which your user account has been granted the "My Clinics, View" security right (in the "Practice/Clinic Setup" category) appear in the list; however, if your user account has not been granted that right to any clinic, only the ID and name of the clinic that you are currently logged in to appear in the list.
In the list, select the correct clinic.
Click OK.
Encounter # - If a certain global setting has been enabled, this option is available. To specify the encounter number, do one of the following:
Enter an encounter number (numeric or alphanumeric, depending on a certain global setting).
Select an encounter number (if the applicable global setting is enabled).
Note: Depending on a certain global setting, the number may have to be unique for each patient, for each day, or for each patient per day.
Provider - The provider who is associated with the finance or late charge. To change the provider, do one of the following:
Enter the correct provider ID in the box.
To select a provider, do the following:
Click the search button ![]() .
.
The Select Provider dialog box appears.

Either leave the ID and Last Name boxes empty to get a list of all providers, or enter all or part of a provider's ID or last name in the ID or Last Name box, respectively, to search for a provider.
Under Search By, select one of the following options:
This Clinic - To search for the provider in the clinic that you are currently logged in to.
All Clinics - To search for the provider in all clinics.
Note: This option is available only if your user account has been granted the "View All Providers" security right for the Central clinic and if your user account has not been granted the "My Clinics, Select Provider" security right for the clinic that you are currently logged in to.
My Clinics - To search for the provider in the clinics for which your user account has been granted the "My Clinics, Select Provider " security right.
Note: This option is available only if your user account has been granted the "My Clinics, Select Provider" security right for at least one clinic and if your user account has not been granted the "View All Providers" security right for the Central clinic.
Either select the All Providers option to include providers who are associated with clinics (and who have a Log On User ID), or select the In ApptBook option to include providers who have been set up in Appointment Book.
Click
the search button ![]() .
.
The matching primary and secondary providers appear in the list.
Select the correct provider.
Click OK.
Type:
To change a late charge to a finance charge, select the Finance Charge option.
To change a finance charge to a late charge, select the Late Charge option.
Apply Charges - According to a preference setting, by default, the finance charge will be associated with either the patient who is currently selected in Ledger or that patient's family. From the list, either select <Family> to post the finance or late charge to the account, or select a name to post the finance or late charge only to that person in the family.
Note - The reason for the finance
or late charge needing to be changed (for auditing purposes). To check
the spelling of the note text, click the Check
Spelling button ![]() (this button is available only if a certain preference
setting has been enabled).
(this button is available only if a certain preference
setting has been enabled).
Click OK/Post.
If you have backdated the finance or late charge to a date in a month that has been closed, and if applicable, do one of the following:
If the Password - Ledger, Backdate to Closed Month dialog box appears, user verification has been assigned to the "Ledger, Backdate to Closed Month" task. Do one of the following:
If your user account has been granted the "Ledger, Backdate to Closed Month" security right, enter your credentials in the User ID and Password boxes, and then click OK.
If your user account has not been granted the "Ledger, Backdate to Closed Month" security right, have a user with permission temporarily override this restriction so you can save a finance or late charge with a date in a closed month this one time. The overriding user enters his or her credentials in the User ID and Password boxes and then clicks OK.

If a message appears, informing you that you do not have rights to this operation, your user account has not been granted the "Ledger, Backdate to Closed Month" security right. To have a user with permission temporarily override this restriction so you can save a finance or late charge with a date in a closed month this one time, do the following:
On the message, click Yes.

In the Password - Ledger, Backdate to Closed Month dialog box, the overriding user enters his or her credentials in the User ID and Password boxes and then clicks OK.
