With eTrans for Dentrix Enterprise, you can send claims electronically in Office Manager and Ledger to simplify the complex and time-consuming task of sending insurance claims. eTrans saves time, materials, and postage, significantly reducing the cost of sending claims. And, if your claims cannot be sent to a payor electronically, the eServices department will print them and mail them for you, so you can send all of your claims electronically even if the payor does not accept electronic claims.
Using eTrans helps you resolve insurance claims faster, leaving you with more time to interact with your patients. When you send e-claims through eTrans, your claims arrive at the insurance company immediately over the Internet, so your office receives payment in much less time than it would if you had mailed the claims.
To use eTrans to send electronic claims, you must configure some settings in Dentrix Enterprise.
Note: Accessing the Data Services settings requires the "Integration Settings, Data Services" security right.
To set up electronic claims
While logged in to the Central clinic, in Office Manager, expand the Maintenance menu, point to Practice Setup, and then click Integration Settings.
Note: You can edit Data Services settings only if you are logged in to the Central clinic; otherwise, you can only view them.
The Integration Settings dialog box appears.

Select the Data Services tab.
If applicable, do one of the following:
If the Password - Integration Settings, Data Services dialog box appears, user verification has been assigned to the "Integration Settings, Data Services" task. Do one of the following:
If your user account has been granted the "Integration Settings, Data Services" security right, enter your credentials in the User ID and Password boxes, and then click OK.
If your user account has not been granted the "Integration Settings, Data Services" security right, have a user with permission temporarily override this restriction so you can access the Data Services settings this one time. The overriding user enters his or her credentials in the User ID and Password boxes and then clicks OK.

If a message appears, informing you that you do not have rights to this operation, your user account has not been granted the "Integration Settings, Data Services" security right. To have a user with permission temporarily override this restriction so you can access the Data Services settings this one time, do the following:
On the message, click Yes.

In the Password - Integration Settings, Data Services dialog box, the overriding user enters his or her credentials in the User ID and Password boxes and then clicks OK.

The Data Services settings appear on the right. The General tab is selected by default.

The electronic claims service requires eTrans (eClaims) or Data Services accounts. Make sure the needed accounts are set up and the correct clinics are assigned to each account. For information about adding, edting, and deleting accounts in Dentrix Enterprise, see the topic about managing Data Services accounts.
Select the EClaims tab.

Note: The eClaims Path, which is where the eTrans program files are installed, appears for your reference.
Set up the following options:
When Sending A Claim Use the Data Service Account - The Data Services account (eTrans account) to use when a claim is submitted. Select one of the following options:
that is assigned to the claim's clinic - The account that is associated with a claim's clinic.
chosen by a prompt when claim is sent - The account that a user selects when submitting a claim (Dentrix Enterprise prompts the user to select the account).
always use selected user for any claim on any clinic - The same account for all claims. With this option selected, select the correct account from the corresponding list.
If no claims need attention, do not display Error Report - After you submit electronic claims, if there are claims that have errors or need attention, the Error Report appears automatically. However, if none of the claims have errors or need attention, you can specify if the Error Report should appear. Select or clear the checkbox:
With this checkbox selected, if none of the claims have errors or need attention, the Error Report does not appear.
With this checkbox clear, if none of the claims have errors or need attention, the Error Report does appear.
Suppress warning messages on eClaims Pre-submission Summary - Having this checkbox selected suppresses warning messages on the Pre-submission Summary so that you are not notified if there are problems with your e-claims.
Server - The name of the eTrans server to which you are connecting to send your e-claims.
Port - The port number through which you are connecting to the eTrans server to send your e-claims.
To test your eTrans server connection, do the following:
Click Test Connection.
The Test eTrans Connection dialog box appears with the status of the connection test.

One of the following occurs:
If the connection tested succeeded, a message appears and states that your reports have been retrieved successfully.
If the connection test failed, an error message appears.
Click OK.
You are returned to the Test eTrans Connection dialog box.
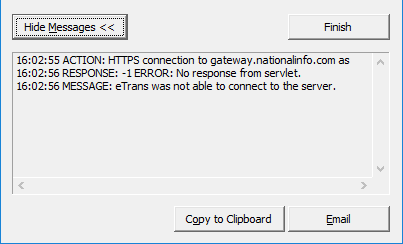
If you want to view a detailed log of the transmission, click Show Messages >>.

The expanded dialog box provides the following options for the log:
Copy to Clipboard - If you want to copy the output log to the Windows clipboard so that you can paste it into another program, click this button.
Email - If you want to send a message containing the output log, click this button.
Click Finish.
You are returned to the Integration Settings dialog box.
Click OK.